ryanjg117
Member
- Joined
- May 18, 2015
- Messages
- 328
Apologies for the multiple posts here. FOG choked on all the images, even though I scaled them down.
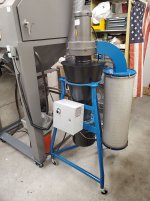
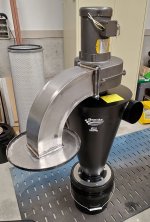
Finished product for the TLDR crowd:
[attachimg=1]
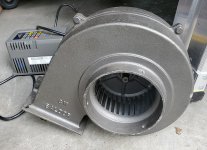
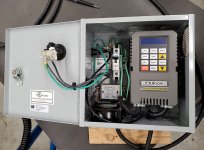
I happened about a cheap Baldor 1hp motor/blower with variable frequency drive a few months back, and it collected dust as I wasn't sure how I wanted to use it. I was thinking maybe I could build a downdraft table or I could add some filters and use it as a HVLP spray backdrop.
[attachimg=2]
I've been getting into sandblasting lately, a great complement to another new-ish hobby of mine, welding. I recently scored a new-to-me sandblast cabinet but it didn't come with a dust collector. I've come to discover sandblast dust management is a real problem/mess. Cheap 100 cfm cylindrical dust collectors are typically sold with sandblast cabinets but they are terrible; a huge pain to empty since you have to take them apart from the middle, and with cloth filters that almost immediately get caked up with the extremely fine abrasive dust coming out of the cabinet. Cleaning is a huge mess and you basically have to take it outside to empty.
Econoline, the maker of my sandblast cabinet, recommends a 400 CFM dust collector. Not finding any good dust collector new or used that I was really excited about, I checked the specs on that Baldor motor/blower to discover that its capable of ~600 CFM. This is actually the same (or very similar) motor/blower they use on their pedestal grinder dust collection kits. So I figured this motor/blower/VFD would work well for a mini-cyclone style dust collector that I could dedicate to my sandblaster.
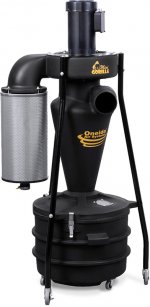
I figured I would "take inspiration from" Oneida's mini-gorilla design, but make it more stout. I don't have good tools or experience in sheet metal forming, so I decided to purchase Oneida's standalone 5" steel dust deputy cyclone. For an output HEPA filter, Dick at Wynn Environmental recommended their 13R230NANO filter stack. With 230 square feet of filter area it is way larger than the 95 square feet that comes with the Mini Gorilla. Here's the Mini Gorilla:
[attachimg=3]
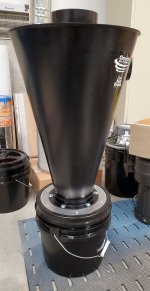
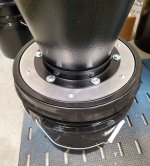
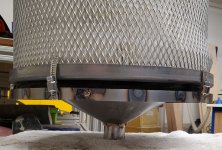
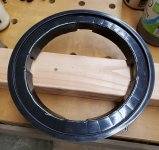
I don't need the ability to store a large volume of waste, so I went with a small 3.5 gallon bucket with gamma seal lid. This would make it easy to simply twist off the bucket to empty, and would only require a very simple piece of sheet metal to adapt the cyclone to the bucket. Easy to just twist on a 5 gallon bucket or larger if I ever need the extra capacity.
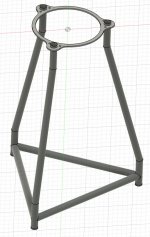
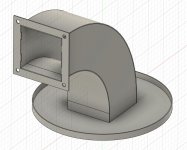
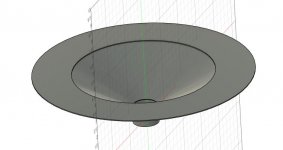
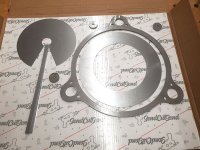
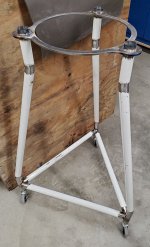
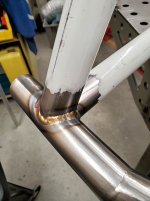
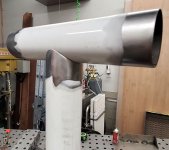
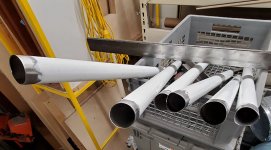
With the core parts identified, I just needed to make some of the transitional pieces. I set out to design the filter transition, filter bottom sphincter, gamma seal lid adapter, rolling carriage, and VFD cabinet.
[attachimg=4]
[attachimg=5]
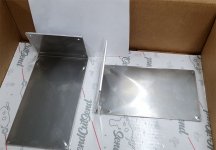
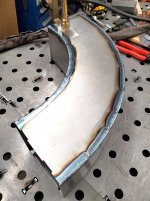
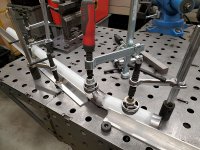
I designed all of these parts in 3D CAD, exported to DXF, and used SendCutSend.com to laser cut these parts from sheet metal, and ship them to my door. Instant quotes online, no human intervention, very cool. I'm a huge fan of SendCutSend and amazed how they can do this all so cheaply--here is a part they laser cut out of 1/8" steel and bent to my specifications for $58 shipped to my door. They even threw in a second one, at no cost- “We just happen to have an extra after setting up for bending so we decided to send it to you instead of throwing it away.” Did I mention this service is awesome?
[attachimg=6]
Finished product for the TLDR crowd:
[attachimg=1]
I happened about a cheap Baldor 1hp motor/blower with variable frequency drive a few months back, and it collected dust as I wasn't sure how I wanted to use it. I was thinking maybe I could build a downdraft table or I could add some filters and use it as a HVLP spray backdrop.
[attachimg=2]
I've been getting into sandblasting lately, a great complement to another new-ish hobby of mine, welding. I recently scored a new-to-me sandblast cabinet but it didn't come with a dust collector. I've come to discover sandblast dust management is a real problem/mess. Cheap 100 cfm cylindrical dust collectors are typically sold with sandblast cabinets but they are terrible; a huge pain to empty since you have to take them apart from the middle, and with cloth filters that almost immediately get caked up with the extremely fine abrasive dust coming out of the cabinet. Cleaning is a huge mess and you basically have to take it outside to empty.
Econoline, the maker of my sandblast cabinet, recommends a 400 CFM dust collector. Not finding any good dust collector new or used that I was really excited about, I checked the specs on that Baldor motor/blower to discover that its capable of ~600 CFM. This is actually the same (or very similar) motor/blower they use on their pedestal grinder dust collection kits. So I figured this motor/blower/VFD would work well for a mini-cyclone style dust collector that I could dedicate to my sandblaster.
I figured I would "take inspiration from" Oneida's mini-gorilla design, but make it more stout. I don't have good tools or experience in sheet metal forming, so I decided to purchase Oneida's standalone 5" steel dust deputy cyclone. For an output HEPA filter, Dick at Wynn Environmental recommended their 13R230NANO filter stack. With 230 square feet of filter area it is way larger than the 95 square feet that comes with the Mini Gorilla. Here's the Mini Gorilla:
[attachimg=3]
I don't need the ability to store a large volume of waste, so I went with a small 3.5 gallon bucket with gamma seal lid. This would make it easy to simply twist off the bucket to empty, and would only require a very simple piece of sheet metal to adapt the cyclone to the bucket. Easy to just twist on a 5 gallon bucket or larger if I ever need the extra capacity.
With the core parts identified, I just needed to make some of the transitional pieces. I set out to design the filter transition, filter bottom sphincter, gamma seal lid adapter, rolling carriage, and VFD cabinet.
[attachimg=4]
[attachimg=5]
I designed all of these parts in 3D CAD, exported to DXF, and used SendCutSend.com to laser cut these parts from sheet metal, and ship them to my door. Instant quotes online, no human intervention, very cool. I'm a huge fan of SendCutSend and amazed how they can do this all so cheaply--here is a part they laser cut out of 1/8" steel and bent to my specifications for $58 shipped to my door. They even threw in a second one, at no cost- “We just happen to have an extra after setting up for bending so we decided to send it to you instead of throwing it away.” Did I mention this service is awesome?
[attachimg=6]