Making accurate square cuts on and off an MFT with a TS55

lasttoleave

Member
Joined
Feb 8, 2015
Messages
29
Hello all,

I'm enjoying my new TS55, it's certainly proving to be worth the price tag. It is my alternative to a table saw, because I simply don't have the room. I am planning to replace one of my workbenches with a DIY MFT type only without a sliding fence attachment. My plan is to use dogs for most of my rail alignment.

However, when I'm cutting panels for cabinets that are too large for an MFT style bench, aside from being careful marking out then aligning the splinterguard with the knife line, what clever tricks are there to keep the guide rail square or parallel depending on the cut? I have a few large-ish squares but I might have to invest in something larger to help me start out.

When making a custom sized MFT, my plan is to buy an existing MFT/3 top and using it as a router template, has anyone had trouble making one this way?

It seems Rail Dogs aren't readily available in the UK so I'll have to wait a while and import some from the US. I've done some searching for jigs and stops for producing repeatable cuts, but I haven't found much that looks simple to build, does anyone have some advice for someone starting out with the MFT way of doing things?

Thanks guys!
 
Nothing clever, but clamping the rails to the panels you're cutting is usually a smart idea, even if the strips on the bottom of the rails hold them in place pretty well.  The Fs-Rapid clamps are nice if you've got a lot of cuts to do on ply (I use them more than I thought I would), but if you don't mind taking your time to get everything how you want it, the regular screw clamps are great also.

That doesn't help you aligning things square or parallel in the first place, but if you get your cutting lines and splinter guard lined up just right, they'll keep them in place.

If you've really got a knife line, some single edge razor blades could be placed in the line, and then you simple push the guide rail splinter guard up against the razor blades.
 
For what you would spend on just the MFT top, you could probably have a mill shop produce one for you -- and maybe cheaper.  I had access to a ShopBot so I milled my own from a full sheet of MDF.  I trimmed it down to 36" x 84" to more easily fit in my shop.

I'm remote and don't have a picture to attach from my iPad but if you search "MFT-XL" you can see my post about my  bench.  I wanted to prove first that the size works well.  I'll be adding an end vise and some storage under it eventually. Nothing too fancy but it is very functional as a main workbench and also outfeed table for my table saw.
 
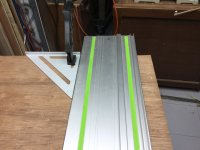
I use a Woodpecker framing square to square up the rail for the TS55 track saw. This works both on the MFT and for breaking down sheet goods on saw horses.

I draw a pencil line for the cut, line up the rail with the splinter guard exactly on the line. I know the kerf will be perfectly on the pencil line.

When using saw horses, I clamp the rail using the Festool clamps that slide into a channel on the bottom side of the rail.
 
JavierMoreno said:
Pardon, I hit the send button too early. Yo can buy Parf Dog at http://www.axminster.co.uk/catalogsearch/result/?q=parf+dosgs (England) and http://www.fine-tools.com/bankhaken-20mm.html (Germany).

About parf dogs in this forum: http://festoolownersgroup.com/festool-sales-dealer-area/parf-dogs-28465/

There is a lot of DIY MFT alternatives in this forum. Search for "Homemade MFT" or "MFT alternatives".

Again, Thanks guys! I've done a lot of research/reading but it's easy to get overwhelmed with ideas/peoples solutions.

I have seen the Parf Dogs, my only reservation is it does not seem they can be used as "Rail Dogs" Due to the 25mm collar around the longer set of dogs.. For this reason I am thinking I might be better putting the money towards a full set of Qwas dogs from the US or similar.

I really like the rail dogs idea, especially when they are set, they are somewhat clamped much like the actual MFT rail.

Someone is probably missing out by not supplying a Rail Dog alternative in the UK! The postage is reasonable but it does get pricey overall.
 
Hi. I have a set of Festool parallel guides as well as an aftermarket set that work with incra tracks, both of these once set will provide you with good equal parallel cuts in your larger workpieces and then you can use your mft to cut them to the proper length. The Festool guides are very good quality, and also expensive...to be honest the aftermarket guides I have are easier to setup.. I also use a woodpecker ruler and rule stop either buy itself (for one rip), or to setup my guides.
Simply cut yourself a good edge on the plywood, then I deduct the width of the guiderail and use the ruler with a stop on the edge of the plywood set to make up the difference of the width I want and lightly clamp the rail. I double check my settings then make my cut. When using the guides, I don't even bother clamping as the rail stays put if you apply very light outward pressure during your cut...if you are concerned, you can even clamp the guides lightly and that works well too....great reliable cuts every time.
Greg
 
FWIW here in Britain it's quite a lot cheaper to buy a replacement top for the older MFT1080 than the newer MFT3 - PowerToolsUK do them for about £65 - which is a lot less than you can get one CNC'd here, btw.

HTH Pete
 
Peterm said:
FWIW here in Britain it's quite a lot cheaper to buy a replacement top for the older MFT1080 than the newer MFT3 - PowerToolsUK do them for about £65 - which is a lot less than you can get one CNC'd here, btw.

HTH Pete

Woah you're right there! Are the hole sizes identical? I've read conflicting things regarding the hole spacing/hole diameter?

It seems much harder to find somewhere willing to do a one off job (especially with MDF) for a reasonable price! So I'll probably go the router template route.

I'd rather pay a bit more for the MFT/3 top if the hole sizing is better for 20mm dogs etc.
 
lasttoleave said:
Woah you're right there! Are the hole sizes identical? I've read conflicting things regarding the hole spacing/hole diameter?

AFAIK yes the hole sizes and spacing pattern are identical (grid of 20mm holes on 96mm centres), just the size of the tops is different; I was told that some of the older MFT 1080s had slightly larger/looser holes, but the current replacement tops should be fine. FWIW I bought an MFT 800 top to use as a template and the holes were spot on for my MFT dogs from toolimprovements - couldn't get any in the UK back when I bought mine!

HTH Pete
 
Hi,

New TS55 owner here too. I got one of these http://www.multifunctionslab.com/ CNCed for £75 total price inc the MDF, up near York.  1 inch thick, bigger than the MFT, more extras like tool shelf, clamp holes and tool troughs.  Although it did cost about a tenner for the plans too.

It sits sturdy on a couple of saw horses.

Cheers,
Carl.
 
Here is what works for me... I square the back edge of the MFT tools per the Greg Paolini video (maybe weekly). That gives me good certainty that the cut will be square, but in following the "measure twice, cut once" rule, I check the square of the rail against the wood using a Woodpeckers 1081 square on the edge of the piece to be cut closest to me and the back of the swinging rail. Its a quick look, and a quick adjustment (if any).

I used to spend a lot of time checking the square of the back edged against the swinging rail, but this is much less time consuming. Works with unmarked cuts using the sliding flag thingy.
 
The Parf Dogs do have a collar but you reverse them, i.e. put the collar underneath the top and the threaded hoel in the bottom accommodates a bolt to hold your track.
 
turnpike said:
Hi,

New TS55 owner here too. I got one of these http://www.multifunctionslab.com/ CNCed for £75 total price inc the MDF, up near York.  1 inch thick, bigger than the MFT, more extras like tool shelf, clamp holes and tool troughs.  Although it did cost about a tenner for the plans too.

It sits sturdy on a couple of saw horses.

Cheers,
Carl.
the problem with a 1” thick top is that most of the Festool clamps won't work with it AFIK.
 
I've just been cutting a few pieces that are too big for registering from any of my workbench holes and the light and colour of the material make pencil marks difficult to see.

My answer was to measure to a small framing square on each side of the board clamp each one, then butt the rail up to the squares. So no chance of misreading a pencil line.

It will only be useful for a few cuts, it's just too slow if you need to do a lot but it is accurate and difficult to get wrong.
[attachthumb=1]
 

Attachments

  • image.jpg
    image.jpg
    1.8 MB · Views: 541
Back
Top