Making windows quieter?

Deke

Member
Joined
Nov 11, 2008
Messages
247
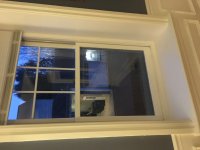
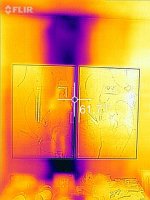
[attachimg=3]You guys always have the best advice. Our house has somewhat new windows installed by the previous owners (say early 2000s). Wood, double pane, but not the best quality (they did EVERYTHING cheap). My main problem is I can hear people outside like they are inside the house. It is as if the windows are acting like speakers or something. It's funny, but it is less easy to hear from the outside. I'm thinking a crappy install might be a big part of this. Short of buying new windows I'd like to try something or anything. Here are some pics of a typical window. Stone house so the walls are very deep. Might it be worth taking out the trim and trying something? I have seen acoustic sound proofing caulk like this -https://www.amazon.com/Green-Glue-Noiseproofing-Sealant-Tubes/dp/B005UNESBY Or should I try things form outside? They each have that sort of aluminum cladding/trim.

Any advice appreciated. PS. While I think I am pretty handy, windows intimidate me, though I have no idea why.

Sorry, I have no idea why my pics are sideways here.


Attachments

  • 2018-12-09 16.55.16.jpg
    2018-12-09 16.55.16.jpg
    1.9 MB · Views: 584
  • 2018-12-09 16.55.22.jpg
    2018-12-09 16.55.22.jpg
    1.9 MB · Views: 541
I'd pull the inside trim from one window and see what was used between the windows and the frame. Sometimes tightly compressed fiberglass, sometimes wadded up paper and sometimes nothing.

I'd then clean out the cavity and spray in SEVERAL small passes of low expansion foam. Spray and let set for 4-5 hours, then spray again. Even low expansion foam can bow wood if too much is sprayed all at once. Take your time.

I'll bet you'll notice a big difference in noise level.

I managed to get our house so tight (and that also means quiet), that I'm presently installing a Honeywell dehumidifier in the HVAC system. In the northern climates, during the winter, you normally need a humidifier not a dehumidifier.  [eek]
 
Cheese said:
I'd pull the inside trim from one window and see what was used between the windows and the frame. Sometimes tightly compressed fiberglass, sometimes wadded up paper and sometimes nothing.

I'd then clean out the cavity and spray in SEVERAL small passes of low expansion foam. Spray and let set for 4-5 hours, then spray again. Even low expansion foam can bow wood if too much is sprayed all at once. Take your time.

I'll bet you'll notice a big difference in noise level.

I managed to get our house so tight (and that also means quiet), that I'm presently installing a Honeywell dehumidifier in the HVAC system. In the northern climates, during the winter, you normally need a humidifier not a dehumidifier.  [eek]

Thanks! Did not know that about the foam and I bet I would have tried too much at a time. I am a long way from needing a dehumidifier as the house is so leaky, a humidifier seems to make no difference at all. That's another post, but I have been working on air sealing and it is a long process here that includes finding nearly 100 year old newspapers stuffed into walls as "insulation." I guess there were hack contractors in the 1920s too!
 
Deke said:
That's another post, but I have been working on air sealing and it is a long process here that includes finding nearly 100 year old newspapers stuffed into walls as "insulation." I guess there were hack contractors in the 1920s too!

When trying to chase down those air leaks, just remember the source of the leak can be pretty far away from where the leak is. I've had some that were 8-10 feet away. The air leak can travel between stud cavities even if fiberglass insulation is in place through small holes, knot holes or outside sheathing that's not fastened snug to the studs. It was only after removing the fiberglass insulation that I could track down the leak.

Also, remember some older houses had a shiplap style of sheathing so air can enter between the broken/cracked shiplap boards and also through what was once tight knots that have over the years, dried out and consequently fallen out. Foam is your friend... [big grin]
 
Do you have a Home Depot near you where you can rent a thermal camera? (not all do)  If so, rent one for a day when it's cold out (below 30 or so) and scan the area.  Odds are cold air is also infiltrating so it would be no surprise that sounds come through clear as day.  Your problem may not even be the windows.  A lack of insulation in parts of the walls could contribute.  And don't worry if the glass panes look really cold on the camera, that's normal as the R value is very low compared to an insulated wall. 

Alternatively, you could scan the walls with your hands.  Its sounds stupid, but everything I found with my thermal camera I was easily able to confirm running my hands across the walls, from air movement to cold cavities behind the sheetrock.  The thermal camera just does it faster and allows me to visualize the problem better.  In one area of my house I found air leaking into the ceiling from the porch area.  On cold nights the ceiling was getting into the 40-50F range.  The builder never installed blocking or insulation between the joists on the outside wall and air was freely drafting in. 
 
Good call Raj, I forgot about that option. [smile]

Here's a photo of 2 pictures on the wall in the dining room while the air-conditioning ductwork can be seen running behind them in the wall cavity.

Even the 4 hour rental of an IR camera will be a huge help. Just make sure it's more than just a viewer and is capable of recording images for you to download.

You can also purchase a Flir module to attach to an iPhone.
https://www.flir.com/products/flir-one-pro-lt/

[attachimg=1]
 

Attachments

  • 0024.jpg
    0024.jpg
    342.7 KB · Views: 368
Any idea how much a thermal camera rental costs?  Is the rental unit "better" than the phone attachment or vice versa?
 
I've never rented one, but I imagine $100/day?  It should be much better than the one that attaches to the phone, but for your purposes, I don't think it matters.  Both will capture what you're looking for.  The better cameras have more resolution, so for example if you're looking inside an electrical panel with a lot of wires, you can easily find the one that is abnormally hot amongst a nest of wires.  The better ones also have finer gradations in temperature (0.1F) and sometimes a wider field of view so you can scan an area faster. You'll get the job done with a lower quality camera.

Edit:  I just looked at Flir's website at the latest generation of phone attached cameras.  They have gotten WAY better over the first generation.  This one linked below has the same resolution as my 5 year old unit (which was over 5x the price as well). 

https://www.flir.com/products/flir-one-pro/

Ah, just realized Cheese provided a link to the cheaper one above.  $250 for the LT vs $325 for the Pro (the most significant improvement is better resolution).  Both will work fine for you, but I would be inclined to buy the Pro.
 
That's good to know.  I bought this smoke pen to try to find an air leak and it was totally useless.  The thing smelled like burning plastic and didn't help me find the source of the draft.
 
The local HD rents a FLIR i7 for $53 for 4 hours or $75 for 8 hours plus a $150 deposit. The i7 is more than just a viewer, it’ll also store up to 5000 jpegs.

The photo I posted was using a FLIR Gen 2 iPhone adapter. The new FLIR adapter is Gen 4 or 5. Like everything electronic, they keep getting better & cheaper.

I’d also be tempted to purchase the Pro over the Pro LT.
 
Back
Top