MFT/3 Fence and Square ... TSO GRS-16 PE?

Bugsysiegals

Member
Joined
Mar 19, 2016
Messages
908
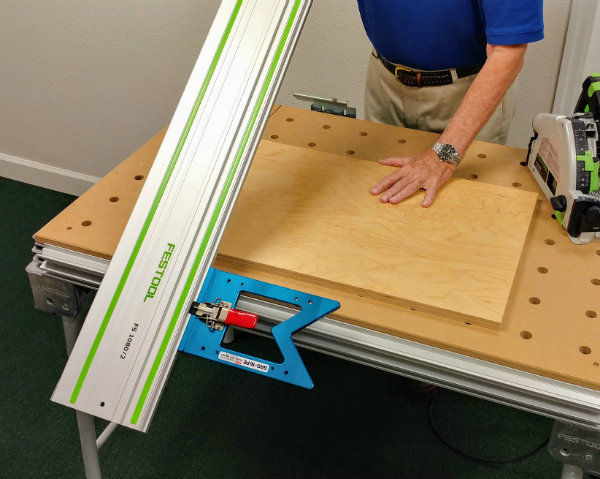
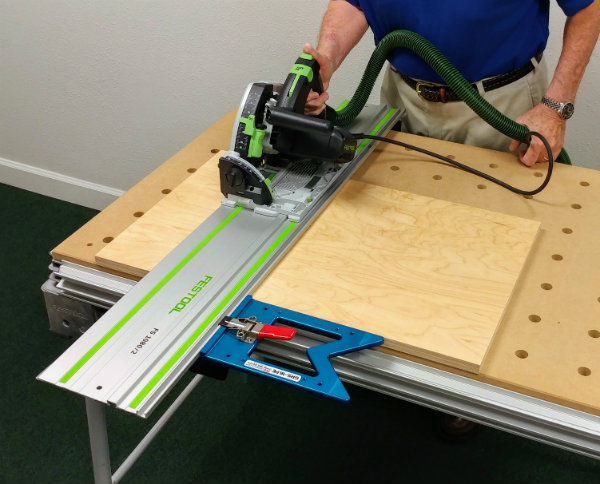
I see the TSO GRS-16 PE shown attached to the guide rail on a MFT/3 table to square the guide rail which is cool but they do not have the parallel guide rail connected in the images. Can it be connected so that in addition to square cuts on the MFT/3 you have a fence with rule?

This seems huge as you don’t need the fence to be square to the table, tightened down in a way so it has no deflection, and can produce perfectly measured square cuts immediately even if you decide to slide the guide rail Left/Right to make a new zero clearance in the MFT/3 table.
grs-16-pe-connects-perfect-square-to-mft-3-guide-rail.jpg

it-does-not-get-any-more-accurate-or-faster-than-this.jpg
 
06d28cf82b4af0fa4a042d2823fe8fdb.jpg

ee5d7c17d1ea64db43adc5c7a77abc73.jpg


I have the Right Angle Design setup and currently have mine setup this way with the 50” parallel guide. Can switch to the smaller 30” guide too.

I also have a BenchdogsUK fence, and had it setup before trying this setup. Both work good but using the TSO guide puts the fence right at the start of the cut, so less leaning over the table for smaller cuts with the fence at the back of the cut.

Sent from my iPhone using Tapatalk
 
Wow, this seems incredibly powerful for me as I struggle with re-squaring the guide rail every time I have to adjust it’s height not to mention how the front locking mechanism can tilt Left/Right considerably.  I’m addition, this setup can be quickly removed which is great because my MFT/3 is also my outfeed table for my table saw and also so I can move it to the FS 3000 rail when I need to initially break down a 4x8 sheet on the floor.

Thanks for sharing!!

[member=59331]TSO Products[/member] ... Hans, it seems you should add an image of this setup to your web page as this is incredibly powerful and I’d no idea this was possible and yet so simple.  ;D
 
That’s the reason I decided to try this arrangement out.  Keeping the rail square to the fence isn’t really an issue, but to keep it square and calibrated for the scale on the fence was. Then I saw a post on a Facebook group with the TSO setup.

Like you say, you can remove it and put it back on and the setup is square and scale is calibrated.  Also, really easy to calibrate or check the scale calibration.

Sent from my iPad using Tapatalk
 
Not to be the curmudgeon of the thread but I dont like it.  I see the back edge of the parallel guide not being strong enough to maintain square and it being lifted with every cut only adds to the possibility of errors. There's a lot of stress on that when sliding/moving/bumping around big heavy panels.  You should be wanting to lock down everything as tight as possible.  The best system I came up with for square cuts with a MFT style bench (DIY built bench) was with a piece of 80/20 as a fence in combination with a rail hinge (also diy built) it wasn't as glamorous as a festool one but it was solid with no play at all.  I attached 2 angles along the back of the 80/20 and used parf anchor dogs to locate it into the MFT that stay permanently attached to the angle brackets.  This way the 80/20 can be attached/removed in seconds.  Then I attached flat plate (mending plate) as stops for common cabinet sizes and built a 3 sided U shaped wood stop that fits over the 80/20 snug but not tight.  The U shaped block sits on top of the 80/20 and butts to the mending plates that are screwed to the top.  Kind of like a flip stop without the flipping.  The U piece just gets picked up and moved to the different stops as needed or clamped for the occasional odd cut.  Leave the leg .125 short to leave room for dust to pass under it. 
 
With 50" of fence, there's a lot of leverage and chance to cause deflection, but this is the case whether you use the guide rail with or without the MFT ... the only difference I see is that there's probably less chance of deflection by bringing the fence to the panel versus bringing the panel to the fence but I suspect this is only the case if you're not gentle. 

My Incra fence on the MFT is mounted to the side extrusion and while very solid, it can be moved a bit if I force the wood against it which is why I push the wood to the fence semi-gently, slide it down to the flag stop, then pull the panel back just a bit, and more gently re-position it taking care to touch the panel up against the fence and not to push the fence out of position.

I like the 8020 and dog holes but this only works on the table and you're only as accurate as the holes are.  I'm not sure how off the holes can be but it seems the TSO square is only off by user error of pushing too hard, assuming it's square within some degree of accuracy from the beginning.

[member=71544]08G8V8[/member] ... do you notice any issues with deflection and cuts not being consistently square?  Do you push the wood to the fence gently, moderately, or like the Incredible Hulk?
 
I started with making the top with the UKJ Parf guide, and planned to just use the rail clips from UJK to attach the rail and the BenchdogsUK fence and fence dogs, and it turned out my hole pattern was not dead square. I had to shim between my rail and rail dog to keep it square.

I decided to use the dog holes for clamping and not alignment.

I then added the Right Angle Design flip setup and squared my rail to the fence and this worked great, but was having issues keeping scale calibrated when moving. Not that you should ever need to move it often.

Since trying the TSO guide with the flip guide support I haven’t had any issues. I am aligning material to the guide without slamming it. I’m not mass producing anything. I have the long parallel guide on now as I was cross cutting at a 36” length, so the shorter 30” rail was swapped for the longer rail.  I see this as less stress than using the TSO guide and parallels on the floor as you are constantly moving it and setting it down to move materials, then picking it back up to locate for another cut, over and over. Folks using the TSO system in that manner gives the system very good reviews.

I have not been using the setup like this for long, but it is working for me. I can always swap back to the Benchdogs fence, and will be basically the same as the setup @afish is using, as the fence is basically 8020 profile material.

Sent from my iPad using Tapatalk
 
Bugsysiegals said:
With 50" of fence, there's a lot of leverage and chance to cause deflection, but this is the case whether you use the guide rail with or without the MFT ... the only difference I see is that there's probably less chance of deflection by bringing the fence to the panel versus bringing the panel to the fence but I suspect this is only the case if you're not gentle. 

My Incra fence on the MFT is mounted to the side extrusion and while very solid, it can be moved a bit if I force the wood against it which is why I push the wood to the fence semi-gently, slide it down to the flag stop, then pull the panel back just a bit, and more gently re-position it taking care to touch the panel up against the fence and not to push the fence out of position.

I like the 8020 and dog holes but this only works on the table and you're only as accurate as the holes are.  I'm not sure how off the holes can be but it seems the TSO square is only off by user error of pushing too hard, assuming it's square within some degree of accuracy from the beginning.

[member=71544]08G8V8[/member] ... do you notice any issues with deflection and cuts not being consistently square?  Do you push the wood to the fence gently, moderately, or like the Incredible Hulk?

Sorry bugs, thats simply not true.  You can either adjust the the hinge for the track or adjust the 80/20 between where the 80/20 screws to the angle.  Which is where I decided to make my adjustments. Since I locked the DIY rail hinge from any adjustment side to side and it seemed like it would be easier to shim the 8020 fence for super fine adjustments. First I put the 80/20 down (I always used the same holes) and then squared the track as close as I could using the TSO MTR and mounted the hinge permanently. Then made a test cut using the 5 cut method and put the required shims (i used clear packing tape) between the 80/20 and the angle bracket.  The most important thing is to make sure EVERYTHING is locked down tight with no room for possible deflection otherwise you will be chasing the problem forever since the deflection will always vary slightly. 
 
Also, you aren’t butting material to the parallel guide portion, only the TSO GRS which is firmly clamped to the rail. The parallel guides sit above the material.

The reference surface is only the length of the GRS, similar to the fence on your miter saw. Your reference surface for square is only as long as the miter saw fence, even though your stop block for length could be along your extensions very far from the blade.

Sent from my iPhone using Tapatalk
 
[member=73094]afish[/member], I’m not sure why I didn’t consider the ability to shim things, good point!  I believe you said you’re not using the MFT table hit a custom table? 

My fence is solid and aligned with the extrusion as well as dog holes ... checked with square and super parf dogs set perpendicularly but it’s the rail that has to much opportunity to move ... 
 
I initially tried to just rely on the dog holes, but found I wasn’t exactly square. I think I had to use .023” shim on the dog closest to the start off the cut.
7f247c653a013010b5445f832e422cd2.jpg


Sent from my iPad using Tapatalk
 
afish said:
Not to be the curmudgeon of the thread but I dont like it. 

I wish to see more divergent views when I visit a forum or thread, instead of everybody nodding to each other -- trying to be politically correct. As long as the engagement is civil if it's spirited, I enjoy them.
 
08G8V8 said:
Also, you aren’t butting material to the parallel guide portion, only the TSO GRS which is firmly clamped to the rail. The parallel guides sit above the material.

The reference surface is only the length of the GRS, similar to the fence on your miter saw. Your reference surface for square is only as long as the miter saw fence, even though your stop block for length could be along your extensions very far from the blade.

Sent from my iPhone using Tapatalk

Well, that’s great from the perspective that you’re not going to have any deflection because of the parallel guide.

It should be easier to produce more consistent results with a longer fence than a shorter one like the TSO but I’m curious what the accuracy and consistency is on the TSO.  For example, a WP square is accurate to .001” over 12” ... can the TSO guide rail square consistently achieve some similar accuracy?
 
Oh, I see that's better for deflection issues but brings up another issue trying to make sure the material is squarely against the GRS which is beyond easy view of sight (at least with my crappy sight) most of the time.  Here is the best pics I could muster of what I used to use.  I have been redoing everything in the shop and just tore down my MFT bench the other day and cut it down since I dont need it so big anymore.  I already removed the stops along the top of the 8020 so those arnt there anymore.  Hopefully it helps but there is zero deflection issues this way and no need to be super careful you can push/move or bump as firmly as you want its not going to budge and it gives a long reference edge to measure against. I used 8' of 8020 since I do a lot of full height cabs.  Plus the 80/20 pops on and off in seconds.  I think the 8020 and parts where about $100 bucks no expensive fences or MFT's 1 sheet of russian birch for bench, 1 sheet of MDF for top and 8020 parts, throw in a MFT drilling system (technically you dont need it since it only uses 2 holes) and everything still costs half of a MFT/3
 

Attachments

  • 80202.jpg
    80202.jpg
    72.9 KB · Views: 616
  • 80201.jpg
    80201.jpg
    78.9 KB · Views: 604
ChuckM said:
afish said:
Not to be the curmudgeon of the thread but I dont like it. 

I wish to see more divergent views when I visit a forum or thread, instead of everybody nodding to each other -- trying to be politically correct. As long as the engagement is civil if it's spirited, I enjoy them.
I have no issue with afish not liking the setup. I am a novice and trying different things to see what works for me. I saw someone using this and decided to give it a try.  I only added my current setup when I came across this thread asking if someone has done such a thing. I’m just passing it along for use or criticism to help get a better setup. I have no problem reversing course and going back and tweaking my fence setup.

Sent from my iPad using Tapatalk
 
Glad to hear. I meant no offense.  I am usually straight to the point type of guy and sometimes it comes across as harsh, but its not intended to be. If it was trust me you would know it :)  I have done various forms of construction my entire (rough/finish/metal fab/ concrete) life. So, IM not new to it but I am newer to Festool items/process.  Doesnt really matter how long anyone has been doing it there is always room to learn and grow. 
 
08G8V8 said:
I initially tried to just rely on the dog holes, but found I wasn’t exactly square. I think I had to use .023” shim on the dog closest to the start off the cut.
7f247c653a013010b5445f832e422cd2.jpg

The dogs are almost surely not square vertically either (that fat collar makes it hard to check though) which means .023" shim will only work for the specific thickness you tested.  Properly tight dog holes also wear out quickly to develop slop and then the shims are different for every time you insert the dog. Dog holes are a fundamentally unworkable system for consistent high accuracy.
 
Our decisions are typically based on the available data so I always appreciate feedback whether it agrees with or goes against what I've said.

FWIW - I REALLY enjoy 8020.  As you may know, my outfeed table is built with 8020, and I was considering to build my Kapex miter station out of 8020.  As far as my MFT fence, the stock fence wasn't good enough, but I decided to use an Incra fence rather than 8020 mainly because I've bad vision in my Left eye and an astigmatism. 

I can line up an end stop to a measure and it will look different with both eyes open and will also look different between each individual eye opened even if I move the open eye directly over the mark!  Because of this, and maybe even if I had better vision, I really like being able to calibrate a rule/end stop system once, and be able to quickly drop the end stop to the measure, move it, move it back, and confidently reproduce the exact same measure, as quickly as possible.  Not only is it quick and accurate but because of my eyes and desire to get an exact measure it saves me a good deal of time ... and it's not just for predefined end stop points but any point on the scale.

Another bonus is my fence is 99% off the table which gives me a generous cross cutting capacity when compared to setting up 8020 after the back row of holes ... I suppose I could fabricate brackets for 8020 to use the side rails so this isn't a concern.  The downside of mounting to the rail profile is that it takes a minute to reinstall as opposed to bench dogs.  I hardly need to switch back and forth as I don't get much time in the shop but certainly can appreciate that convenience for the times you do use it.

All that said, I just made a video to illustrate the maximum deflection with me purposefully bending the fence back with a lot more pressure than it should see in reality to show the maximum possible deflection.  From what I see it seems my fence is very solid and reliable under normal usage but you can judge for yourself.  But even if the fence is solid, the guide rail requires more effort than I'd like, and is not always consistent thus why I really like the TSO guide rail with parallel guide rail.  You still think it wouldn't be consistent in this usage?

I've some people over but will update the video shortly ...

 
Pant said:
08G8V8 said:
I initially tried to just rely on the dog holes, but found I wasn’t exactly square. I think I had to use .023” shim on the dog closest to the start off the cut.
7f247c653a013010b5445f832e422cd2.jpg

The dogs are almost surely not square vertically either (that fat collar makes it hard to check though) which means .023" shim will only work for the specific thickness you tested.  Properly tight dog holes also wear out quickly to develop slop and then the shims are different for every time you insert the dog. Dog holes are a fundamentally unworkable system for consistent high accuracy.
What are you trying to say?  The fence doesn’t index off the fat part of the dog. The table was basically brand new at this stage and I discovered the holes were not producing a 90 degree cut, and it was off by the shim value.

Sent from my iPad using Tapatalk
 
Pant said:
08G8V8 said:
I initially tried to just rely on the dog holes, but found I wasn’t exactly square. I think I had to use .023” shim on the dog closest to the start off the cut.
7f247c653a013010b5445f832e422cd2.jpg

The dogs are almost surely not square vertically either (that fat collar makes it hard to check though) which means .023" shim will only work for the specific thickness you tested.  Properly tight dog holes also wear out quickly to develop slop and then the shims are different for every time you insert the dog. Dog holes are a fundamentally unworkable system for consistent high accuracy.

Agreed, I tried all methods with dogs and while a good idea in theory it produces unreliable results and as you say the taller the dog the worse it gets.  However that has not been my experience with the anchor dogs.  Since the force applied to the dog is right at the table surface there is no leverage to tilt the dog.  They have held up extremely well and developed no slop even after many uses.  Im willing to bet that the top would need to be replaced do to other issues before you wore out the 2 holes and even if you did manage to wear them out you could just move it over one hole to the left or right and recalibrate if needed or drill a couple more holes in between the 96mm C-C space.  As far as attaching it to the MFT and retaining full capacity that seems pretty easy to me.  If you could fashion a upside down L shape from some scrap ply and flip it upside down with the short leg facing up and away.  Attach the long leg to the MFT with T bolts or whatever fits in the extrusion so the top of the short leg is flush with the MFT top. Drill 2 - 20mm holes in the short leg to accept the anchor dogs. The wood L could probably stay attached 99% of the time without interfering with anything.  As you say though using the mft it probably doesnt need to be so easily removable.  For me the MFT bench was also my outfeed table so I needed it to go on and off quickly without any loss of accuracy. I struggled with squareness at first but after switching it was spot on all the time.   
 
Back
Top