Im not 100% sure what you have going on with the dogs to try and eliminate cutting up any rails but if your trying to use the small dogs under the track for extra support where the fence doesn't reach. No no, you want a nice straight and preferably as long as possible straight edge to reference the track squarely off of. Some places sell a second piece that attaches to the main fence that is shorter to slip under the track. Im not a fan of that either. Straight, long and one piece lessens any chance of introducing errors, wider is better so its more rigid with no chance of deflection since there's not a lot of material left after chopping it down. Im perhaps a little more OCD on it then I need to be but Id rather be safe than sorry and have no issues.
You are using an out of date browser. It may not display this or other websites correctly.
You should upgrade or use an alternative browser.
You should upgrade or use an alternative browser.
MFT/3 Fence and Square ... TSO GRS-16 PE?
- Thread starter Bugsysiegals
- Start date
Bugsysiegals
Member
- Joined
- Mar 19, 2016
- Messages
- 893
Much appreciated [member=73094]afish[/member]!! I considered buying the UJK drilling jig but seen at least one person who had the 3mm holes oblong after drilling their table and so I figure it might be better to try and get my buddy with a CNC to just cut a 4x8 sheet for me in hopes those holes would be snug and best chance of being aligned.
Bugsysiegals said:Much appreciated [member=73094]afish[/member]!! I considered buying the UJK drilling jig but seen at least one person who had the 3mm holes oblong after drilling their table and so I figure it might be better to try and get my buddy with a CNC to just cut a 4x8 sheet for me in hopes those holes would be snug and best chance of being aligned.
My only use of the UJK Parf MK2 kit, so far, was to make the 200 holes in my workbench top. The 200th hole was just as perfect as the 1st.

I dont think I would by the system again either (sorry peter). For me the MFT is great system for fixturing and clamping but not for precise, repeatable cutting some might disagree but there is to much room for error depending on the person doing the drilling. Its a very boring and monotonous job drilling an entire 4x8 I tend to start rushing and holes get drilled slightly off or out of plumb apparently etc. Not horribly so but it can be enough to mess you up later. The bit itself probably wouldn't hurt to have so you can add holes as needed. If no cnc is available I would just lay out the 96mm grid by hand center punch the center for a starting point and drill the holes free hand and use them for clamping only. Then just drill a few holes for the anchor dogs on the fence a little more carefully. These also dont need to be super critical (but they do need to fit the dog snugly) if you need to tighten up the dog hole spray some lacquer in the hole and the mdf will swell and harden slightly making a tighter and more durable dog hole. Since the angle brackets can slide anywhere along the 8020 and the track gets squared off of the 8020 those holes can be placed just about anywhere and dont have to use the 96mm grid unless you want. Once the 8020 is in its location square the track off of that. Any fine tuning can be done with shims between one of the brackets as needed to really dial it in. I was only off by the thickness of one piece of that clear packing tape that goes on a packing gun. It shouldn't take much to really dial it in if you have a good square to start with.
Bugsysiegals
Member
- Joined
- Mar 19, 2016
- Messages
- 893
afish said:Yes they are handy. I also make adjustable stops with them and some scraps of BB similar to the TSO TDS ones but I just put a single 8mm grove and a cheap 8mm star knob from amazon. Works really good with the LR32 system. As far as dogs go I dont use them for squaring or cutting unless I have a set of holes dedicated to the anchor dogs that I have verified with the 5 cut test. Dogs rarely sit square in all directions even the supers which I also have. So I dont trust them the taller the dog the worse it gets. That's part of the issue too whenever you have any variances nothing is consistent, that's why I said you need to lock everything down as tight as possible first then concentrate on squaring. I know its all little amounts when looked at separately seem insignificant but once you start adding everything up it creates problems as you found out with your drawer bottoms. Then on top of that by the time you are done cutting up the job and routed dados, drilled shelf pins the panels can be flipped in such a way that the sum of all those small errors are now doubled when its time to assemble. I stand by my earlier suggestions lock everything down tightly no play on anything, extend the fence "solidly" under the track, and you should start to see much better and consistent results.
As far as the MFT I would seriously consider selling it and building a larger more permanent MFT outfeed table and putting another MFT type table on top of your sys cart and store it under the outfeed. so you can have a seperate table to assemble on and a separate cutting station. Im not sure about the hole size on a MFT either there seems to be some variances between hole sizes depending on what made the hole I can say that the 20mm UJK bit is a perfect match for the anchor dogs and so is the ujk chamfer tool.
About replacing the MFT, the top of the MFT is 188mm above the top of the sys cart and is 20mm below the top of the table saw. If I remove the MFT and build a stationary 8020 outfeed table using 4080 profile for strength, I'm left with 127mm (1mm drop from table to outfeed so panels don't catch) to build a portable MFT style assembly table. This would probably be 2x 4040 profile with 28mm posts between them and 19mm MDF on top? I'm not sure how it would compare to the MFT/3 but could probably be portable in that I could carry it to the garage and put it on saw horses if I needed?
Bugsysiegals
Member
- Joined
- Mar 19, 2016
- Messages
- 893
afish said:Im not 100% sure what you have going on with the dogs to try and eliminate cutting up any rails but if your trying to use the small dogs under the track for extra support where the fence doesn't reach. No no, you want a nice straight and preferably as long as possible straight edge to reference the track squarely off of. Some places sell a second piece that attaches to the main fence that is shorter to slip under the track. Im not a fan of that either. Straight, long and one piece lessens any chance of introducing errors, wider is better so its more rigid with no chance of deflection since there's not a lot of material left after chopping it down. Im perhaps a little more OCD on it then I need to be but Id rather be safe than sorry and have no issues.
I was saying to use the dogs as the fence and if they barely protrude above the table they could stretch the entire table including underneath the guide rail. I said this since they seem to fit really snug and if they're all aligned then why not use them as a fence. In this way the fence doesn't need to be cut since the panels never touch the fence. Rather, the fence is mounted on top of the dogs and since the T-Track slot on the fence is up front and the threaded hole of the dog is in the middle the fence would simply sit just a bit forward than the middle of the dog but not touching any panels ... only the end stop(s) would touch. Since the dogs are independent of each other this assumes the holes are perfectly aligned and there's no slop in the dogs which is what I assumed based on your advising how stiff your fence was ... but that's with anchor dogs which sit in the chamfered hole ... I was thinking if they made a short dog with chamfer ring on it and only slightly protruding above the surface...
Bugsysiegals
Member
- Joined
- Mar 19, 2016
- Messages
- 893
MikeGE said:My only use of the UJK Parf MK2 kit, so far, was to make the 200 holes in my workbench top. The 200th hole was just as perfect as the 1st.
I guess it just depends how careful you are while drilling the 3mm holes through the SS template. Maybe this guy had to big of a bit, couldn't hold steady, or maybe it's inevitable to wear out after so many times drilling through it?
Your post about replacing the MFT confused me a bit. What I was thinking is a stationary workbench with a MFT style MDF top. Whatever size you can fit behind your saw. 4x8, 3x7 just kind of depends on how much space you have. looks like you have a basement shop so you probably dont want to carry full sheets into the basement unless its a walkout. Otherwise I would want something big enough to break down a full sheet. I would suggest getting a sheet of russian birch and make a bench from that first and live with it for a bit and see how you like it before investing in the 8020 and selling the MFT. This way if you hate it your only out a small investment and can go back to what you have now. All I did was ripped up a 4x8 sheet into 4" strips and built the entire thing from those. I doubled up the stringers in the 8 ft length for extra strength and to any prevent sagging. Pocket screwed some spreaders in between the stringers and made the legs out of 2 pieces and screwed them in the corners of the stringer/spreader joint. I brought the legs in about 14-16 inches from the ends for some shop cabinets on each end. This left me about 56" in between the legs for a lower shelf but you will need to delete the shelf for the sys cart to slide under and may need to adjust the legs out to accommodate the cart. Yes its a little more work to build it twice but You might find that the birch version is fine. Until you add the cabinets on the end it wont be rock solid but once I added the cabinets it took out any racking. You could just add some diagonal bracing if you dont want to build any cabinets.
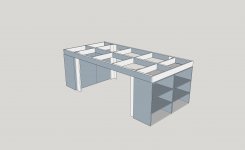
I did a real quick sketch showing what I was talking about. You probably dont even need the legs this way but I was toying with the idea of being able to remove the cabinets for mobile use. drawn as 47x97 but you might want to shrink it down. I didnt get crazy drawing shelf holes etc. just down and dirty overall basic idea. The cab's I built were .5" RB the bench was .75" I packed out the face of the front 2 legs so they were flush and drilled 20mm holes vertically to accept dogs for when I used to iron on edge banding  you can add t track to the front rail too if you like. I tend to evolve quickly with different configurations so I try not to get to carried away on shop furniture/fixtures etc. no toe kick, just some scraps of .5" RB for feet. No doors but doors are nice for keeping the dust out. One side I had pull outs for dewalt tough system boxes and the other was just adjustable shelving.
you can add t track to the front rail too if you like. I tend to evolve quickly with different configurations so I try not to get to carried away on shop furniture/fixtures etc. no toe kick, just some scraps of .5" RB for feet. No doors but doors are nice for keeping the dust out. One side I had pull outs for dewalt tough system boxes and the other was just adjustable shelving. Attachments
Bugsysiegals
Member
- Joined
- Mar 19, 2016
- Messages
- 893
afish said:Your post about replacing the MFT confused me a bit. What I was thinking is a stationary workbench with a MFT style MDF top. Whatever size you can fit behind your saw. 4x8, 3x7 just kind of depends on how much space you have. looks like you have a basement shop so you probably dont want to carry full sheets into the basement unless its a walkout. Otherwise I would want something big enough to break down a full sheet. I would suggest getting a sheet of russian birch and make a bench from that first and live with it for a bit and see how you like it before investing in the 8020 and selling the MFT. This way if you hate it your only out a small investment and can go back to what you have now. All I did was ripped up a 4x8 sheet into 4" strips and built the entire thing from those. I doubled up the stringers in the 8 ft length for extra strength and to any prevent sagging. Pocket screwed some spreaders in between the stringers and made the legs out of 2 pieces and screwed them in the corners of the stringer/spreader joint. I brought the legs in about 14-16 inches from the ends for some shop cabinets on each end. This left me about 56" in between the legs for a lower shelf but you will need to delete the shelf for the sys cart to slide under and may need to adjust the legs out to accommodate the cart. Yes its a little more work to build it twice but You might find that the birch version is fine. Until you add the cabinets on the end it wont be rock solid but once I added the cabinets it took out any racking. You could just add some diagonal bracing if you dont want to build any cabinets.
Yes, you said to build a stationary workbench, and slide the sys cart underneath, with some MFT type table on top of it. I was telling the dimensions I could put on top of the sys cart which would still fit underneath the stationary workbench, assuming it was built with 4080 Aluminum extrusion and 3/4" MDF top. I carried 10x 4'x'8'x3/4' Maple plywood, 6x 5'x5'x5/8" BB, and 6x 5'x5'x3/8" BB down here and still have a few sheets left. It was a real pain and I'm not sure I want to ever do that again but am not sure how well they'll hold up on a plywood cart in the garage which isn't air conditioned or heated? I hope to someday have a heated garage which I can make my shop in which will be much more convenient!
Bugsysiegals
Member
- Joined
- Mar 19, 2016
- Messages
- 893
It sounded like you said to build a smaller MFT table on top of the mobile sys cart. If you were simply saying to put MDF on top then it already has that and just needs dog holes.
Bugsysiegals
Member
- Joined
- Mar 19, 2016
- Messages
- 893
Ok, seems I could build a decent top but how will I attach the guide rail in the front/rear in a way that’s adjustable yet stronger, consistent, and 90 degrees to the fence holes?
Im not sure how the bracket on the MFT attaches to the MFT. However, the RAD one works with t track or the bracket can probably just be screwed to the side of the table. I built my own out of .5 R.B. It wasnt pretty but worked good. Here is a link to the RAD looks like they are changing their name or something this has good feedback from what I have seen. track hinge
Bugsysiegals
Member
- Joined
- Mar 19, 2016
- Messages
- 893
Thanks!!
Bugsy, is this the profile of the Incra track you are using? I assume it is from what I see on their website.
I like the idea of using a 8020 profile, but want to have a built in scale. This profile looks like it would be pretty easy to cut/modify to have support under the rail.
If this is the profile you are using, how tall is the portion marked on the attachment if the center vertical flanges were cut away for the under the rail area?

Sent from my iPad using Tapatalk
I like the idea of using a 8020 profile, but want to have a built in scale. This profile looks like it would be pretty easy to cut/modify to have support under the rail.
If this is the profile you are using, how tall is the portion marked on the attachment if the center vertical flanges were cut away for the under the rail area?
Sent from my iPad using Tapatalk
Bugsysiegals
Member
- Joined
- Mar 19, 2016
- Messages
- 893
Yes, that's the same fence. It's just short of 9mm from the bottom to the lowest point of the t-slot and 10.5mm to the top of that rib you highlighted.
While I never force material against the fence, I've ordered the anchor dogs which should help with consistency and ease of use removing and re-installing the Incra fence. If needed, I've 4040 profile I can use, but see no reason why this Incra fence wouldn't be stable enough unless I hire a gorilla to start cutting my panels. [laughing]
I'm not sure how I'll get the fence aligned and anchor dogs mounted tightly yet but I'm sure I'll figure it out ... if there's anything in particular you'd like to see, let me know, but I'm curious, I thought you liked the TSO guide rail and parallel guides on your MFT?
Bugsysiegals
Member
- Joined
- Mar 19, 2016
- Messages
- 893
I just got my anchor dogs and can confirm they will not work with this Incra fence. The anchor dogs are 8mm and the bottom slot will only fit 6mm.
I've Seneca parallel guides which use a thin Incra T-Track which can fit an 8mm bolt shaft but the max width is 11.80mm which is to small for a M8 bolt head or socket head cap screw head. I see they make 8mm male to 6mm female thread reducers so maybe with a little loctite this would allow the thin Incra rail to work. Assuming it’s sturdy enough with 3-4 dogs I’d think it would work great as it doesn’t need to be ground down to fit under the fence, is light weight, and can have flag stops setup with a rule. I may just buy some to test it out ...
I've Seneca parallel guides which use a thin Incra T-Track which can fit an 8mm bolt shaft but the max width is 11.80mm which is to small for a M8 bolt head or socket head cap screw head. I see they make 8mm male to 6mm female thread reducers so maybe with a little loctite this would allow the thin Incra rail to work. Assuming it’s sturdy enough with 3-4 dogs I’d think it would work great as it doesn’t need to be ground down to fit under the fence, is light weight, and can have flag stops setup with a rule. I may just buy some to test it out ...
Similar threads
- Replies
- 58
- Views
- 3K
- Replies
- 12
- Views
- 3K
- Replies
- 0
- Views
- 259