Bugs, the incra rail looks like it has a t-track across the back why not use a couple angles like I did off the back side? Or just widen the bottom slot with a file a couple mm's if you go this way you will have to square the track hinge to the fence since you wont be able to shim the fence but that's not a huge deal.
You are using an out of date browser. It may not display this or other websites correctly.
You should upgrade or use an alternative browser.
You should upgrade or use an alternative browser.
MFT/3 Fence and Square ... TSO GRS-16 PE?
- Thread starter Bugsysiegals
- Start date
Bugsysiegals
Member
- Joined
- Mar 19, 2016
- Messages
- 893
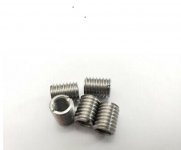
By the time I fabricate brackets, drill them, shim them, etc., I'd have spent more time than it might be worth than to just spend $15 on these threaded reducers. BTW, the threaded reducers are 10mm tall so I still have thread left at the bottom if I wanted to throw a star knob underneath to really tighten it down.
FWIW - The Incra fence has a bottom slot width of 10.00mm and the bolts are 9.90mm. While not perfect, I suspect I could add a few pieces of sticky note paper to the side of the bolt to further reduce this or might not need to at all since the bolt will twist sideways a bit and remove all gap once the anchor dogs are tightened?
View attachment 1 View attachment 2
Attachments
Bugsysiegals said:By the time I fabricate brackets, drill them, shim them, etc., I'd have spent more time than it might be worth than to just spend $15 on these threaded reducers.
There're countless YouTube "instructional" videos put there about spending hours and hours on making something that can be bought with ease.... I value my time in anything but re-inventing the wheel. Different strokes for different folks.
Bugsysiegals
Member
- Joined
- Mar 19, 2016
- Messages
- 893
I’m cheap when it comes to paying for something I can do, especially when it comes to more expensive things. For example, we had our vehicle at the dealership and they said while they had the engine apart they could do the timing belt for $500 which included free labor. I said heck no I can get the parts for under $200. I ended up doing the job myself and it was a pain ... I dropped my phone and a ratchet down into a spot I spent 30m fishing it out of, my 1/2” extension fell down and hit me in the face (could’ve lost a tooth), and so on and so forth. I laughed it all off and my wife let me keep the labor cost towards more tools which is great but at some point your time and lack of issues to deal with become invaluable.
Bugsysiegals
Member
- Joined
- Mar 19, 2016
- Messages
- 893
I've been able to install the Incra rail with Anchor Dogs on the MFT/3 and not only do I love how quickly the fence can be removed/installed but most importantly it retains its exact squareness to the fence after every removal/install!! The only negative is the loss of a few inches of cutting capacity but it wasn't needed in most cases to begin with and I'm switching to a home made 8020 cutting station so this is a no brainer.
Regarding the fence squareness ... I'm able to remove/re-install the fence, place my 12" WP triangle to the fence/guide rail, and cannot slip a 0.0015" feeler gauge between either ... #WINNING. FWIW - this is with the guide rail being attached by 2 Super Parf Dogs with chamfered collars and UJK guide rail clips since it's probably how I'll attach it to begin with on a 8020 cutting station.
Regarding the fence rigidity... I used a dial indicator, pushed HARD against the TOP of the Incra fence, and measured max deflection of 0.020" with 3D printed brackets and max deflection of 0.013" with Anchor Dogs (no fasteners underneath the table). While I'd love the deflection to be lower (I had it down to 0.006" when I first tested before switching to 3D printed brackets and then back), I do not push the wood hard enough to the fence that the top bends backwards so I'm not worried at this point and will see if it's an issue once I cut a few panels.
Thanks [member=73094]afish[/member] for the Anchor Dog recommendation ... besides fabricating some flip stops, it seems this will be my new fence solution for now!")
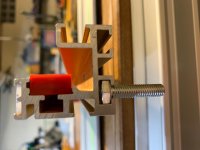
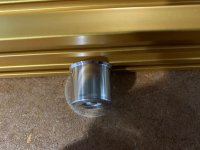
Top view with M8 to M6 threaded reducer
View attachment 1
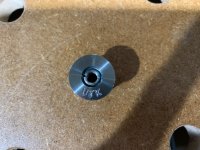
Bottom view ... plenty of room to attach a M8 star knob underneath the table if needed.
View attachment 2
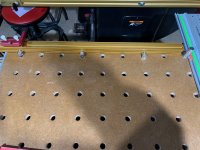
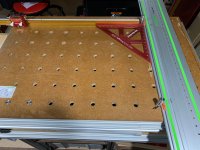
Aligning the Anchor Dogs to the MFT/3 holes.
View attachment 3
I originally placed these in the front t-track but moved them to the bottom so the Super Parf Dog wasn't obstructing the front of the fence. I could switch these if I drilled another hole further back for the Super Parf Dog and may do this on my 8020 cutting station.
View attachment 4
View attachment 5
View attachment 6
Regarding the fence squareness ... I'm able to remove/re-install the fence, place my 12" WP triangle to the fence/guide rail, and cannot slip a 0.0015" feeler gauge between either ... #WINNING. FWIW - this is with the guide rail being attached by 2 Super Parf Dogs with chamfered collars and UJK guide rail clips since it's probably how I'll attach it to begin with on a 8020 cutting station.
Regarding the fence rigidity... I used a dial indicator, pushed HARD against the TOP of the Incra fence, and measured max deflection of 0.020" with 3D printed brackets and max deflection of 0.013" with Anchor Dogs (no fasteners underneath the table). While I'd love the deflection to be lower (I had it down to 0.006" when I first tested before switching to 3D printed brackets and then back), I do not push the wood hard enough to the fence that the top bends backwards so I'm not worried at this point and will see if it's an issue once I cut a few panels.
Thanks [member=73094]afish[/member] for the Anchor Dog recommendation ... besides fabricating some flip stops, it seems this will be my new fence solution for now!
Top view with M8 to M6 threaded reducer
View attachment 1
Bottom view ... plenty of room to attach a M8 star knob underneath the table if needed.
View attachment 2
Aligning the Anchor Dogs to the MFT/3 holes.
View attachment 3
I originally placed these in the front t-track but moved them to the bottom so the Super Parf Dog wasn't obstructing the front of the fence. I could switch these if I drilled another hole further back for the Super Parf Dog and may do this on my 8020 cutting station.
View attachment 4
View attachment 5
View attachment 6
Attachments


Bugsysiegals
Member
- Joined
- Mar 19, 2016
- Messages
- 893
Thanks! I’ll probably cut it at some point but just wanted to get it up and working so I could confirm it works.
That said, will the fence loose any accuracy when I make a top with the Parf Guide? I’m not sure if those holes are slightly larger and if the accuracy can compete as good as the CNC’d top ...
That said, will the fence loose any accuracy when I make a top with the Parf Guide? I’m not sure if those holes are slightly larger and if the accuracy can compete as good as the CNC’d top ...
No, the bit that came with my Parf MKII fit the anchor dogs perfectly. Im not sure about the MFT holes but I thought I remember reading they were a little looser. Dont worry about hole squaring accuracy. You can drill 2 extra holes as far back as you wish to gain a little more cross cut capacity. They dont even need to be super accurate since you are squaring the track to the fence the dog hole placement doesnt really matter anymore. You just need to be close enough so you are not binding the track. You would probably need to be 1/8" out before that became an issue.
Bugsysiegals
Member
- Joined
- Mar 19, 2016
- Messages
- 893
afish said:They dont even need to be super accurate since you are squaring the track to the fence the dog hole placement doesnt really matter anymore. You just need to be close enough so you are not binding the track. You would probably need to be 1/8" out before that became an issue.
I'm not sure I understand what you mean by they don't need to be super accurate ... rows/columns need to be perpendicular in order that the fence which mounts in a row is square to the rail which mounts in a column.
Bugsysiegals
Member
- Joined
- Mar 19, 2016
- Messages
- 893
08G8V8 said:What hardware attaches the anchor dog to the fence?
Sent from my iPad using Tapatalk
You can see the images above but they're M6 hex head bolts which fit almost perfectly (minimal play) into the bottom t-tracks and M8 to M6 thread reducers/adapters I found on eBay which cost $15 for 5.
M8 to M6 Thread Reducer / Adapter
I just took another look at the most recent pics. I see you are using dogs for the track now. You had the track hinge before. I like the track hinge more. this way the dog holes dont matter. As mentioned before I'm not super familiar with the festool track hinge but cant it be slid along the aluminum profile and locked in anywhere along it? Using the track hinge:
1.Drill 3 holes along the back for your anchor dogs as far back as you can while still leaving some material around the dog. Im thinking around 30mm from back edge to center. These holes shouldn't need to be perfect. Its important that they are in a straight row but they dont have to be perfectly square to the existing dogs they will be close anyways but we aren't talking to the thousands here.
2. Set incra rail in place.
3. slide rear track hinge until track almost touches the fence but leave 1/16" gap and lock it in.
4. Slide front track hinge in and mate it to the track so the little pin is in the track.
5. Now square the front bracket according to the fence to track using the biggest most accurate square you have in my case it was the TSO MTR which works out well since it has the stand off pins so the track doesn't have to flat on the table.
6. Tighten down the front bracket.
Now your fence to track should be very square independent of the dog holes. I had made my track hinge so it would drop below the surface of the table so I never had to remove it. If for some reason the Festool doesnt drop low enough you will have to come up with a way to make a stop so the front and rear track hinge brackets always locate to the same spot IF you need to remove them for any reason but thats only if. As I said mine stayed all the time but my 4x8 bench wasnt portable either.
You can do a 5 cut test to double check and fine tune if you want to get it super precise. This is where I used a shim between the 8020 and angle bracket since my track hinge was now locked in. That was the easiest place to make the adjustment for me. You will need to adjust the front hinge bracket. (clamp a block of wood next to the bracket and use the appropriate feeler gauge to make the adjustment) the adjustment should be so minor that you cannot just tap it over. As I mentioned you need to make sure all slop is removed from the hinge bracket both front and rear. You also need to make sure if and when you raise and lower the F/R hinge brackets they travel perfectly square to the top, otherwise you will be throwing your part out of square but I dont use the festool bracket so you will have to look at that. The dashboard unit looks like they have some parallel guides that hug either side of the bracket which looks like it would work well.
I think the main problem with dogs is if or when they are drilled the drill is held perfectly square to the top. If not the hole ends up slightly out of square. The problem is compounded by every hole being potentially different amount and angle some might be out of square in the X or Y direction and all of varying amounts. If its done on a CNC hopefully its less of an issue but that still depends on how well the spindle is trammed and how square the gantry is. A lot of people think that just because its cut on a CNC its perfect but the CNC only cuts as good as the guy who set it up. The leverage on a dog also makes it easy to knock them out of square to. Not the holes but the squareness of the dog to the table. Repeated use also makes the dog hole looser and the problems get worse. The taller the dog the easier it is. If the dog is out of square the farther the track is spaced from the top the more out of square your part will be. Switch your dog to a different hole and all bets are off. The super dogs or knobs from under help but if the hole is not square you are doomed. Check your dogs with a good square from both directions X and Y and see how square they are then see how far you can deflect them by applying some lateral pressure from the side. The anchor dogs work fine since they dont project out of the table so its not really an issue. This is why I only use dogs for clamping. If I was out in the field and just needed to make a square trim cut then OK too but as far as building a whole set of cabinets I get more finicky and want my stuff as close to perfect as possible to avoid compounding the problem.
Check this thread herefor the track hinge I was talking about.( I think it a different name now) See how both sides of the vertical section is constrained? This looks much more solid to me than the festool version. I have never handled the festool one but it hard to tell from photos what keeps it Z axis movement perfectly vertical. Or how much side to side movement here is when the latch is loosened. When you release the lock and pull it up can you also move it side to side at all? If so that's an issue and would require you to resquare the track each time it was adjusted. I would also put the track flat on the table and clamp a square vertically next to it. Then raise the track and see if it is still touching the square at the top of its travel when locked.
afish said:Check this thread herefor the track hinge I was talking about.( I think it a different name now) See how both sides of the vertical section is constrained? This looks much more solid to me than the festool version. I have never handled the festool one but it hard to tell from photos what keeps it Z axis movement perfectly vertical. Or how much side to side movement here is when the latch is loosened. When you release the lock and pull it up can you also move it side to side at all? If so that's an issue and would require you to resquare the track each time it was adjusted. I would also put the track flat on the table and clamp a square vertically next to it. Then raise the track and see if it is still touching the square at the top of its travel when locked.
I don't have any affiliation with the Dash-Board Guide Rail Bracket other than being a very happy owner. As you described, the Z-axis movement of the brackets are rock steady because the slides are supported on both sides for the full length of travel. Rob makes two versions of this, one for the Festool track, and the other for extrusion with T-track on the side.
I intentionally chose to set up my guide rail so it aligns over a row of dog holes. The reason escapes me now, but it was valid at the time, and since I've already routed the top for the sacrificial strip, I'm not changing it. I've removed the guide rail from the bracket several times to use the full length of the workbench, and the alignment of the rail is still perfect.
Bugsysiegals
Member
- Joined
- Mar 19, 2016
- Messages
- 893
afish said:I just took another look at the most recent pics. I see you are using dogs for the track now. You had the track hinge before. I like the track hinge more. this way the dog holes dont matter. As mentioned before I'm not super familiar with the festool track hinge but cant it be slid along the aluminum profile and locked in anywhere along it?
I purchased the Parf Super Dogs and UJK Dog Clips in May of 2019 after watching videos by [member=11196]Peter Parfitt[/member] and Dave Stanton in which they both demonstrated accurate square cutting capabilities using this combo; however, I didn't buy them to use on the MFT/3 but rather for the Dave Stanton bench which I'd planned to be my next project.
As you know, I upgraded my MFT/3 with the Incra fence which I mounted to the Aluminum extrusion. Since the extrusion is supposed to be aligned with the dog holes, it was obvious I needed to also align the guide rail to the dog holes. The PSD's worked excellent to quickly align the guide rail to the dog holes, which happen to be square to the fence, but only work while it's flat on the table because both Festool hinges can rotate counter clockwise by -0.3 degrees and clockwise by +0.8 degrees. As you said they need to remain square/perpendicular as they're raised and that's not the case ... once I raise the guide rail off the table, it's easy for it to no longer be square.
Even though I had both I'd never tried the dogs/clips together and was interested to test the squareness ... to my surprise, I couldn't fit a 0.0015" feeler gauge between either end of a 12 WP square! I'm not sure if it's the chamfered collars, the expansion rings, properly drilled holes, all of the above, etc. but the PSD's on my MFT/3 are perfectly perpendicular to the table top resulting in perfectly square fence/guide rail at all heights.
The pictures you seen are me testing this squareness with this combo. I've not yet cut anything with this combo but would bet I produce more consistently square cuts with this combo than the stock Festool hinge system. I'm going to break down another drawer bottom sheet, slightly over sized just in case, and will advise how accurate this setup is for me.
That said, I agree a properly designed hinge system should be superior than dogs but figured I need to try this before investing in an aftermarket hinge system especially since I already have the parts and it seems to be exclusively used by Peter and Dave.
Stay tuned ...
Bugsysiegals
Member
- Joined
- Mar 19, 2016
- Messages
- 893
BTW, thanks for sharing that hinge system ... does it attach to both metric (4080) and imperial (1530) profiles?
If it stays perfectly perpendicular to the table top, I suspect it would outperform the dogs which in theory lose accuracy over time as the holes wear ... [member=11196]Peter Parfitt[/member], do you find the dog holes on your cutting station have worn over time to any measurable loss of accuracy related to square cuts?
If it stays perfectly perpendicular to the table top, I suspect it would outperform the dogs which in theory lose accuracy over time as the holes wear ... [member=11196]Peter Parfitt[/member], do you find the dog holes on your cutting station have worn over time to any measurable loss of accuracy related to square cuts?
Bugsysiegals said:BTW, thanks for sharing that hinge system ... does it attach to both metric (4080) and imperial (1530) profiles?
If it stays perfectly perpendicular to the table top, I suspect it would outperform the dogs which in theory lose accuracy over time as the holes wear ... [member=11196]Peter Parfitt[/member], do you find the dog holes on your cutting station have worn over time to any measurable loss of accuracy related to square cuts?
I have only recently replaced my tracksaw cutting station with a new one. The original had been created with the very first Parf Guide System off the production line and was as good at the end as it was at the start. The new one is even more accurate as it was produced with the Mark II system.
So, to answer your question, it does not lose accuracy over time - certainly not in my workshop.
Cheers. Peter
Bugsysiegals
Member
- Joined
- Mar 19, 2016
- Messages
- 893
Peter Parfitt said:Bugsysiegals said:BTW, thanks for sharing that hinge system ... does it attach to both metric (4080) and imperial (1530) profiles?
If it stays perfectly perpendicular to the table top, I suspect it would outperform the dogs which in theory lose accuracy over time as the holes wear ... [member=11196]Peter Parfitt[/member], do you find the dog holes on your cutting station have worn over time to any measurable loss of accuracy related to square cuts?
I have only recently replaced my tracksaw cutting station with a new one. The original had been created with the very first Parf Guide System off the production line and was as good at the end as it was at the start. The new one is even more accurate as it was produced with the Mark II system.
So, to answer your question, it does not lose accuracy over time - certainly not in my workshop.
Cheers. Peter
Thanks Peter, good to know it has served you well ... if it works for me also, I can put the aftermarket hinge towards some other Festool! [big grin]
I decided to go with the Incra fence like you. Just felt a full fence was best and now I can remove the fence easily, and even move it to the middle of the bench for shorter cross cuts to prevent excessive reaching, even though my bench is only 36” wide. I cut away a portion to have full support beneath the rail. I also decided to go with the metric version in the start of converting to metric.Bugsysiegals said:Yes, that's the same fence. It's just short of 9mm from the bottom to the lowest point of the t-slot and 10.5mm to the top of that rib you highlighted.
While I never force material against the fence, I've ordered the anchor dogs which should help with consistency and ease of use removing and re-installing the Incra fence. If needed, I've 4040 profile I can use, but see no reason why this Incra fence wouldn't be stable enough unless I hire a gorilla to start cutting my panels. [laughing]
I'm not sure how I'll get the fence aligned and anchor dogs mounted tightly yet but I'm sure I'll figure it out ... if there's anything in particular you'd like to see, let me know, but I'm curious, I thought you liked the TSO guide rail and parallel guides on your MFT?
The Shop Stop is also very easy to recalibrate when needed.

Sent from my iPad using Tapatalk
Similar threads
- Replies
- 58
- Views
- 3K
- Replies
- 12
- Views
- 3K
- Replies
- 0
- Views
- 259