Halmccoyii
Member
- Joined
- Dec 1, 2012
- Messages
- 24
I have a small 8’x12’ shop in a shed. I have used the MFT3 and TS55 as my primary saw. I keep dust down with a Pro5 sander, a Trion Jigsaw and Domino. The Festool system has allowed me to have a relatively dustless efficient space. I made some changes to the MFT3. I use the MFT as my primary workspace and need to have a clean space on the table and keep as much space left in my shop.
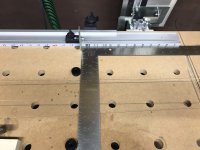
First, I basically never use the protractor and wanted to both maximize my cutting space and keep the table pushed close to the back wall. I ordered another fence clamp and use two clamps to hold the fence on the table. I added a Kreg scale on the front, so I can use a flip stop for measurement. i set up using a carpenter’s square at exactly 12.5” on the flip stop of the fence and squaring up against some veritas dogs. It squares the fence and gets it set for dimensioned for cutting.
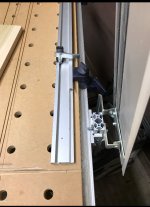
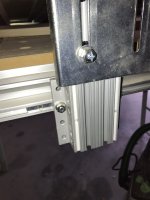
Second, the current hinge mechanism was hard to open and lock from the front of the table. I got inspiration from Sean KS on this forum (thanks). I replaced the Festool mechanism on the back of the table with a linear guide and a 1020 Extrusion from 8020. its not as pretty as his though. I attached it to the hinge plate for the guide rail. I added a bolt to the 8020 so at its lowest the guide rail sets right at the fence height when lain flat. With any wood piece against the fence the guide rail hinges moving the 8020 piece up, perfectly lying flat across the top of the piece to be cut. Most of what I use is ¾” but I have used it up to 2” and tested up to 3”. It does not need to be locked at height and has no movement side to side riding along the bearing.
I can set up the table from completely clean times in 2.5 minutes. Since it is new I have checked square and correct dimensions each time. They both have been perfect each time. I can keep my table pushed back saving several inches and don’t have to lock the guide in place to cut. I can have a clean or set up table with very little effort. It has been a game changer for me.
First, I basically never use the protractor and wanted to both maximize my cutting space and keep the table pushed close to the back wall. I ordered another fence clamp and use two clamps to hold the fence on the table. I added a Kreg scale on the front, so I can use a flip stop for measurement. i set up using a carpenter’s square at exactly 12.5” on the flip stop of the fence and squaring up against some veritas dogs. It squares the fence and gets it set for dimensioned for cutting.
Second, the current hinge mechanism was hard to open and lock from the front of the table. I got inspiration from Sean KS on this forum (thanks). I replaced the Festool mechanism on the back of the table with a linear guide and a 1020 Extrusion from 8020. its not as pretty as his though. I attached it to the hinge plate for the guide rail. I added a bolt to the 8020 so at its lowest the guide rail sets right at the fence height when lain flat. With any wood piece against the fence the guide rail hinges moving the 8020 piece up, perfectly lying flat across the top of the piece to be cut. Most of what I use is ¾” but I have used it up to 2” and tested up to 3”. It does not need to be locked at height and has no movement side to side riding along the bearing.
I can set up the table from completely clean times in 2.5 minutes. Since it is new I have checked square and correct dimensions each time. They both have been perfect each time. I can keep my table pushed back saving several inches and don’t have to lock the guide in place to cut. I can have a clean or set up table with very little effort. It has been a game changer for me.