MFT/3 Router Table Hybrid using the Parf Guide Systems

tristam

Member
Joined
Jun 4, 2015
Messages
10
Hi All,

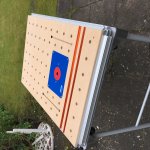
I know that building hybrid MFT/3 router tables is a very divisive topic, however as I am currently renovating my house and need to move my workshop from room to room as we progress, so it is the perfect solution.

I started off by building a replacement top for the MFT using the parf guide system, which, all in all, took me about an hour (Peter, you're a genius !), then moved onto the router section.

I took allot of inspiration form others at this part. The general design layout came from a similar build seen in the background of Mark Spagnuolo's "Wall Hanging Tool Chest" build series. I used Steve Ramsey's technique for perfectly fitting the Kreg router plate, and then I based my fence on the one Norm builds as part of his deluxe router station build. What on earth did we enthusiastic amateurs do before Youtube !

In addition to the awesome parf guide system, the other useful tool I picked up to complete this project, was Axeminster Tools new-ish T-slot cutting router bit. they have got the profile just right to allow it to be used with the standard Festool Quick Clamps.

Anyway, this is my first post and I hope this isn't a subject that's been done to death, however I am rather proud of it so I thought I would share it.
 

Attachments

  • MFT_1.jpg
    MFT_1.jpg
    2.1 MB · Views: 6,072
Here are some other photos
ce16a2f868defda89f00dce7fdd29e98.jpg
288a7d8ff62f863f155b41c3620044a0.jpg
39ad284e771dd0bb66e10ea8d2a45cf5.jpg
4b450d78685efc60e9d72d6272614f13.jpg


Sent from my iPhone using Tapatalk
 
live4ever said:
Nice job! 

Any comments on the accuracy you were able to achieve with the PGS?

I haven't gotten around to doing a 5 cut test yet, but I did get lazy sizing the top to fit the MFT, and instead just cut it close and used a flush trim bit to cut it exactly to size. To hold it in the right position I laid it ontop of the factory top and held it in place with 4 of the long parf dogs passed through the same hole in both tops, and I have to say all four slid in like butter.
 
That is an awesome job!! I think it will work out very, very well for you. Thanks for sharing!
 
That's awesome work! Great idea with the flush trim bit as well.

P.S. Extra points for so much name dropping there as well! [big grin] It's great to see so many ideas and experiences come together in the one project.
 
eddomak said:
That's awesome work! Great idea with the flush trim bit as well.

P.S. Extra points for so much name dropping there as well! [big grin] It's great to see so many ideas and experiences come together in the one project.
Thanks, I thouht that if I was going to so shamelessly rip off other peoples good ideas, I should at least give them an honourable mention :-)
 
guydot said:
I love it! I am not sure why there aren't more solutions like this one.

[member=61174]guydot[/member] are you asking why more people don't do this sort of thing or about the availability of stuff to do it with?

Relative to the number of people that are inclined to build custom or fabricate component router table setups, I actually think there's a pretty good range of options and demonstrations available.

Generally speaking, a work top that is intended to be sacrificial and a setup where you've added a router plate and several in surface tracks changes it's purpose significantly and could be seen as simply an expensive and time consuming way to get a router off the ground and upside down ... that would be why the majority here would opt for something that doesn't interfere with the MFT surface. This setup is specifically meeting the needs of the OP (and that's a good thing, but probably not as ideal for many others).

 
Good point about the sacrificial surface. For my small workshop it (theoretically) makes a lot of sense to use a flat surface for multiple purposes: router table, table saw outfeed table, assembly. I think that the mft is too high for an outfeed though.
 
I did the same thing a while ago but found that I often wanted to use the router and the saw at the same time. This occures when the router damages the piece requiring you to make an extra part. Retracting the router and then setting it up to the same setting proved to be a real PITA.

The weight of the router also caused the centre of the MFT to sag so I had to reinforce it.

In the end I just settled for a CMS with an OF2200 and power feed permanently set up.
 
Good work Tristam - I finished a router table recently, but it's a more fixed system for my workshop.

You made a much nicer job than I did of the fence - the material looks like MDF with a grey phelonic (sp?) surface on it. Might I ask where you got that from?

It seems like we live quite close to each other - I'm just north of Basingstoke if you are ever passing...
 
scgwhite said:
Good work Tristam - I finished a router table recently, but it's a more fixed system for my workshop.

You made a much nicer job than I did of the fence - the material looks like MDF with a grey phelonic (sp?) surface on it. Might I ask where you got that from?

It seems like we live quite close to each other - I'm just north of Basingstoke if you are ever passing...
Hi,

Thanks. The fence is just made from scrap MDF with some Formica attached using contact adhesive. I found that there is allot of offcut Formica on ebay, as long as you don't want it much wider that 600mm. I paid £13 including delivery for a piece 600mm x 1500mm.

I went this route so that I can just knock up and specialist fences I may need in the future, without storing large sheets of phenolic board.

Sent from my iPhone using Tapatalk
 
Kev said:
guydot said:
I love it! I am not sure why there aren't more solutions like this one.

[member=61174]guydot[/member] are you asking why more people don't do this sort of thing or about the availability of stuff to do it with?

Relative to the number of people that are inclined to build custom or fabricate component router table setups, I actually think there's a pretty good range of options and demonstrations available.

Generally speaking, a work top that is intended to be sacrificial and a setup where you've added a router plate and several in surface tracks changes it's purpose significantly and could be seen as simply an expensive and time consuming way to get a router off the ground and upside down ... that would be why the majority here would opt for something that doesn't interfere with the MFT surface. This setup is specifically meeting the needs of the OP (and that's a good thing, but probably not as ideal for many others).
Thanks for your comments, and I agree. This meets my specifics needs for my working environment at the moment.

I have plans to cut the router section off when my workshop is built and mount it into a new permanent frame, and go back to a standard top for the MFT, but while I'm carrying everything from room to room at the moment this does the job.

I'm also quite impressed with just how quick I can knock a new one of these together now  that I have a set of templates that align via the holes.

Sent from my iPhone using Tapatalk
 
Looks great!  I have a somewhat similar setup in the aux table of my table saw.  It works fine but I ended up building a dedicated table because I wanted to use the table saw without taking the router and it's fence off.  If I hadn't found the space I would still use he table saw setup.
 
Great set up. One of the better ones I've seen here. How did you manage to attach  the router to the plate ?
 
jobsworth said:
Great set up. One of the better ones I've seen here. How did you manage to attach  the router to the plate ?

Hi Jobsworth.

The hardest part was centring the base on the plate. In the end I used a 30mm guide bushing on the router and a 30mm centre insert in the plate to align it, drew around it, then removed the base and taped it to the plate to drill the pilot holes using a self centring drill bit.

I then bored through and counter sunk from the top.

It's held in place with a couple of hex bolts that match the accessory holes in the base of the OF1400.

Sent from my iPhone using Tapatalk
 
Back
Top