MFT/3 Users

Mario Turcot

Member
Joined
Nov 26, 2017
Messages
1,288
I will receive the UJK Parf Guide System today and plan to work on a custom MFT this weekend. The MFT will be 910mm(~36") x 1520(~60") I'm like an ape with 810mm(~32") reach should I go deeper?

I have some real use questions and would like inputs from current MFT/3 users.

The Top;
I hate working with MDF and plan to use Baltic Birch. I am aware about potential chip out when drilling ply and will use crap board to prevent chipping.
1) Any concern about using BB?
2) Should I use 18mm or 24mm?
3) Obviously the dog holes will be 20mm, do the Festool quick/crew clamps will work fine with 24mm or 18mm is the only alternative?

The Profile;
My understanding is that the profile is a handy way to hold boards vertically using the quick/screw clamps.
4) Do the profile utility goes beyond my understanding?
5) I watched [member=1854]Dave[/member] Stanton and his Stanton woodworking workbench videos and he add an apron/skirt with a few rows of dog holes, is that approach more flexible?

The Dog Holes Pattern;
I am not yet decided about the dog holes pattern. I will wax/seal the top then run series of 3mm holes across the entire top.
6) I want to use a wipe on sealer, what sealer do you suggest?
7) In your experience what is the most used pattern?

Under the Hood;
Like I never use an MFT I am wondering if the need for reach under the table is important.
8) How often you use dog knobs or any other accessories that require you to access under the table?
9) The MFT will sit on a Torsion Box table, based on question #8 do 130mm(~5") space between the two tops will suffice? This will also guide question #5.

10) Any other aspect I should consider?

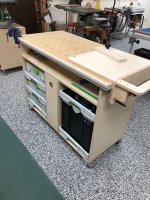
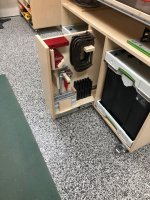
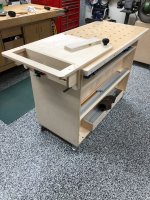
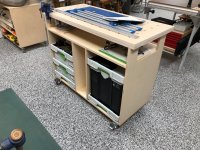
Any picture of yours(I mean your MFT  [tongue]) would be awesome.

Thanks,
 
Suggestion - duplicate the thickness of the stock MFT top.  Anything thicker will necessitate countersinking the underside holes so you can get clamps into them.  That diminishes the possibility of reversing the top when it's worn.  Baltic birch is great stuff, but the HDF that Festool uses is not shabby in any way.  It's way far better than ordinary MDF.  I've used Butcher's Bowling Alley Wax on my MFT tops.  If I ever replace them, I'll likely use Osmo PolyX as a sealer.  YMMV...  [smile]
 
re: parf and baltic birch.  I eliminated tear out by scoring the opposite side prior to drilling the holes. 

Yes it is double work, but the results are a lot better than using a backer board.

Cut a few holes all the way through.  You will probably get some tear out on those. Those holes will serve as your reference holes for the Parf rulers/guide.  From there, flip the board over and start scoring the first layer or two of the baltic birch. 

EDIT:  My memory is a bit foggy this morning. i.e. my explanation sucks.  lol.  the pilot holes are the reference.  Parf is so accurate the dog holes line up with no issue.
 
[member=447]Joe[/member] Sioux
Joe Mioux said:
re: parf and baltic birch.  I eliminated tear out by scoring the opposite side prior to drilling the holes. 

Yes it is double work, but the results are a lot better than using a backer board.

Cut a few holes all the way through.  You will probably get some tear out on those. Those holes will serve as your reference holes for the Parf rulers/guide.  From there, flip the board over and start scoring the first layer or two of the baltic birch.

Fantastic suggestion  [big grin] yes it's more work but easy, and I can do that across the top just in case i go crazy and bore all the 3mm holes to 20mm  [wink]
 
I used lightweight MDF for the top on a Paulk bench I built and like it.  Stick with 18mm as 24 won’t  let you use the Festool clamps like the quick grip due to inability to insert without a significant chamfer. 

I find side clamping to be very worthwhile for edge work.  Could be holes or Ttrack or just slots but you will find them useful. Dave’s skirt is nice on his portable one.  I made his top but not the skirt.

Downside of B.B. is in time you will sand the top to remove imperfections.  The MDF will sand nicely.  BB will show layers pretty quickly.
 
4) I'm not certain of this, but I believe the Vac Sys mounts using the outside profile.  You may have no intention of ever getting/using it, but I thought I'd just throw that out there.

7) I made 2 different custom tops, both which were 2'x4' since that's easily available at transportable from Home Depot.  3'x5' probably would have been a better size. The first was a tracksaw cutting station like Peter Parfitt demonstrated:  I later made a second top with a full set of holes to be used as more of a sanding/assembly top.

8) I've used the knobs underneath to secure my Clamping Elements. A few times I also wished I had secured my standard Parf Dogs underneath with knobs, but I did not.  See my note in 10) below about how I actually put my custom top to use.  Because of the awkward arrangement I actually went out and bought some bolts and washers (much lower profile than an actual knob) so I could tighten things from below if I really had to.

10) I should note that I tried using my own makeshift MFT using the custom drilled top set on top of my Kreg Mobile Project Center.  It worked well enough - but I finally broke down and bought an MFT/3 as I was tired of trying to reinvent the wheel so to speak in making it work and function like an MFT/3  but without the outside profile, space for knobs underneath, and no guide rail supports.  Because the custom top was set on top of the Kreg Bench Dogs there was a little but of room, but not much. I need to lift/tilt the top up a little in order to get a clamp into the hole.  The one upside that I found to this is that the Kreg top underneath keeps the clamp from dropping all the way to the bottom.
 
Mario Turcot said:
Under the Hood;
Like I never use an MFT I am wondering if the need for reach under the table is important.
8) How often you use dog knobs or any other accessories that require you to access under the table?

Personally I haven't found the need to clamp the dogs or the clamping elements from below - yet
However reaching underneath is useful when you use clamps but you need to have the handles below the top because you need more "clamp reach" and/or the handles are getting in the way in the other direction (I did this early this week) - hope that makes sense?

 
Hi Mario

I have only just spotted this thread...

You are getting some excellent advice from the other PGS users. I am not a fan of plywood for custom tops but, with care as suggested above, they can turn out well.

Do not worry about your dog hole pattern, If you make enough 3 mm holes in the top you can return to drilling out more 20 mm holes later if you decide that you need more.

For top thickness, again as cautioned above, keep to 19 mm in order to be able to use the various clamps.

If you do want to oil or protect the top do it before any drilling takes place as even the smallest amount of sealer can make the dogs very tight. The tolerances for the PGS are very tight (literally !).

If your finished design does not allow you to get under the top to secure the Parf Dogs then get some Parf Super Dogs which can be secured from above the bench without reaching underneath at all.

Good luck.

Peter
 
If you do want to go thicker, the Festool clamps will work if you are willing to do a little filing to remove the nib that prevents the two pieces from separating.  A bit more effort to use, but can be a decent tradeoff for a more rigid top.  And if you ever want to put the clamps back to their original configuration, it's easy enough to drill a hole where the nib was and put in a small screw/nut.
 
Mario

Here's a recent MFT-type bench that I made.  The top was lightweight MDF.  Surrounding the perimeter is 19mm baltic birch 3" wide under the top, wrapped with hard maple that holds a T-track for Festool clamps.  The top is screwed from underneath.  I used Dominos to attach the BB retaining perimeter to the four posts of the base and the top can be replaced if needed. 

I typically will lay a piece of 1/4" masonite on top of my tables for a lot of work not requiring clamping and anchor them with a couple of magnetic light holders from Lee Valley.  They are 20mm and facilitate either a gooseneck lamp for improved light or just to hold the top in place.  Works great.

This unit was 24x48" or so in size, and about 35.5" high - slightly taller than my MFT only because it was more comfortable height for me.  I offset the top to the rear to enable a clear front that was flush to use the T-track when needed.  I did use SYS-AZ drawers with a center pull-out on full-extension drawer glides for clamp and other storage. The back section was 'dead space' since I wanted to go a bit wider on the top than the SYS-AZ drawers required so I made it into adjustable shelves.

For the drawer adjustability, I used 16mm hole spacing drilled with a jig since it allows a finer adjustment between Systainers to get maximum density depending on what I want to put in.

A couple of the photos show an auxiliary vertical table that I use with my Shaper for cutting end grain joinery on pieces.  It just clamps in place to the top with a dog and single knob for easy removal.  The last photo shows the clamped front center section for cutting the knob hole in the pull-out with my Shaper Origin.

I have SketchUp Plans if you are interested...  The holes on this table were drilled with the Parf Guide.  I think this is the third one I've built using the guide and it's really excellent.  Peter hit a home run with it!

[attachimg=1]

[attachimg=2]

[attachimg=3]

[attachimg=4]

[attachimg=5]

Neil
 

Attachments

  • image1.jpg
    image1.jpg
    503.1 KB · Views: 1,504
  • image1 (1).jpg
    image1 (1).jpg
    530.1 KB · Views: 1,370
  • image2.jpg
    image2.jpg
    559.5 KB · Views: 1,381
  • IMG_0425.jpg
    IMG_0425.jpg
    542 KB · Views: 1,532
  • IMG_0427.jpg
    IMG_0427.jpg
    346.1 KB · Views: 1,330
For use on thicker benches, in addition to filing the quick clamps, you can also just swap out longer bolts for any dogs/stops that are bolted from the bottom.  I consider underneath access to be pretty essential.

Not to throw a monkey wrench into your proposal, but given the handtool stuff you're doing, have you thought about something sturdier that will allow you to do planing and chisel work?

I ended up building a hybrid bench out of 1 1/2" maple so that I could do powertool and handtool work on the same platform -- I added in the benchcrafted wagon and leg vises, but also drilled a full hole pattern in the top.  The leg vise gives me most of the functionality of a front profile, and then some.  The build and final results are chronicled here:
http://festoolownersgroup.com/workshops-and-mobile-vehicle-based-shops/hybrid-workbench-build/
 
[member=37411]ear3[/member] 

[eek] you almost gave away my plans. The MFT will be a straight top with a Paulk like apron. The top will sit/clamped securely on a torsion box assembly outfeed table, with adjustable height on casters. The top itself should be under 45kg (~90lbs) and the assembly table part close to 120kg(~250lbs)

Now I'm keeping safe some more details for later  [tongue]
 
[member=167]neilc[/member] What's your secret for such a squeaky clean shop? Amazing! I heard cleaning helps. I should try that too.
 
Yes cleaning does make a difference!

First, Central dust collection along with a Festool vac w boom arm helps. 

Plus you really do need to put things away when you are done with them! ;)

 
what Neil is saying works in conjunction with first creating "a Place for everything" - so you can put everything in its place. Sounds trite but every first class factory I have been in in the past twenty years exhibits this layout and worker discipline. (known as 5S) and is adhered to by the workers themselves - not supervisors keeping after them...

We can all learn from that example because these plants operate that way to be more productive - the showcase appearance is just a side benefit.

I recognize my own propensity to bring a new item into the shop without any specific plan on where it will fit in the workspace or available storage. The result: a shop appearance we all wish were better.

One thing I learned when we relocated our development activities and held an industrial auction. We got rid of everything that was not in regular use - amazing !
When was the last time you disposed of an unused or very low usage item in your shop?

try it - you'll like the result. just some food for thought . . .

Hans
 
Back
Top