I'm hoping to use my MFT/3 for a routing task, but not really sure what the best clamping/jig set-up might be. I have a Makita 18v router and need to run some 9mm grooves, approx 6mm deep in some 12mm plywood about 10mm in from the edge.
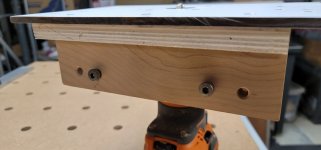
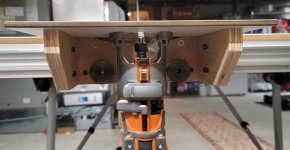
I tried this originally on my MFT. Bare router with side-fence attached, 9mm flute cut bit, with a couple of FS-HZ160 'hold down' clamps holding the work piece over the edge of my MFT. (The depth of the side fence means the piece needs to overhang, which isn't easy given the smaller ones are only 180mm tall.) I ended up with a nice clean cut, perfectly straight in the middle, but with a bit of a wobble at either end as the fence went off parallel entering and exiting the cut.
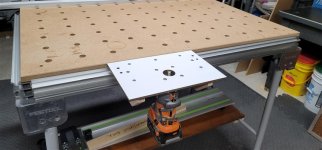
I have a load of these cuts to make, so want to get a better set-up to avoid the 'wobble' at either end. I've bought the plunge base for the Makita router, have two FS-HZ160 clamps and a load of bench dogs of various varieties. I was wondering if anyone had any suggestions about how to clamp things.
I was thinking about:
1. Setting a couple of bench dogs running horizontally, towards the front of my MFT.
2. Pressing a straight strip of wood against these bench dogs.
3. Sliding my cutting piece against this straight piece of wood (all of the above arrange so it overhangs the front of the MFT by 10mm or so)
4. Adding two scraps of same sized plywood either side of my cutting piece. The right hand side piece could be pressed against a couple of bench dogs.
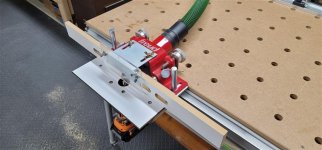
5. Using the router with plunge base and side fence attached. Starting and ending my cut in the scraps and ensuring my fence is in contact with the scraps at start/end point.
6. After cutting, swap the next piece in and repeat.
Perhaps there is a much better way of doing this?
But if I was to take the above approach, I'm wondering how things should be secured. I only have the two hold-down clamps - but the dogs can help. Also wondering if an additional strip of wood should be laid across the top of the two scrap pieces and workpiece - with the hold down clamps, holding to wood strip (and therefore the underlying strip). I couple of MFT-SP clamps as well.
I'm finding it a bit challenging as things start getting crowded quick. Given some of the wood is only 180mm tall - managing overhang of the MFT, space to clamp, and space to run the router itself - it all gets pretty tight.
Grateful for any advice, preferably on how I can do this with the stuff I already have - but if I need to get more clamps, or build a jig of some sort, I'm open to it.
Thanks!
I tried this originally on my MFT. Bare router with side-fence attached, 9mm flute cut bit, with a couple of FS-HZ160 'hold down' clamps holding the work piece over the edge of my MFT. (The depth of the side fence means the piece needs to overhang, which isn't easy given the smaller ones are only 180mm tall.) I ended up with a nice clean cut, perfectly straight in the middle, but with a bit of a wobble at either end as the fence went off parallel entering and exiting the cut.
I have a load of these cuts to make, so want to get a better set-up to avoid the 'wobble' at either end. I've bought the plunge base for the Makita router, have two FS-HZ160 clamps and a load of bench dogs of various varieties. I was wondering if anyone had any suggestions about how to clamp things.
I was thinking about:
1. Setting a couple of bench dogs running horizontally, towards the front of my MFT.
2. Pressing a straight strip of wood against these bench dogs.
3. Sliding my cutting piece against this straight piece of wood (all of the above arrange so it overhangs the front of the MFT by 10mm or so)
4. Adding two scraps of same sized plywood either side of my cutting piece. The right hand side piece could be pressed against a couple of bench dogs.
5. Using the router with plunge base and side fence attached. Starting and ending my cut in the scraps and ensuring my fence is in contact with the scraps at start/end point.
6. After cutting, swap the next piece in and repeat.
Perhaps there is a much better way of doing this?
But if I was to take the above approach, I'm wondering how things should be secured. I only have the two hold-down clamps - but the dogs can help. Also wondering if an additional strip of wood should be laid across the top of the two scrap pieces and workpiece - with the hold down clamps, holding to wood strip (and therefore the underlying strip). I couple of MFT-SP clamps as well.
I'm finding it a bit challenging as things start getting crowded quick. Given some of the wood is only 180mm tall - managing overhang of the MFT, space to clamp, and space to run the router itself - it all gets pretty tight.
Grateful for any advice, preferably on how I can do this with the stuff I already have - but if I need to get more clamps, or build a jig of some sort, I'm open to it.
Thanks!

")