MFT fence enhancement - Incra Incremental Track

bill-e

Member
Joined
Jan 20, 2007
Messages
504
Hi folks,

This is a modification to the way I attached the Incra incremental track to my MFT fence. 

I could swear there was an earlier post where Corwin put forth the original idea but I cant find it so I'm creating a new post.

The problem was with the "no modification" way of installing the track using existing slots and tracks, it sat on top of and slightly in front of the MFT fence.  This worked just fine but anything smaller than 7/16 thickness could slip under it and be registered off the MFT fence.

Anyway I decided a few small holes drilled in the MFT fence wouldn't hurt anything so here's what I did.

First I had to shim the MFT fence so that it was sitting square...it hadn't been.

mft_fence2.jpg

mft_fence1.jpg


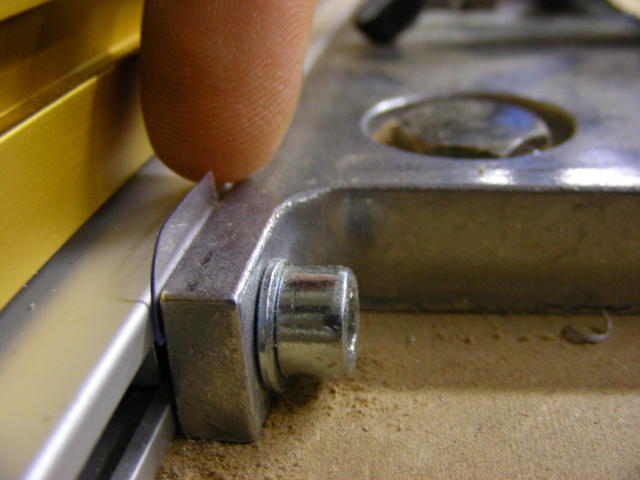
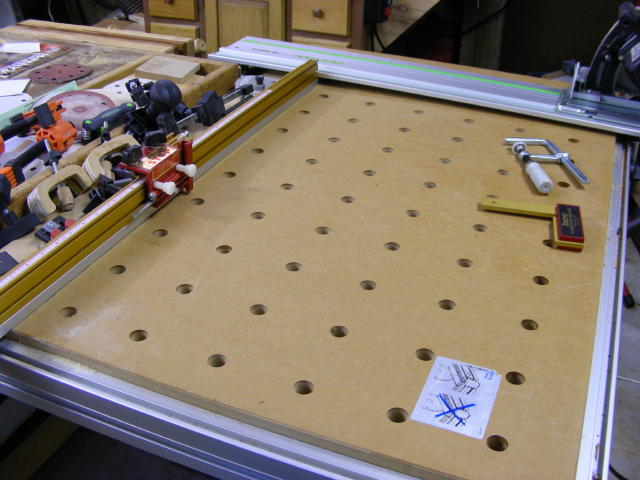
Once that was done I positioned the track where I wanted and drilled a few small holes for screws.  To position the track, first I hooked the guide rail onto the tab of the guide rail support so it was sitting in its 90? position, then I butted the track right up against the guide.  I did this to give me a ready reference of 90? when I use the table to square oversize boards...more on that in another post.

mft_fence4.jpg


Then lastly, using my square, I attached the track.  I'm much happier with this installation.

mft_fence3.jpg


mft_fence5.jpg

 
Bill
I'm not familiar with the Incra parts you are showing.  I have an Incra square and that is it.  would it be possible to show a more distant shot of your setup so I (or anybody else in same situation) can have a better idea about what is actually happening?

Thanks
Tinker
 
Seems as if there are lots of possibilities with this solution. My concern with the Incramental Track is the length, either 36 or 52. With the Incra Track, it will either be short or long on the 48" MFT fence.

I considered getting the Scale Track since it comes in 48" lengths, but I have not sorted out how to attach it yet, and maybe I can do that the same way as you connected the Incra Track.

Did you consider using the Scale Track (t track) at all?

Thanks,
John
http://www.woodpeck.com/scaletrack.html
 
I'm actually OK with the length.  I wanted it long.  And Yes I did look at the scale track but discounted it in favor of an incremental track.

What the track I use does, similar to an Incra fence, is position the stop exactly in 32nd inch increments and over its length has the same accuracy as an Incra fence which is .002" (IIRC).  So once I calibrate the scales to the setup everything is precisely repeatable.

If you weren't a nut about accuracy and precision you could certainly use something like the scale fence but other than the scale, I don't know what it would buy you as the MFT fence has a t-track in it as well.  You could just spend 4 bucks for a stick on tape.
 
The Scale Track offers the advantage of the interchangeable scales as opposed to just sticking a tape on the MFT fence. While it is a little more than regular t track, the disadvantage I see is in not having as functional a fence as the Short Stop, which seems to me the major advantage of the Incremental Track over the Scale Track. This is one of the more cost effective and straightforward alternatives to mark and cut.  Thanks for the pictures.
 
Hi,

      Nice set up Bill. What is the max length cutting capacity?  Do you have it so that the INcra track extends beyond (hangs off ) the end of the MFT?

Seth
 
Bill, placing the Track on the MFT's fence is only one way to use these -- if you do, you will want to add a subfence to the Track that extends below to meet with the table top.  And rather than register the Track directly off the edge of the Guide Rail, you should at least set it back a distance with a feeler gauge -- I just bolt it down close to where I want it and zero out the stop with a known sized setup piece.

Also, to get the max cut from your MFT, you can place the Track separately further back.  Or mount on a base that attaches to the back profile -- this either requires that the Guide Rail is set square to the table or there is enough slop to make the adjustment.  This is my usual setup, and you can see a temporary version of this in my photo album.

You can order the metric racks and scales to easily convert your Tracks -- and the metric racks come in what resembles Festool green.  So far, these scales do not cover a full meter -- only to a little over 800mm.  You can add more scales, but some of the numbers won't read correct.  No biggie.

As to the need for a Track like this...  Do you like the Hole Drilling setup?  With the Incremental Track for a fence you can locate the holes for your next MFT top.  One of the neat uses for these tracks is for making parallel cuts.  You'll need two lengths.  Just like using the Stops in the Hole Drilling system -- only easier to set correctly.  I'll post pictures of this setup in the near future.

That's all for now,
Corwin

 
Bill, Corwin,

I'm interested in this.  Can you post a pic of the track in use?

Thanks,

Dan.
 
Corwin said:
Bill, placing the Track on the MFT's fence is only one way to use these -- if you do, you will want to add a subfence to the Track that extends below to meet with the table top.  And rather than register the Track directly off the edge of the Guide Rail, you should at least set it back a distance with a feeler gauge -- I just bolt it down close to where I want it and zero out the stop with a known sized setup piece.
Corwin,

Not sure I understand you here.  I used to have it mounted like you suggest but find that mounting it this way works better for me because I don't have to mess with the sub fence and the angle stop still works.  I hace et mounted as you suggest for quite a while and never needed to move it so I figure with drilling the holes it will be there 99% of the time.  It's easy to move and mont the other way if needed anyway.
 
semenza said:
Hi,

      Nice set up Bill. What is the max length cutting capacity?  Do you have it so that the INcra track extends beyond (hangs off ) the end of the MFT?

Seth
Seth.  I only have 48" worth of scale on there but assuming I put more scale on there so I could use the incremental tracks to their full advantage, 56" for my setup.  Of course of you needed it longer you could mount the track further from the guide and extend your max stop position.

And yea, it hangs off the end.
 
Bill, Corwin,

How do you manage without a "flip stop"?  I really like the convenience of the flip-style stops like the one that comes standard with the MFT, or the one that comes standard with the Incra miter gauges.  Incra sells track to go with its flip stops, but I see you guys have chosen not to use that.  Why not?

Regards,

John
 
John, in my case a number of reasons.

First, I'm not a fan of the telescoping fence.  Second the Flipstop fence is significantly more expensive than the Incremental track.  Third, a flip stop for my miter gauge is a must because the fence is short and I'd constantly be moving the stop.  A flip stop for the stock Festool MFT fence is a must because there is no way to accurately and repeatably place that stop in the same spot...so you need to be able to flip it out of the way until you're all done cutting and don't need it anymore.

The incremental track is one piece and the Shopstop stop goes on and off easily, accurately and repeatably.
 
Incra's Incremental Track for the Flip Stop is designed to be mounted to a miter gauge, in that the T track for mounting is along the back rather than the bottom.  You could still use this type track, and I do plan on ordering a couple lengths with stops sometime soon.  Also, since the Flip Stop has ridges that fit into grooves in the track's face I don't see where one could mount a subfence.  This feature is to index off the point of a miter -- looks like a good idea for that task.

Corwin
 
Hi Corwin,

You can actually mount a subfence and still use the flipstop on the Incra mitre gauge.
The head of the flipstop can be mounted on a channel closer to the edge.
The subfence can't be more than 2 1/2" tall.

Emmanuel
 
Hi Bill,

How difficult is it to drill the holes on the MFT fence?  I'm very green in woodworking.  I guess I want to know how you align the two fences together and clamp it down before you drill the holes?

Since you butted the Incra fence to the end of the MFT guide rail, I guess you are cutting off 7.8 inches or so of the scale to account for the width of the guide rail.

Thanks for the great post.  I'm really excited to try it out.

Granville
 
granvilletl said:
Hi Bill,

How difficult is it to drill the holes on the MFT fence?  I'm very green in woodworking.  I guess I want to know how you align the two fences together and clamp it down before you drill the holes?
hehe, nothing that scientific. I laid the Inca fence on the MFT fence where I wanted it and stuck my awl through the slot in the Incra fence, centering it, and gave it a tap with my palm to mark the location.  Then drilled the fence...was simple.

Since you butted the Incra fence to the end of the MFT guide rail, I guess you are cutting off 7.8 inches or so of the scale to account for the width of the guide rail.

Thanks for the great post.  I'm really excited to try it out.
Granville
I cut off some amount, not sure how much.  The way I calibrated it was to take a board of a known length and lay it on the MFT.  I plunged my saw and slid the board up until it contacted the blade.  I then took the Incra ShopStop and positioned it exactly at the end of the board and locked it down.  Next I slid the scale until it read exactly the pre measured length of the board.
 
Emmanuel,

  Thank you for that information!  Sounds like it works just like the other track.  Now, I have to ask how the flip arm works when flipped down against the subfence -- I would think it would tip out somewhat without corresponding grooves in subfence to allow it to sit flush, if you will.  This is probably just fine, but I wanted to ask since the subfence is doable.

Hey Bill,

  Hope you are enjoying your new addition, and that you do not feel I have steered you wrong.  Personally, I think these (or similar) tracks are a great fit with the Guide Rail system -- on the MFT, or not.  True, there are some inconveniences, like the different standards (Imperial/Metric), but overall they have proved to be a great asset to me.  

  I had been interested in Incra since they first started their product line, and when I ordered my TS55 (with my first Festool purchase) I also ordered a bunch of Incra Track with Stops.  The idea at the time was to construct a large (4'-9" x 8'-9", or so) super-sized MFT with the track around the perimeter.   I had planned to also make my own brackets.  Well, actually it was to be two jig-type things; one 4'-10" and the other 8'-10", each around 6" wide with tabs that extend down from each end to make contact with the Stops on the Incra Track, and hinges along the top to connect the Guide Rail.  The idea was that with the Guide Rail 'mounted' on the jig, you could set the Stops, slide the jig in position against the Stops, pivot the (hinged) Guide Rail into position and go.  But, the sheer size of such a table was simply too much to work around in my current shop.

  Just called Brother Bob, so after a time I should have some nice new things to show all ya' all.  My previous makeshift setup will take the next step.  Have to clear the shop of some house painting gear first that is currently in the way.  Just wish it would stay dry long enough to finish with all of that first -- this job just seems to drag on an on, however it is turning out SO much nicer for the additional time spent.

Corwin
 
These tracks are easier to mount directly, or maybe I should say indirectly, to the MFT rather than mounting to the MFT's fence (that photo I had was more or less for demonstration purposes).  Simply cut some MDF the appropriate length and a couple inches wider than the Track, mount Track flush with (or just back from, your call) the Track's working face.  Now square to Guide Rail and clamp the assembly in place.  Who needs to drill extra holes in their MFT?  There certainly are enough already! ;)

Once you have the left side taken care of, you might consider the rest.  With another Track on the other side, well, I am sure you get the picture.  But you might then want to fill the void with the same kind of sacrificial backup that one would install on a miter saw.  Mounting subfences to the Track on either side that is cut on a 45 allows the replacable backup section to sort of lock in position.  Cut some MDF about 10" by, oh, let's say 2' where the 2' sides are cut with opposing 45's yielding a piece with a dovetail cross-section.  Now zing off these backup sections cut to the required hight for various thickness material you may use.  Now, I should note that I always use hardboard or foam under material be cut.  This has worked great for me.  

Hope some of this helps,
Corwin

Oh, almost forgot why I was writting yet another reply to this.  When I first mounted the Track to the MFT's fence I also noticed a problem with the assembly being out of square.  On examination, I found my problem to be the MFT's fence is being pulled down along the back causing the front face to lean back.  This seems to be a problem where the protractor-head portion of the fence does not remain flat to the table top when the unit is tightened down to the table, and further insulted when the other end of the fence is set in place with the lock down that secures it at the left profile.

It seems that in mounting the Incra Track to the MFT's fence, Bill has found the need to shim where the two attach.  Since he also experiences this little 'problem', the squareness of the MFT's fence should be in question for others.  The fix might be better addressed at the source -- where the head meets the table.  Shouldn't be a big problem, but one should be aware.       CD
 
Corwin said:
... seems to be a problem where the protractor-head portion of the fence does not remain flat to the table top when the unit is tightened down to the table, and further insulted when the other end of the fence is set in place with the lock down that secures it at the left profile.

It seems that in mounting the Incra Track to the MFT's fence, Bill has found the need to shim where the two attach.  Since he also experiences this little 'problem', the squareness of the MFT's fence should be in question for others.  The fix might be better addressed at the source -- where the head meets the table.  Shouldn't be a big problem, but one should be aware.       CD

I used a square file to make the front of the (tightened) protractor head square to the table surface. Put some tape on the bottom of the file to protect the table. Previously I used a shim but got tired of trying to keep track of it when I moved the fence.
 
Back
Top