I've seen this video before .. shows exactly how you have to turn the jig to expand the 4-hole pattern across your surface. This is where you'll have problems if the clip-in, non-adjustable guide bushing is not centered exactly. He was lucky, his 1400 guide bushing is obviously centered correctly .. mine, not so much.
You are using an out of date browser. It may not display this or other websites correctly.
You should upgrade or use an alternative browser.
You should upgrade or use an alternative browser.
MFT Hole Jigs
- Thread starter Grev
- Start date
Cheese
Member
TrackTubesGuy said:At this point I'm thinking of working on a custom base for the 1400 that would accept Porter Cable style guide bushings (like the one Jasper Tools sells) ... I'm not giving up on this yet.
Festool sells a plain guide bushing plate that will accept PC style bushings, 493566. There isn't a lot of movement but it could be bored out say .030" to give you a little more wiggle room.
Cheese said:Festool sells a plain guide bushing plate that will accept PC style bushings, 493566. There isn't a lot of movement but it could be bored out say .030" to give you a little more wiggle room.
Thanks Cheese ... might be a solution worth trying before I have my machinist figure something out. From reading other threads on the FOG, this seems like a common issue and worth getting a price on a custom insert/guide bushing that others might want also.
Hi. I checked my OF1400 as well, it's off to....not by much but I can see where I will probably have the same issue when my dominofix template arrives.....
Cheese...so am I understanding this correctly..you are suggesting to enlarge the opening in the guide bushing adapter that comes with the router so there is some play to allow the use of a mandrel? If so it appears both the top and bottom of the adapter bushing would have to be enlarged...also after doing so, can you buy metric sized guide bushings in NA?
thanks...patiently waiting and hoping for a resolve from Festool.....
Cheese
Member
gnlman said:Cheese...so am I understanding this correctly..you are suggesting to enlarge the opening in the guide bushing adapter that comes with the router so there is some play to allow the use of a mandrel? If so it appears both the top and bottom of the adapter bushing would have to be enlarged...also after doing so, can you buy metric sized guide bushings in NA?
What I'm saying is that my Festool guide bushing adapter, 493566, has an ID that measures 1.180/1.182", while the OD of my Porter Cable bushings measure 1.170-1.175" diameter. So best case using the parts I have is .005-.006" per side movement. If I needed more movement then I'd have to bore out the Festool adapter, or turn down the diameter of the Porter Cable bushings or both.
Everything is predicated on how much your 1400 is off center and the dimensional size of the parts you have. Just saying that it can be done if you have the patience & time.
As far as metric guide bushings go, the only ones I'm familiar with is UJK that Axminister sells and they do offer a 30 mm diameter brass bushing.
thanks Cheese I thought that is what you meant...my PC (generic) guide bushings are tight on both steps of the festool guide adapter so I don't have any play....but understand what you are talking about....seems like a fairly easy work around..Also thinking ordering the 20mm base plate or making one with same idea drill it out to allow some play. Not too familiar using guide bushings, so thanks for the great ideas.
Greg
Greg
Cheese said:As far as metric guide bushings go, the only ones I'm familiar with is UJK that Axminister sells and they do offer a 30 mm diameter brass bushing.
I actually ordered this bushing last week .. should have it in the next couple days. I have a couple ideas to make it work and will let you know what I come up with.https://www.amazon.com/Trend-US-30-...coding=UTF8&psc=1&refRID=TSXZR5GS1RN9CQ22ZQK3
dlu
Member
TrackTubesGuy said:Thinking of purchasing one of the dog hole drilling/routing systems to make my own MFT style tables for a project I'm working on. Looking for feedback from anyone who's used the Woodpecker, Dominofix, or the UJK Parf system. I've watched all the videos available online ... just looking for actual users input. Thanks.
My take would be to avoid all of them and use a "holy rail" and the LR-32 router attachment and 20 mm bit. In my experience the results are dead on and you're using tools you already have or getting tools that have broader use than just making MFT holes. The method that I use is an adaption of Timothy Wilmot's (of MF-TC fame) method, it is easy and reliable and if you thing you'll need to do it more than once the first pass has you well on your way to making a jig.
Cheese
Member
Douglas Urner said:My take would be to avoid all of them and use a "holy rail" and the LR-32 router attachment and 20 mm bit. In my experience the results are dead on and you're using tools you already have or getting tools that have broader use than just making MFT holes. The method that I use is an adaption of Timothy Wilmot's (of MF-TC fame) method, it is easy and reliable and if you thing you'll need to do it more than once the first pass has you well on your way to making a jig.
I’m siding with you...the Festool bit cuts a nice hole with no burning and the holey rail makes it impossible to fail. If I were to do it all again, I’d go with the LR-32 system or hire a CNC router.
Hi. Douglas could you explain how you used your lr32 system to achieve this. I've only seen one method that looks repeatable just using the system, and it was running 2 rows of holes parallel down the outside of the top and using the edge guide pins to locate and move the rail down those holes while plunging the 20 mm holes across the top. (hope that makes sense)...the edge guide pins appear to be 6mm so the standard bit that comes with system would not work...would need a 6mm router bit which is available from festool..it seems you would be limited in how long the top could be as I only have the shorter rail...unless there was a way to reset the system accurately. The jig to me seemed to be a simpler solution at the time...had I known about the router/bushing issues I think I would have tried the lr32 idea first..will need to break out the lr32 and do some more investigating...but still hoping for a fix to the jig as it seems faster and easier....that is if it can be made to work..and yes I find the 20mm festool bit makes fine holes for the qwas dogs I have as well....
Thanks, Greg
Thanks, Greg
DynaGlide
Member
- Joined
- May 16, 2017
- Messages
- 1,588
1. Cut a sheet larger than needed for final top perfectly square.
2. Reference your lr32 off one end with the longitudinal stop, bore 20mm holes 96mm on center (every 3 on the rail).
3. Now reference off the same end with the lr32 but on the opposite side and repeat. You now have two rows of holes perfectly parallel 96mm on center. Using some rail dogs you can attach the guide rail to these parallel holes and bore 20mm holes every 3 for 96mm centers. Lift the rail and rail dogs and move down and repeat. This creates a grid of holes for your top. When you're done cut off the two rows created in steps 1 and 2.
Hope this helps. I'll look for pictures from when I did it.
Attachments
Here is your challenge #1.DynaGlide said:1. Cut a sheet larger than needed for final top perfectly square.
BTW, this is how I did it, but without LR32. Equal spacing is easy and can be done with a simple jig. Perpendicular alignment is tricky.
If you have MFT than just copy it with a pattern bit.Sometimewoodworker said:If you already have an MFT then here's another way to skin the cat
Svar said:If you have MFT than just copy it with a pattern bit.Sometimewoodworker said:If you already have an MFT then here's another way to skin the cat
I don't know of any MFT owner who has decided to do that, though it certainly could work.
You would have to drill clearance holes first so it seems that it is the slowest method and most error prone method, just look at the woodpecker jig reviews with each hole needing about 5 passes, I don't see any reason that a pattern bit would be any better or faster.
Cheese
Member
Sometimewoodworker said:You would have to drill clearance holes first so it seems that it is the slowest method and most error prone method, just look at the woodpecker jig reviews with each hole needing about 5 passes, I don't see any reason that a pattern bit would be any better or faster.
I’m with you on this one. Somethings work well and somethings just barely work at all. That’s where the copy bit for this application comes in. It’s a painfull experience if you’ve tried it and I’ll never go back there again.
If it’s only one or two holes, you will persevere, more than that and it’s just becomes some exercise in self flagellation. Just chuck a 20mm bit of your choice in the router and go forth.
I disagree. I've done it both ways. I replicated existing top with pattern bit and a number of people on this forum have done the same. It is fast. Clearance holes for MFT size plate 5 min time. Yes, final routing requires steady hand. Worked perfectly for me. Advantage: 1) no error propagation due to multiple template repositioning, 2) no need to center bushing and bit (royal PITA with festool routers), 3) no blowout at the bottom.Cheese said:Sometimewoodworker said:You would have to drill clearance holes first so it seems that it is the slowest method and most error prone method, just look at the woodpecker jig reviews with each hole needing about 5 passes, I don't see any reason that a pattern bit would be any better or faster.
I’m with you on this one. Somethings work well and somethings just barely work at all. That’s where the copy bit for this application comes in. It’s a painfull experience if you’ve tried it and I’ll never go back there again.
If it’s only one or two holes, you will persevere, more than that and it’s just becomes some exercise in self flagellation. Just chuck a 20mm bit of your choice in the router and go forth.
Ideally, I would prefer phenolic template with 42 (6 x 7) 20 mm holes at 100 mm step (don't care for 96 mm).
Clearly you are very much better at using a pattern bit and many times faster than I am, as this is a job I would never describe as fast or easy. As to blowout a sacrificial backing stops that.
You mentioned 5 minutes. Is that for all the holes (incredibly, unbelievably, amazingly fast under 4 seconds each) or for each hole (painfully slow at over 6 hours for the standard 77 )
You mentioned 5 minutes. Is that for all the holes (incredibly, unbelievably, amazingly fast under 4 seconds each) or for each hole (painfully slow at over 6 hours for the standard 77 )
So why not get one? CNC shops are very common now so it shouldn't cost more than a few hundred US$Svar said:Ideally, I would prefer phenolic template with 42 (6 x 7) 20 mm holes at 100 mm step (don't care for 96 mm).
Cheese
Member
Well Svar you're better with that router than I am. [smile]
I MFT'd some 18mm thick Baltic birch, maybe that makes a difference? I've never tried any MDF so I don't know how smoothly that goes.
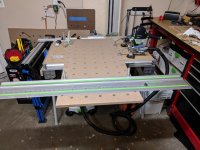
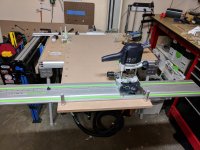
The Baltic birch went incredibly slow, the first 19 holes took 2.5 hours and the next 21 holes took just over 2 hours. For the final 20 holes, I swapped the 1/2" router bit for a Festool 20mm boring bit. The last 20 holes took 30 minutes.
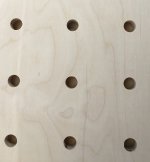
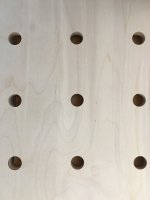
Here's a random shot of 9 of the holes where I used a 1/2" router bit versus 9 of the holes when I switched to the Fetool boring bit.
In the first photo I can see that there are 5 or 6 holes that are wonky.
Proceeding left to right, it appears that there are issues with holes 1, 4, 5, 7, 9 and possibly hole 8. Tough to tell and I certainly can't remember as this was done 4-5 months ago.
I MFT'd some 18mm thick Baltic birch, maybe that makes a difference? I've never tried any MDF so I don't know how smoothly that goes.
The Baltic birch went incredibly slow, the first 19 holes took 2.5 hours and the next 21 holes took just over 2 hours. For the final 20 holes, I swapped the 1/2" router bit for a Festool 20mm boring bit. The last 20 holes took 30 minutes.
Here's a random shot of 9 of the holes where I used a 1/2" router bit versus 9 of the holes when I switched to the Fetool boring bit.
In the first photo I can see that there are 5 or 6 holes that are wonky.
Proceeding left to right, it appears that there are issues with holes 1, 4, 5, 7, 9 and possibly hole 8. Tough to tell and I certainly can't remember as this was done 4-5 months ago.
Attachments
Similar threads
- Replies
- 58
- Views
- 3K
- Replies
- 10
- Views
- 561