MFT Hole Jigs

Cheese said:
Sometimewoodworker said:
A couple of examples of Parf system holes and a top that will get at least 4 location holes

Is that mahogany ply?
No it's a cheap local 20mm ply about ฿600 per sheet, I do have some really nice hardwood ply with a good thickness top ply but that cost ฿4,600 per 20mm sheet I can't tell you the species but maybe there is someone who can translate

View attachment 1
 

Attachments

  • IMG_5375.JPG
    IMG_5375.JPG
    1.5 MB · Views: 305
  • IMG_4785.JPG
    IMG_4785.JPG
    1.3 MB · Views: 481
  • IMG_4784.JPG
    IMG_4784.JPG
    667.6 KB · Views: 441
DynaGlide said:
1. Cut a sheet larger than needed for final top perfectly square.

2. Reference your lr32 off one end with the longitudinal stop, bore 20mm holes 96mm on center (every 3 on the rail).

3. Now reference off the same end with the lr32 but on the opposite side and repeat. You now have two rows of holes perfectly parallel 96mm on center. Using some rail dogs you can attach the guide rail to these parallel holes and bore 20mm holes every 3 for 96mm centers. Lift the rail and rail dogs and move down and repeat. This creates a grid of holes for your top. When you're done cut off the two rows created in steps 1 and 2.

Hope this helps. I'll look for pictures from when I did it.
The holes for the two alignment rows (step two) could also be made with the 5mm bit included in the LR32 set, then shelve pins will do the job of the dogs (but with less play). Less space (for alignment holes) to cut away later and less work for the 20mm cutter (you can plunge way faster with the 5mm one).

I agree with going for LR32 instead a MFT hole jig, especially should the one-trick-pony jig be a reasonable fraction of the cost to get a LR32 set (and holey rail, if needed) as the LR32 has way more use cases (and likely a higher resell value).
 
Another good idea...I've been looking at the lr32 method some more....I have the shorter holy rail (1400 I believe) so it seems to me you would be limited length wise (I want to make a 42x72 inch top) on a top unless there is a reliable and accurate method to move the rail along the 2 parallel edges. I know if your top is cut perfect in 32mm increments you can flip the rail and register from the other end, but getting it dead perfect might be a bit challenging....I suppose you could use a spacer, but then again it would have to be perfect...anyone have a fix?...lol
Also, my dominofix jig arrived today...don't have a festool 30mm guide bushing yet for my OF1400 as my local supplier doesn't have any..might have to order one. I did order the trend guide bushing as discussed in this thread, but it's still in transit from the US.
thanks, Greg
 
Michael Kellough said:
Corwin said:
Incra's Incremental Track can play nicely with the LR32 system.

Do they have a metric version?

I'm not sure if they offer the track with the metric tracks or not, but they do offer conversion kits that include both the metric racks and the metric scales -- used to cost $6 for the kit 12 years ago, now it is about $10. And, it looks like their metric racks are now orange rather than light green like the metric racks I purchased years ago.

While I haven't used these Incremental Tracks to make MFT-type tops, I have used them when making my fence setup for my MFT which has 20mm holes spaced 96mm apart so it will attach to my MFT using my cam-lock dogs that fit through the holes in my fence base and into the MFT's system holes such that it both locates the fence and locks it in place. With two lengths of Incremental Track, and the conversion kits, you should be able to align a LR32 guide rail to make system holes in a table top.
 
gnlman said:
Also, my dominofix jig arrived today...don't have a festool 30mm guide bushing yet for my OF1400 as my local supplier doesn't have any..might have to order one. I did order the trend guide bushing as discussed in this thread, but it's still in transit from the US.
thanks, Greg

I just received my Trend 30mm guide bushing and it fits the Dominofix and Festool adapter perfectly.  I spoke with Festool service a couple days ago and was told I could send my OF1400 in for a look, but I'm not to that point yet.  Service guy said sometimes they can flip the removable mounting plate 180 degrees, and/or can bend the clip-in tabs slightly to make it center better.  It didn't sound too encouraging ... I'm hoping this new setup will be centered better .. will let you know tomorrow. 
 

Attachments

  • Trend1.jpg
    Trend1.jpg
    126.1 KB · Views: 564
  • Trend2.jpg
    Trend2.jpg
    122.4 KB · Views: 527
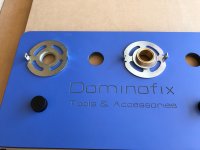
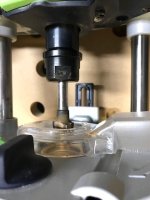
TTG. Good to hear the trend guide bushing fits perfectly!! I ordered one as well, just waiting for it to arrive....I thought in case the OF1400 can't be made to work, I'd be able to use the trend bushing in another router if I had to buy one. My dominofix jig arrived today. I tested it out on my mft, and it does have slight movement on some of the front holes on my mft top...rotate it 90 degrees, and it's rock solid...my top is about 8 years old, and wondering if I have used the front holes moreso than others also my shop is not always heated, which I'm fixing this year...lol
Let me know how it goes...I thought of bending the guide bushing tabs as well, but my guide bushing adapter does not move at all....
I really like the of1400 so if I have to, I'll buy a non festool router (with dust collection) that can be centered using a mandrel to use with guide bushings.
thanks, Greg
 
gnlman said:
Another good idea...I've been looking at the lr32 method some more....I have the shorter holy rail (1400 I believe) so it seems to me you would be limited length wise (I want to make a 42x72 inch top) on a top unless there is a reliable and accurate method to move the rail along the 2 parallel edges. I know if your top is cut perfect in 32mm increments you can flip the rail and register from the other end, but getting it dead perfect might be a bit challenging....I suppose you could use a spacer, but then again it would have to be perfect...anyone have a fix?...lol
I also only have the old short LR32 rail and had to extend it to do some of the last locating holes. I just joined a non holy rail after making as many location holes as I could. Re positioning was easy as the exact distance from the side of the board was simple to maintain and I used the already drilled holes to ensure longitudinal position (with the router off). You only need the router to fit into about 3 previously bored holes to be confident of the rail location then clamp.
 
[member=8389]gnlman[/member]  .. There's a problem with using the Trend bushing.  When using the Dominofix and plunging through 19 mm MDF, the depth of the plunge is such that you can only insert the router bit shaft into the collet approx. 1/4", otherwise, the collet nut hits the top of the brass guide bushing.  It can be adjusted to work .. I did it .. but there's not much room to play with and I really want more of the bit shank inserted into the collet.  One good thing, it did solve my problem.  Although tight, I was able to quickly plunge 4 rows of holes and turn the jig 90 degrees and two retaining dogs lined up with the holes I had just plunged.  That tells me my original problem is the Festool 30 mm clip-in guide bushing is off .. most likely tabs need tweaking.  Think I'll tackle that tomorrow. 
 

Attachments

  • IMG_5861.jpg
    IMG_5861.jpg
    78 KB · Views: 517
  • IMG_5858.jpg
    IMG_5858.jpg
    61.5 KB · Views: 519
  • IMG_5856.jpg
    IMG_5856.jpg
    64 KB · Views: 474
  • IMG_5855.jpg
    IMG_5855.jpg
    62.4 KB · Views: 561
Hmmm that is not much for the bit to be in the collet....but glad it worked...I have a dimar 20m bit with a longer shaft and it's half inch...but it's not a plunge bit. I used it with a jig I made to enlarge 3/4 inch dog holes on a table I bought....I'll check it out tomorrow to make sure shaft is longer..might be a fix but you'd have to plunge a larger hole first...not sure about that....
Thanks, Greg
 
TrackTubesGuy said:
Service guy said sometimes they...........can bend the clip-in tabs slightly to make it center better.  It didn't sound too encouraging ...

Hmmm, that’s not the right answer...

How confident would you be if you brought your car in to be aligned and they suggested that the tie rods or A-arms could be bent slightly to adjust toe-in? I’d bring it to a different shop  [eek]

Remember that the insert will not move laterally along the horizontal axis created by the 2 push in tabs. The insert however does move at 90 degrees to that axis to the tune of approximately .010-.015”. So the bottom line is, you can mitigate insert movement but you have to be keenly aware of the direction of your router movements versus the axis created by the 2 push tabs.

Any router movement along the axis created by the 2 push tabs will not move the insert, while router movement at 90 degrees to that axis will produce the maximum amount of insert movement. Movement at +_ 45 degrees to that axis will also produce approx 70% of the maximum potential insert movement.

I will still use my 1010 over the 1400 if absolute router bit concentricity is a must.
 
Cheese said:
I will still use my 1010 over the 1400 if absolute router bit concentricity is a must.

Going to Festool Connect next week .. guessing I might be adding to my Festool collection?
 
I did not mine to make more tops...I have six or seven now.  I did however Use the grid function to test for the Festool grid and it works great.  I've made all mine with the LR-32 and my 1400 using Festool's router bit.  One thing the Shaper would be great for would be making hand cutouts and other specialized openings not to mention patterns.  The biggest thing I've used it for was a 49" diameter, .250 acrylic round.  The circle function as well as the other stock functions makes it easier for a computer drawing program 
illiterate Like me to make it useful.
 
Here is an example of using the Parf system as a location and fixing, I was reminded that it was something that I had intended to do but forgot about. The 20mm holes are not all the way through but about 15mm deep.
 

Attachments

  • IMG_5378.JPG
    IMG_5378.JPG
    1.9 MB · Views: 551
  • IMG_5379.JPG
    IMG_5379.JPG
    1.6 MB · Views: 534
  • IMG_5381.JPG
    IMG_5381.JPG
    823.3 KB · Views: 550
Gregor said:
The holes for the two alignment rows (step two) could also be made with the 5mm bit included in the LR32 set, then shelve pins will do the job of the dogs (but with less play). Less space (for alignment holes) to cut away later and less work for the 20mm cutter (you can plunge way faster with the 5mm one).

I like that idea - both the savings in time and waste material are both attractive. Would you use the 5mm shelf pins to register against the back of the rail? Or do you have an idea about how to make 5mm "rail dogs?"
 
So after spending an hour or so yesterday trying every conceivable combination of mounting plate, guide bushing, and router handle direction when plunging with the Dominofix, I finally got everything to line up perfectly.  I had to plunge the holes with the handle facing in the orientation shown in the photo .. don't ask me why, but it works and I'm going with it.  I'm fairly certain the problem is the Festool guide bushing being out ever so slightly so I will be picking up another one, just to make sure.  Once I figured this out, I was able to plunge a 7 x 8 pattern in only 11 minute .. and taking my time.  Easily could do an MFT3 sized top in 15 min. or less .. very impressive.  Only issue now is Festool 20mm bit makes the holes just a tad looser than I would like, which others have mentioned before.  Not a big deal for the wings I'm making for my sliding table system, but would like them tighter if I was using them for tracksaw rail alignment. 
 

Attachments

  • IMG_5872.jpg
    IMG_5872.jpg
    110.5 KB · Views: 518
  • IMG_5874.jpg
    IMG_5874.jpg
    101.4 KB · Views: 500
Hey TTG. Good to hear it worked out. I take it by the pictures you didn't use the trend bushing. Was the trend bushing worse, or just too scary because you couldn't chuck it up very far? I still have not rec'd my trend bushing, nor the festool one, so have dominofix jig sitting there waiting to try. Hmmm not sure what dogs you are using, I use Qwas dogs, and the festool holes seem to fit OK...I have another bit made by dimar that is very slightly smaller it is pretty snug, but it's not a plunge bit...having said that, I did try plunging the dimar bit, and although slow it did work...I also just discovered that the ujk system is coming out with an upgraded version for dog holes called the Mark 2. The rulers have larger holes, and the drill guide bushings fit in the holes so over time you don't wear the holes out on the ruler causing some issues...although for just home use the original system sounds like it lasts a long time before that issue arises.
Thanks for posting your results!
Greg

PS scored a slightly used metric of1010 online this morning being shipped tomorrow...wondering if collets are same size as of1400...I suspect they are so I'll have to buy the festool guide bushing for the 1010 as well...these holes are costing me a lot of money....lol
 
Back
Top