Mid-century dresser restoration

mrFinpgh

Member
Joined
Oct 30, 2015
Messages
568
Short story time:

My girlfriend moved in last weekend  [big grin] and brought with her the sorriest pine dresser I ever saw.  The whole thing is held together with staples, and it looks like it was built out of scrap flooring.  Fortune smiled upon us, though, as we stopped by the local reuse center and dropped off some recycling.  As is my habit, we walked through the furniture section looking to see what hidden gems might be available, I saw a dresser that looked a lot like a coffee table I have in my basement. 

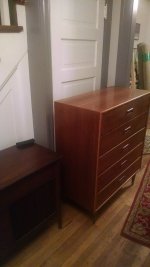
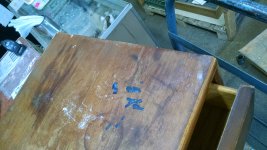
I asked my girlfriend if she saw any stamps in the drawers, and she did.  The dresser turned out to be from the Lane Acclaim series.  It fits our style a lot better, and I think it will be better storage than what she has now.  So at $50, the price was right and we grabbed it.

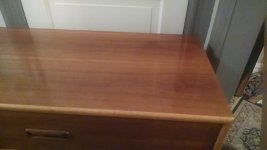
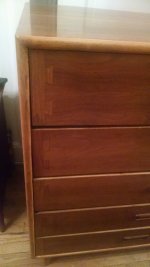
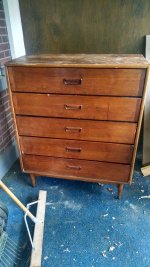
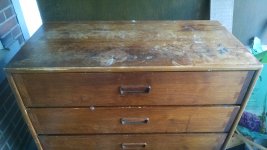
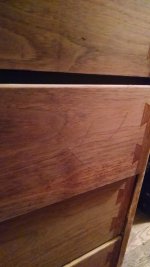
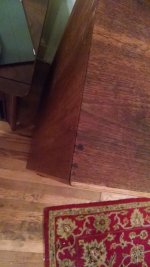
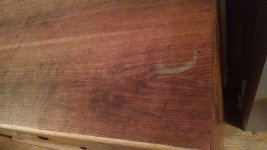
Now the challenge is to clean it up and fix up some of the damage to the veneer.  There's a fair amount of water marks on the top and some scratches and chips on the case and a couple of the drawer faces.  The body is solid, though, and the legs look to be in great shape.

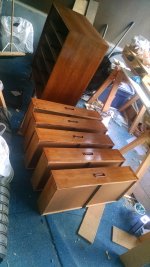
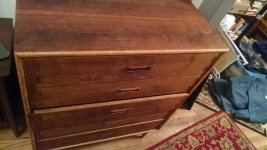
Here's where we're starting from - excuse the mess, as I don't have much room to put things indoors right now.


Attachments

  • IMG_20160522_104745045.jpg
    IMG_20160522_104745045.jpg
    3.7 MB · Views: 583
  • IMG_20160522_104754260.jpg
    IMG_20160522_104754260.jpg
    3 MB · Views: 455
  • IMG_20160529_164101395_HDR.jpg
    IMG_20160529_164101395_HDR.jpg
    3.7 MB · Views: 498
  • IMG_20160529_164113415.jpg
    IMG_20160529_164113415.jpg
    3.8 MB · Views: 554
  • IMG_20160529_164121056_HDR.jpg
    IMG_20160529_164121056_HDR.jpg
    3.6 MB · Views: 502
Couldn't resist and stripped it this evening.  8)

We used citri-strip.  Put it on thick, and covered with wax paper.  Let it dwell for about an hour, and then took it off with a plastic scraper.

Once the bulk of it was off, we wiped the surfaces down with wood shavings and then rinsed with mineral spirits.  It seems to have taken off the remaining film finish, although I think there is probably a good amount of dye in the wood.

I've attached the results of our efforts below.

So now, I'm confronted with a couple items:

1 - How to finish?  I just did a spice rack in walnut, and used two coats of oil, some clear shellac, and wax.  That looks great, but I don't think it would be right in this case.  The other issue is that the wood most likely has been dyed, so I'm not sure how I could do some samples unless I figure out how to match the dye they used in the original.

2 - Similar to above, I need to patch in some veneer that has chipped out.  So I would guess that I need to dye it in order to get it to look like it belongs. 

3 - Also related to the question of the dye - there are some black stains on the top that I'm guessing are old water stains.  In the past, I've had good luck using oxalic acid to remove these from Mahogany, but that was case where there wasn't dye in the wood.  I'm a bit concerned that bleaching could create some significant differences in shade.  Is this something I need to account for?

I'm curious how others might approach this one at this point.  So far, it's been an easy one, but I want to make it look as close to the original as possible - keeping in mind that I don't have a setup for spraying lacquer. 

Thanks,
Adam


Attachments

  • IMG_20160529_212117143.jpg
    IMG_20160529_212117143.jpg
    2.5 MB · Views: 415
  • IMG_20160529_212051214.jpg
    IMG_20160529_212051214.jpg
    2.5 MB · Views: 401
  • IMG_20160529_212001663.jpg
    IMG_20160529_212001663.jpg
    2.5 MB · Views: 453
  • IMG_20160529_211940445.jpg
    IMG_20160529_211940445.jpg
    2.6 MB · Views: 411
  • IMG_20160529_211929689.jpg
    IMG_20160529_211929689.jpg
    2.8 MB · Views: 467
  • IMG_20160529_211852688.jpg
    IMG_20160529_211852688.jpg
    2.2 MB · Views: 498
Looks good, I'm curious what the finished dresser will look like. So far it seems really, really promising!

Kind regards,
Oliver
 
Is the top and sides solid wood or veneer?  I'd be inclined to sand it with 220 grit or higher and then wipe down with mineral spirits.  Do you have any kind of sprayer for spraying a dye? 

Not sure Oil will give you the uniform finish you are looking for.  You could explore general finishes wiping gel stains.  I've had good luck with them on fresh wood but have not done much on refinishing except where I sanded to a fine finish.
 
I do not have any experience, but I am wondering if you could sand it?
The veneer is usually ~0.012" or thereabouts...
It may look ok, and could be slightly distressed (with the sections where the veneer is damaged) which may look ok?

Another option may be to put another layer of veneer on it?

I put some oil on veneer samples last week, as well as some brush on lacquer. None of the 5 samples were walnut, but we got a good idea of oil, oil+lacquer, and straight lacquer looked on them.
 
neilc said:
Is the top and sides solid wood or veneer?  I'd be inclined to sand it with 220 grit or higher and then wipe down with mineral spirits.  Do you have any kind of sprayer for spraying a dye? 

Not sure Oil will give you the uniform finish you are looking for.  You could explore general finishes wiping gel stains.  I've had good luck with them on fresh wood but have not done much on refinishing except where I sanded to a fine finish.

Yes, the top and sides are walnut veneer over poplar.  The front edge is banded with solid oak.  When we stripped it, we cleaned it up with mineral spirits and there is a definite orange hue when moistened.  I think the veneer is pretty thing, so it's probably going to be a hand-sanded type of deal - why risk burning through?

No sprayer setup for me -- no room to handle overspray.

As far as uniformity goes, I want the finish on the patches to match whatever the finish on the other bits looks like.  I've definitely seen a lot of folks using a stain before topcoating these pieces.  I guess the contrast isn't intended to be super strong.  My concern with Gel stains (and stains in general) is that they always seem to muddy the grain compared to dyes or just using an oil.  Generally, I've only used gel stains when I didn't want to strip off existing finishes or if I wanted to obscure some of the specifics of that species (e.g. Java stain on Red Oak).

-Adam
 
Holmz said:
I do not have any experience, but I am wondering if you could sand it?
The veneer is usually ~0.012" or thereabouts...
It may look ok, and could be slightly distressed (with the sections where the veneer is damaged) which may look ok?

Another option may be to put another layer of veneer on it?

I put some oil on veneer samples last week, as well as some brush on lacquer. None of the 5 samples were walnut, but we got a good idea of oil, oil+lacquer, and straight lacquer looked on them.

I think that I can sand it very carefully and by hand.  The veneer isn't as thin as some of the plywood I've seen recently, but it's thin enough to be a risk.

I'm hoping to avoid too much 'distress' to this one.  Partially to push my skills and partially because it seems like this piece will look best intact. 

Which samples did you like the best?  I've been doing a lot of sample pieces on some unsteamed black walnut I had left over from other projects.  Thus far, my favorite remains oil+wax.

-Adam
 
I had mrtyl, pear, Tasmanian Blackwood, Australian Karri, and zebra wood.
I did the lower 1/2 with oil, and the right half with lacquer... So natural was upper left, and both was lower right. Most looked about the same except for the Karri which was much redder with only the lacquer. Just the lacquer was glossier than the oil.
Oil+wax would be close and more towards satin.

I guess the point is if you blow through the veneer sanding, then you could just reveneer it all.
 
Holmz said:
I guess the point is if you blow through the veneer sanding, then you could just reveneer it all.

True.. but that would be a heck of a project.  :-)

I did sand it with 220 on my ROS (Bosch..  getting a ro150 very soon though  [big grin] ).  I didn't burn through any veneer -- it's actually a little thick compared to the stuff commercially available today.  I'm going to have to either double up some of the store-bought stuff for patches, or try to cut out my own from some scraps.

I'm putting the project on hold until the book I ordered (Refinishing Furniture by Jeff Jewitt) arrives.  This is too nice of a piece to goof up with the patching and color matches, so I want a little authoritative guidance. 

-Adam
 
mrFinpgh said:
Holmz said:
I guess the point is if you blow through the veneer sanding, then you could just reveneer it all.

True.. but that would be a heck of a project.  :-)

I did sand it with 220 on my ROS (Bosch..  getting a ro150 very soon though  [big grin] ).  I didn't burn through any veneer -- it's actually a little thick compared to the stuff commercially available today.  I'm going to have to either double up some of the store-bought stuff for patches, or try to cut out my own from some scraps.

I'm putting the project on hold until the book I ordered (Refinishing Furniture by Jeff Jewitt) arrives.  This is too nice of a piece to goof up with the patching and color matches, so I want a little authoritative guidance. 

-Adam

Back about 20+ years ago my brother in law gave me a Parker (a local medium quality brand) veneered top coffee table. The table was really nice and had a good woven cane under tray, etc .. but for some reason my brother in law had coated the top in an thick ugly varnish.

Back then I thought a quick go with the belt sander would sort it out [embarassed]

Then it was amateur hour with veneer strips that didn't work for me [sad] The table ended up on the garbage tip [crying]

 
I would think about a Wiping Varnish. No spraying needed, and you can control the film build.
I've used Old Masters Gel Stains on refinishing furniture for exactly what they offer... Color control and the ability to remove the stain if you're not happy with how it's turning out since it will 'lay' on top of the wood unlike a penetrating stain.
If you apply a sanding sealer coat over the color you already have, then you can protect what you already have while playing with the dresser.
 
leakyroof said:
I would think about a Wiping Varnish. No spraying needed, and you can control the film build.
I've used Old Masters Gel Stains on refinishing furniture for exactly what they offer... Color control and the ability to remove the stain if you're not happy with how it's turning out since it will 'lay' on top of the wood unlike a penetrating stain.
If you apply a sanding sealer coat over the color you already have, then you can protect what you already have while playing with the dresser.

Thanks.  This is what we ended up deciding to do.  I picked up some General Finishes Gel Stain in Prairie Wheat.  I did a sample on some walnut with a thin coat of shellac under it.  It looked really nice.

Now the trick will just be getting the color to blend between the old stuff (which reads pretty orange) and the new (which is just raw walnut).  I have some really nice grain matching in my patches, but the tone of the wood is pretty different.

-Adam

 
No photos at the moment, but today I patched the missing pieces of veneer and bleached the top with some oxalic acid. 

The patching went surprisingly well. I used my knife to cut small triangles out where the chipped/missing veneer was located, and then removed it up to that knife line with a sharp chisel. 

Then, I traced the triangle using a piece of printer paper and a pencil to rub over the area.  This gave me a template for the patch. 

Once I figured out how I wanted to line up the grain in the patch to the area being patched,  I cut the template out and rubbed it with a glue stick.  I stuck that to the veneer and let it set up for a few minutes.  Then I used that to give me a guide to where to cut out the patch.

I taped the surrounding areas and fit the patch into place. Using some tape, I made a 'hinge' for the patch so that I could apply some glue to the substrate as well as the back of the patch.  Then I clamped it all down for a couple hours and enjoyed some coffee. 

I ended up cutting a piece of 4/4 stock with my dovetail saw to make one of the patches, as it was a deep chip and the veneer would have been too low.  That was a new thing for me, but worked out pretty well.  My walnut (air dried stock that's about 13 years old) is a bit darker than the surrounding stuff, but the grain pattern blends really well with the surround area.

This evening, I bleached the top of the dresser to see if that helped to get rid of any persistent stains that stripping and sanding did not remove.  I've had good luck in the past using Oxalic acid on Mahogany, but it seems like it didn't do a whole lot on this piece.  There are two black stains near the corner which did not fade at all.  There's a small ring which seems to be persisting.  A couple blotches did go away, but I think I may want to consider chalking it up to the piece being 60 years old. 

Tomorrow I'm going to hand sand it back to 150 (it's at 220 right now) and apply some Sealcoat.  How many folks are cutting it in half with alcohol as opposed to using it straight? 

Depending on time, I may go ahead and apply the gel stain tomorrow night.  I'm using General Finishes Prairie Wheat.  Hopefully it will help to tone down some of the orange.

Once that's done, I guess I'll need to pick a topcoat.  I know I'll be making some samples, but I'm interested in whether anyone has a suggestion worth exploring?  I want to keep it pretty close to the wood.

Here's what I'm thinking right now:
1 - Sealcoat
2 - Gel Stain
3 - Sealcoat
4- Scuff at 220
5 - Wipe on oil based polyurethane

I'm a little concerned about how far to amber the whole thing might go.  I think the Gel Stain has polyurethane in it, so maybe it will stop at that, but generally the wipe-on polyurethane has taken stuff browner/redder than I initially expect it to.

Thanks for reading,
Adam

 
mrFinpgh said:
No photos at the moment, but today I patched the missing pieces of veneer and bleached the top with some oxalic acid. 

The patching went surprisingly well. I used my knife to cut small triangles out where the chipped/missing veneer was located, and then removed it up to that knife line with a sharp chisel. 

Then, I traced the triangle using a piece of printer paper and a pencil to rub over the area.  This gave me a template for the patch. 

Once I figured out how I wanted to line up the grain in the patch to the area being patched,  I cut the template out and rubbed it with a glue stick.  I stuck that to the veneer and let it set up for a few minutes.  Then I used that to give me a guide to where to cut out the patch.

I taped the surrounding areas and fit the patch into place. Using some tape, I made a 'hinge' for the patch so that I could apply some glue to the substrate as well as the back of the patch.  Then I clamped it all down for a couple hours and enjoyed some coffee. 

I ended up cutting a piece of 4/4 stock with my dovetail saw to make one of the patches, as it was a deep chip and the veneer would have been too low.  That was a new thing for me, but worked out pretty well.  My walnut (air dried stock that's about 13 years old) is a bit darker than the surrounding stuff, but the grain pattern blends really well with the surround area.

This evening, I bleached the top of the dresser to see if that helped to get rid of any persistent stains that stripping and sanding did not remove.  I've had good luck in the past using Oxalic acid on Mahogany, but it seems like it didn't do a whole lot on this piece.  There are two black stains near the corner which did not fade at all.  There's a small ring which seems to be persisting.  A couple blotches did go away, but I think I may want to consider chalking it up to the piece being 60 years old. 

Tomorrow I'm going to hand sand it back to 150 (it's at 220 right now) and apply some Sealcoat.  How many folks are cutting it in half with alcohol as opposed to using it straight? 

Depending on time, I may go ahead and apply the gel stain tomorrow night.  I'm using General Finishes Prairie Wheat.  Hopefully it will help to tone down some of the orange.

Once that's done, I guess I'll need to pick a topcoat.  I know I'll be making some samples, but I'm interested in whether anyone has a suggestion worth exploring?  I want to keep it pretty close to the wood.

Here's what I'm thinking right now:
1 - Sealcoat
2 - Gel Stain
3 - Sealcoat
4- Scuff at 220
5 - Wipe on oil based polyurethane

I'm a little concerned about how far to amber the whole thing might go.  I think the Gel Stain has polyurethane in it, so maybe it will stop at that, but generally the wipe-on polyurethane has taken stuff browner/redder than I initially expect it to.

Thanks for reading,
Adam
. With a Shellac sealer coat in place , you try General Finishes Enduro as this gives you some Amber Warmth without being heavy on Orange like an Oil Based finish.
I would stay away from Polyerethane and either use a Water Based Finish like the GF Enduro or a Wiping Varnish that isn't a poly. Maybe Waterlox product or something similar.
 
leakyroof said:
With a Shellac sealer coat in place , you try General Finishes Enduro as this gives you some Amber Warmth without being heavy on Orange like an Oil Based finish.
I would stay away from Polyerethane and either use a Water Based Finish like the GF Enduro or a Wiping Varnish that isn't a poly. Maybe Waterlox product or something similar.

Thanks for bringing up Enduro.  That looks like it could do the trick nicely.  It looks like they don't want you putting it over shellac.  I just put down two coats of 1# cut shellac to seal before I use the gel stain. 

A lot of folks are saying it's probably not a big deal, but GF seems pretty hardcore about it.

The dresser looks a lot nicer with some shellac on it.  I'm always surprised how much finish changes the appearance of a wood. 

-Adam
 
mrFinpgh said:
leakyroof said:
With a Shellac sealer coat in place , you try General Finishes Enduro as this gives you some Amber Warmth without being heavy on Orange like an Oil Based finish.
I would stay away from Polyerethane and either use a Water Based Finish like the GF Enduro or a Wiping Varnish that isn't a poly. Maybe Waterlox product or something similar.

Thanks for bringing up Enduro.  That looks like it could do the trick nicely.  It looks like they don't want you putting it over shellac.  I just put down two coats of 1# cut shellac to seal before I use the gel stain. 

A lot of folks are saying it's probably not a big deal, but GF seems pretty hardcore about it.

The dresser looks a lot nicer with some shellac on it.  I'm always surprised how much finish changes the appearance of a wood. 

-Adam
. Weird about the Shellac precaution . As long as it's Dewaxed, not sure why they are worried.  [blink]
 
After some deliberation, I decided to go with an old friend - Arm R Seal.  I was leery about using a polyurethane based topcoat on this piece, but I saw some good examples of folks using it judiciously and keeping it close to the wood, and those looked great.

I put the first coat on tonight - it's going down over a sealcoat of shellac, a coat of oil based gel stain, and another coat of shellac.  The plan is to put on three coats total, rubbing with steel wool between coats, and then finish with paste wax and steel wool.

Here's how it looks so far:

View attachment 1

I'm doing the finishing on my porch, since I don't have any other good space to work in at the moment.  I must like living dangerously, because I have a bag of 20 minute mud about 2 feet behind the dresser!!  [eek]

-Adam
 

Attachments

  • IMG_20160625_195301169.jpg
    IMG_20160625_195301169.jpg
    3.7 MB · Views: 256
All finished.

Final tally:  2 coats 1lb cut shellac, 1 coat gel stain, 1 coat 1lb cut shellac, 3 coats arm r seal gloss.  Rubbed the final coat of arm-r-seal with paste wax and 0000 steel wool to knock back the shine.  It's still quite reflective, but the finish seems very close to the wood.

View attachment 1

View attachment 2

View attachment 3

It seems shiny with so much overhead lighting.  In person, it's less glaring.

Thanks for everyone's advice.  I'm pleased with how it came out, especially compared to where it started.

-Adam


Attachments

  • IMG_20160629_211715599.jpg
    IMG_20160629_211715599.jpg
    2.2 MB · Views: 225
  • IMG_20160629_211852029.jpg
    IMG_20160629_211852029.jpg
    2.3 MB · Views: 185
  • IMG_20160629_211844833.jpg
    IMG_20160629_211844833.jpg
    2.2 MB · Views: 240
Back
Top