Mistakes were made...by me.

tiralie

Member
Joined
Jan 26, 2010
Messages
3,617
Some examples of some crap I have done...

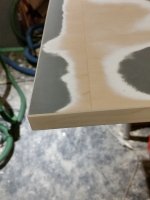
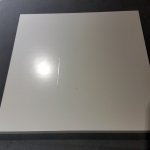
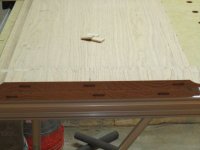
I cut veneered particle core door slabs too short, so I cut a section off an extra one I had with the TS55 joined one side with the Colins plywood bit and joined it to the short ones. I sanded and painted it. Joint completely disappeared.

[attachimg=1]

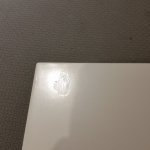
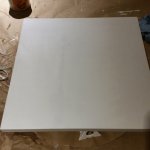
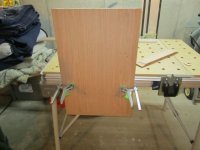
I had my spray booth a little too warm and sprayed the Aqualente too thick and I got a nice crackle texture. Unfortunately the lovely crackle effect was not required. I sanded and repainted it.

[attachimg=2]

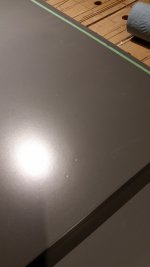
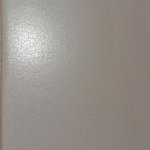
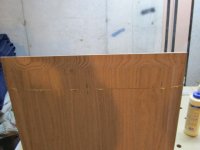
I primed over a some epoxy filler I added to a gap in the veneer in this veneer core panel. You can just see the slightly darker area under the primer in this shot

[attachimg=3]

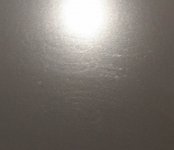
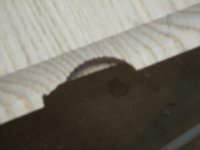
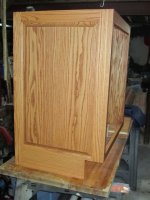
After I sprayed my top coat of Agualente, I got this nice raised line. I dug out the filler, put some different filler in the gap, sanded and top coated.

[attachimg=4]

Not using the right sander gets you some pig tails showing through your final coat. Should have used the Rotex or hand sanded not the ets.

[attachimg=5]

Spraying Aqualente too thick is a receipt for some fisheye's. More sanding and a lighter pass fixed the problem.

[attachimg=6]

Ya, this last one is just plain dumb. Touching paint while it's still wet. Never good.

[attachimg=7]
 

Attachments

  • CutIncorrectlysm.jpg
    CutIncorrectlysm.jpg
    589.4 KB · Views: 1,352
  • FingerPrintSm.jpg
    FingerPrintSm.jpg
    417.6 KB · Views: 1,215
  • fisheyesSm.jpg
    fisheyesSm.jpg
    264.4 KB · Views: 1,250
  • mousetracksSm.jpg
    mousetracksSm.jpg
    360.1 KB · Views: 1,274
  • fillerLineSm.jpg
    fillerLineSm.jpg
    346.2 KB · Views: 1,321
  • PrimedoverfillerLineSm.jpg
    PrimedoverfillerLineSm.jpg
    393.7 KB · Views: 1,328
  • CrackleSm.jpg
    CrackleSm.jpg
    652.2 KB · Views: 1,333
Hahaha.  I'd break the forum posting all the pictures of mistakes I've made.  You've got some good ones here.
 
I cut an inch off the top off a bathroom door, instead of the bottom when I was supposed to be trimming the bottom to accommodate a newly tiled floor.

Just remember the true definition of a professional isn't about not making mistakes, it's about hiding the evidence and fixing the cock-up before anyone else notices.
 
Mistakes only make you better. When started to spray i learned quickly a razer blade is my best sand paper! It works great to take out any unwanted texture.
 
This is what I have to look forward too?  [scared]

You know, I was going to post the question, if anyone uses a wet film gauge or do I need one!
 
wptski said:
This is what I have to look forward too?  [scared]

You know, I was going to post the question, if anyone uses a wet film gauge or do I need one!

This is nothing, it gets too be much more interesting than this.

I use the wet film gauge when I use a product for the first time, if I change the alchemy, and to double check myself once in awhile.

I have my rep supply me with extras so I can give them away, PM me your address and I'll mail you one.

Tom
 
I've screwed up stain grade and repaired it.

Tom
 

Attachments

  • IMG_0077.jpg
    IMG_0077.jpg
    35.9 KB · Views: 436
  • IMG_0078.jpg
    IMG_0078.jpg
    24.6 KB · Views: 385
  • IMG_0079.jpg
    IMG_0079.jpg
    40.3 KB · Views: 453
  • IMG_0081.jpg
    IMG_0081.jpg
    41.7 KB · Views: 437
  • IMG_0083.jpg
    IMG_0083.jpg
    33.2 KB · Views: 425
  • IMG_0097.jpg
    IMG_0097.jpg
    53.2 KB · Views: 429
[member=4105]tjbnwi[/member] Tom, thanks for posting this thread!  It's very helpful to me and I'm sure a lot of other people.

But I have to say that the stain grade fix is really amazing.  I can't find it at all in the final picture.  Well done!

Mike A.
 
Mikey f said:
When started to spray i learned quickly a razer blade is my best sand paper!

Ya, the razor blade does a great job but it wouldn't save any of these mistakes.
Tim
 
wptski said:
This is what I have to look forward too?  [scared]

Yes. "Skill is only developed by hours and hours and hours of beating on your craft." - Will Smith

wptski said:
You know, I was going to post the question, if anyone uses a wet film gauge or do I need one!

Yes, you need and need to use a wet film gauge. While it doesn't solve all problems it is a really good guide particularly when you are spraying a new coating.
Tim
 
The only person that never made a mistake never did anything and the sign of a true craftsman is the ability to repair any SNAFU that occurs.
 
Tim Raleigh said:
Yes, you need and need to use a wet film gauge. While it doesn't solve all problems it is a really good guide particularly when you are spraying a new coating.
I assume that you set up a test on scrap wood, etc. first?
 
I love it when you drill the Blum cups on the wrong side of the door you are building...

eb3596d5c170b9301ea222cf6c3cf88d.jpg


Easy enough fix/plug

4f155fc5eeb38262dc68200f4475d0d6.jpg


After the first coat you can still see. 2 coats and it was all gone.

729b99391376c70f6828efe0d1ae8088.jpg


Cheers. Bryan.
 
deepcreek said:
tjbnwi said:
Thanks. Sometimes I get lucky.

I'm still trying to figure out how you pulled off the grain match!

That was the lucky part---the drop off piece had not ended up in the fire pit.

Tom
 
Mikey f said:
Mistakes only make you better. When started to spray i learned quickly a razer blade is my best sand paper! It works great to take out any unwanted texture.

Take a single edge razor blade and draw it (once and only once) backwards over a piece of 1200 grit sand paper, gently bend the blade so the edge that was up is convexed. You now have a micro burr draw scraper to pull across the area of finish that needs correcting.

Look into paint nibs also.

I want to get the small thumb sander Festool markets across the pond, I used to have a pencil sander, can't find it.

Tom
 
tjbnwi said:
Mikey f said:
Mistakes only make you better. When started to spray i learned quickly a razer blade is my best sand paper! It works great to take out any unwanted texture.

Take a single edge razor blade and draw it (once and only once) backwards over a piece of 1200 grit sand paper, gently bend the blade so the edge that was up is convexed. You now have a micro burr draw scraper to pull across the area of finish that needs correcting.

Look into paint nibs also.

I want to get the small thumb sander Festool markets across the pond, I used to have a pencil sander, can't find it.

Tom

Which "thumb sander" are you talking about Tom?  I have the pocket stick fix and it works well, but I have also been eyeing this bad boy for a while. http://www.woodpeck.com/sandingdetailer.html

81471_R.jpg
 
I have the Woodpecker detail sanders, they work well. I also have the Pocket Stick Fix and HGK(?).

Festool calls it a spot sander;
http://www.festool.com.au/WebRoot/S.../Guides/polishing/polishing_out_dust_nibs.pdf

Back when I did custom paints on automobiles there was a sander about the diameter of a pencil eraser. It took dots of Wet R Dry paper, you rolled it between your thumb and forefinger. Loved that thing.

I also have nib files and run blocks.
http://search.eastwood.com/search?w=nib file

All of the above I hope to never use------wishful thinking.

Tom
 
Back
Top