Mismarked
Member
- Joined
- Oct 8, 2014
- Messages
- 139
I’m sure this has been covered previously but couldn’t find any threads. Can anyone suggest a quick and easy way to move some of the holes on the MFT top? Don’t want to enlarge or change their shape. Just move ‘em about a millimeter or so (at most).
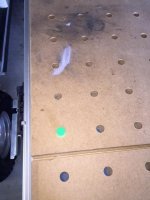
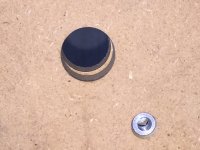
Here is the issue. I just got a replacement MFT top. Never had any Festool stuff till a few months ago. At some point that first weekend, I overlooked the depth stop on the TS55 and cut a 7/8” kerf, which was a little aggressive for the ¾” top. Went almost all the way across, so ended up with a “zero clearance” slot in the edge of the aluminum MFT frame and an MFT top that resembled a ballot with a hanging chad but still pretty solid. Beautiful glue ready cut, though. Very impressed with the blade. After a couple of months, it started to sag in the middle so I ordered the new one. Just picked it up last weekend. Put both pieces of the old one on top of the new one to see how thick of a strip of wood I would need to domino between the two pieces to get it back to normal and use as an extension table top. I lined up the holes in one corner and inserted a Qwas dog, but then noticed that the holes at the far corner were slightly off. Looking down through the holes, I saw a small crescent of the new MFT top underneath instead of just a hole. I have a couple of photos below, one with the dog in one corner, and the other showing one of the holes on the other corner that doesn't line up.
I immediately suspected expansion from humidity because I keep the MFT3 in an open garage near the Texas coast, and some mornings we have fog so thick that it is a little foggy inside the garage. But the edges of the new top and both pieces of the old top seem to line up perfectly, and the dogs also fit nicely in all of the holes, so there doesn’t seem to be any swelling of the MDF. I also suspect that Festool machines the holes with a CNC to the 96mm distance, so I am sure that can’t be it.
The only explanation I could think of was that some of the holes moved. I keep thinking back to my first-ever attempt at hand planing, which happened to be on top of the MFT, and I know that activity isn’t recommended on this site. (Also, I never noticed the leg tightening knobs on the MFT until last weekend, when I removed the original MFT top and saw the knobs hiding underneath. I thought Festool’s moving parts were always green).
Anyway, I used 2 Qwas dogs at the front of the board to hold it in place, used one hand to hold the MFT to try and keep it from wobbling, and the other hand on the tote. After a while of vigorous effort, I got into a rhythmic motion of pulling the table toward me and ramming the plane into the board. Miserable failure. Going to watch some videos and try again at some point.
My best guess is that maybe I got careless with some WD-40 overspray on the MFT top at some point, and when I started hand planing and putting all of that sideways pressure on the Qwas dogs, something suddenly gave, and a lot of the holes slid over just a little.
This gets back to the main question. I finally got the hang of squaring everything with the Qwas dogs, but if the holes are catawampus I can’t really do that with the old MFT top. Don’t want to pitch it in the scrap pile. I have two days left to decide about the new Woodpecker’s MFT square, but even that won’t fix the issue.
Really need to find a way to move the holes back to where they were. As we sit here today, all of the holes are rock solid and won’t budge—even a millimeter.
Any suggestions would be appreciated. I certainly won’t be hand planing on the new MFT top. Learned my lesson.