4nthony
Member
This is my "lipstick on a pig" lower kitchen cabinet refacing project.
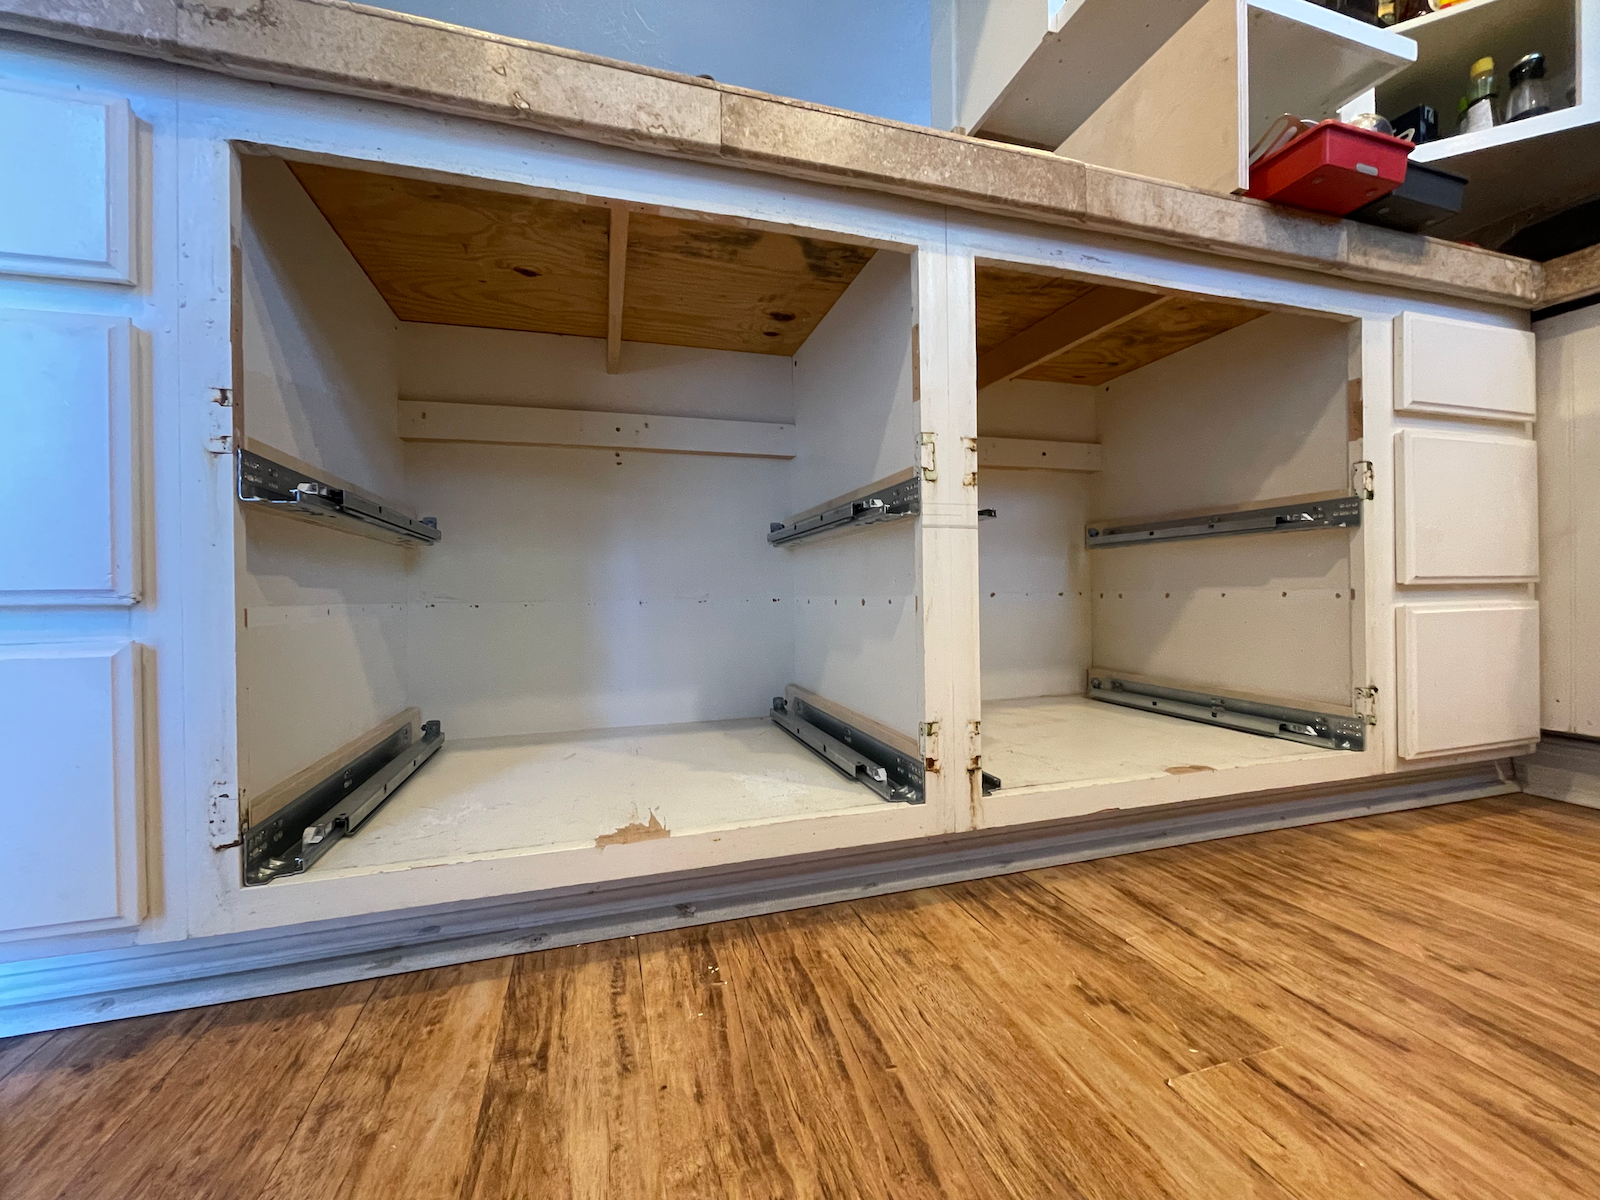
My house was built in 1949 and I'm guessing these cabinets are from the 80s. We moved in last year and struggled with the small drawers and shelves. I wanted to try and make the kitchen a bit more functional so I went about retrofitting new drawers into the existing cabinets.

The shelves and face frame dividers were pulled out, but the face frame around the perimeter was kept as I would be attaching a new aesthetic frame to the existing frame.

Because some of the face frame remained, I needed to shim out the drawer slides.
I wanted large and deep drawer boxes for the two middle cabinets. Drawers are 27" x 21" x 9". I used 5/8" Baltic Birch with 1/2" Baltic Birch for the bottoms.

Simple butt joint construction with Dominos.

The 2 top middle drawers will have a nested drawer for silverware and utensils. 1/2" Baltic Birch sides and bottoms.

At the time, I didn't have a 4mm cutter for my Domino so I used a locking rabbet for the joinery on the nested drawers.

I tested out some different finishes for the drawer boxes (Boiled Linseed Oil, Rubio Natural, Rubio Pure) and opted to go with Rubio Natural since it was less amber than the others.

The drawers on the far right did not clear the range so they only opened about 6". I had to reduce the width of the cabinet to accommodate a narrower drawer. I was able to use a piece of the old face frame as the spacer. How nasty is the green grim that was under the old hinges?

The shim for the drawer slide also had to be wider than the others.


With the middle drawers finished, it was time to make the two drawers for the left cabinet. I was smarter when I ordered this hardware and got the adjustable clips for the Blum slides. I still need to order some for the middle drawers as my gaps are a bit off.

The right side drawer is full-height for cutting boards, etc.

All drawers are in. We lived with it like this for 3-4 months before I started cutting up the panels for the drawer fronts.

On the opposite side live the sink and dishwasher. Same issue here with the cabinet needing a spacer to prevent the drawer from hitting the range. This side is still incomplete as I didn't have enough material to wrap it up.


The old face frames will be visible when the drawers are opened so I need to remove the old paint.

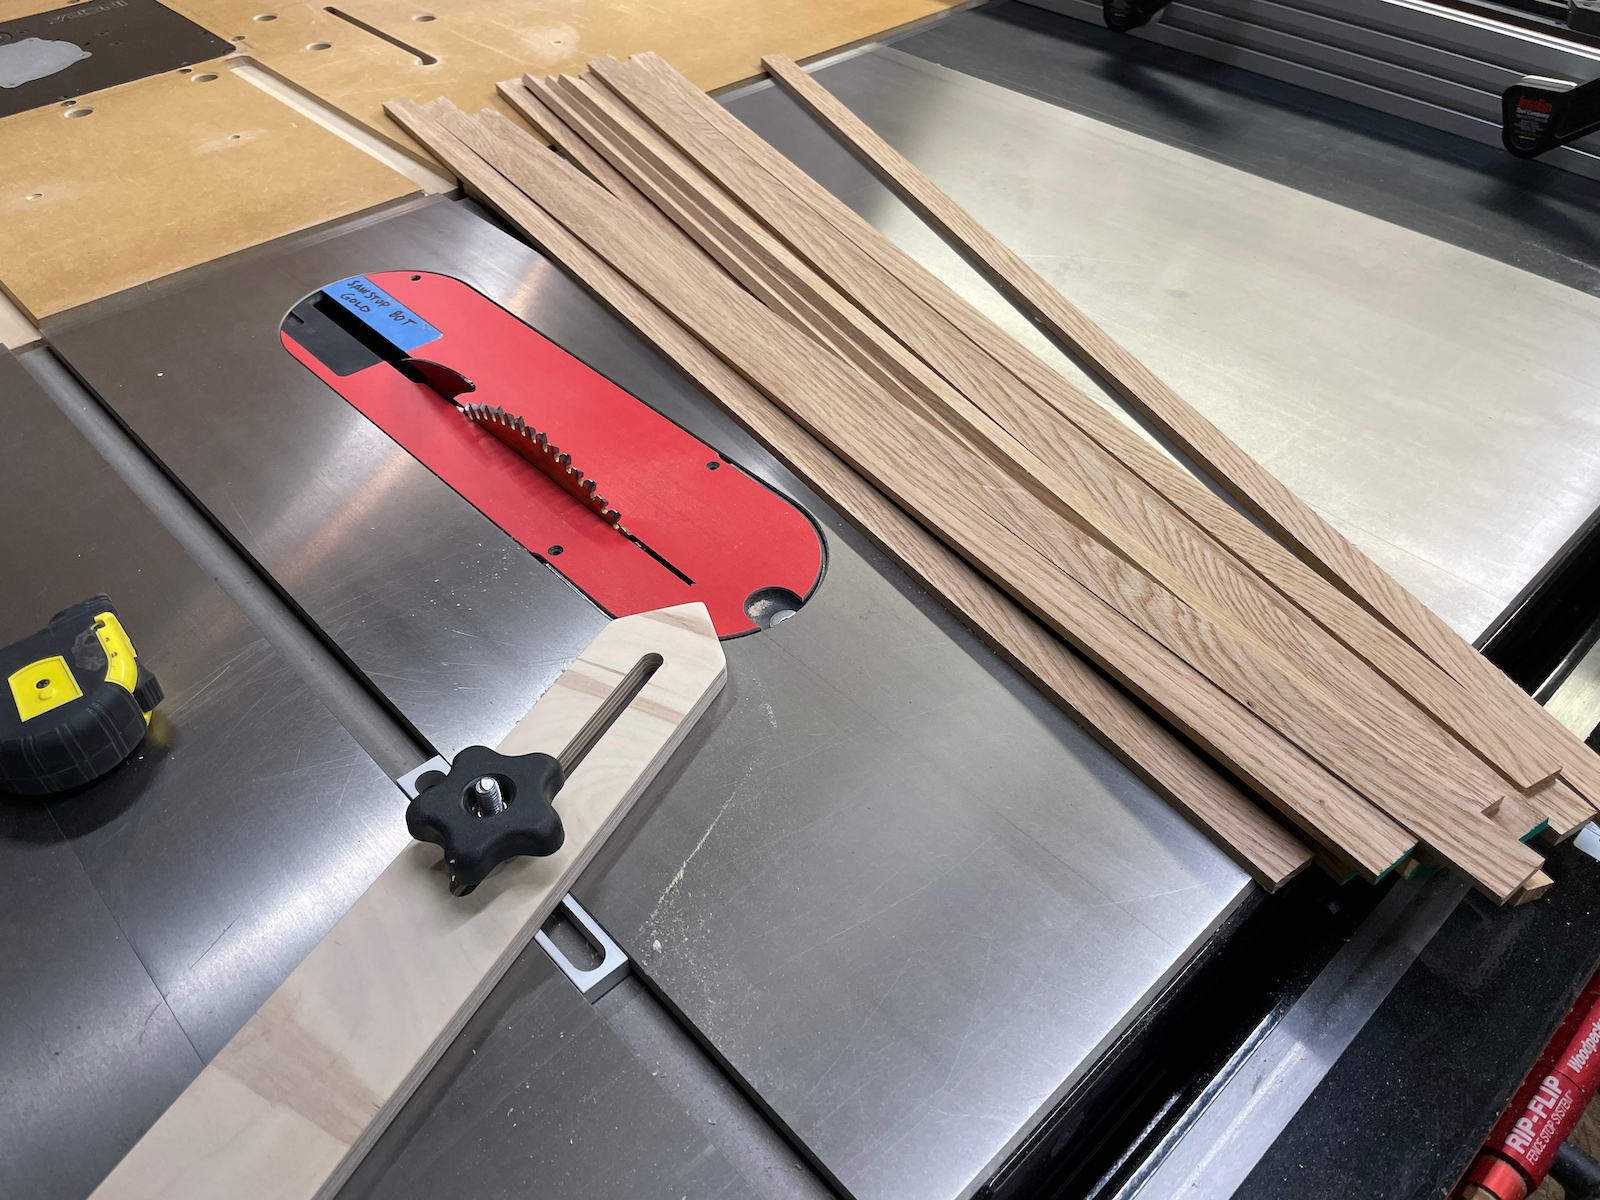
Now it's time for the lipstick. The fronts and new aesthetic face frame and fronts are white oak ply with white oak edge banding. These are the slats that will be vertical and divide the cabinets.

This is why I kept some of the old face frame. I ended up installing the slats using dowels. I thought about using the Domino but decided that trying to hold the Domino in place vertically while plunging would've been too difficult. I drilled holes in the slats, used some dowel pins, then drilled into the old face frames. You can see the paint left in the crease where the cabinets meet. You'd think they'd be plumb but turns out everything was slightly out of square and plumb.

Preparing the panels for the fronts. The countertop and edging was also not square so each top drawer front needed to be cut to the lowest point. If you were to look at the finished fronts from below, you'd see them stair stepping from right to left. I wanted to keep a continuous grain pattern as best as I could from top to bottom and left to right across the cabinets.

Edge banding for the drawer fronts.

The drawer pulls were cut from 6/4 white oak. I used Dominos to attach them to the panels.

Partially finished drawer pull. I went back later and routed a small groove on the bottom to give my fingers a bit more grip.

The location of the pull for the cutting board drawer would dictate the location of the pulls along the other drawer fronts.

Also, the pulls for the top fronts would be recessed into a dado. I used a Kerfmaker for the dado but was struggling getting an accurate dado width in my test cuts. My dados were always about .02mm off. I ended up having to shim my jig for setting the kerf width.

Drawer pull for the bottom flush cut.

Fitting the fronts and the horizontal dividers at the bottom. I was going to leave gaps on the bottom dividers to match the drawer gaps but ended up adding material back to them so they were butted up against the vertical slats.


False top and edge for the cutting board drawer.


The pull fits cleanly under the oven handle.

Dado for the pulls in the top drawers.

Gluing the new dividers to the old face frames. I opted to glue these and finish them in place.


Finish has been applied and the fronts are going on. I used Osmo PolyX Clear Matte but in hindsight I wish I'd used their raw/natural oil to less the amount of amber. Lesson learned.

Getting closer.

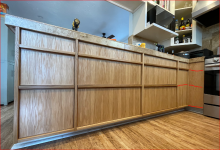
Done.
I think I'm going to pull the cover panel next to the stove and add a horizontal slat to the bottom just to continue the line.

Eventually, the house will get remodeled and the kitchen will be demo'd and relocated elsewhere in the house, but I'm hoping to salvage these and turn them into a built-in in another room. At the very least, the drawers and fronts will be saved and fitted to new carcasses.
This kitchen from Nordiska Kok was the inspiration for my refacing project. I originally planned for the vertical slats to continue to the floor but found that we all kept kicking them so they were removed.

Cheers!
Anthony
Edit: some of you might remember me asking about how to remove the old counters. We decided to just keep them in place for now. They don't look as bad with the new fronts and we didn't want to spend the money on new countertops since they'll be temporary. [cool]
My house was built in 1949 and I'm guessing these cabinets are from the 80s. We moved in last year and struggled with the small drawers and shelves. I wanted to try and make the kitchen a bit more functional so I went about retrofitting new drawers into the existing cabinets.
The shelves and face frame dividers were pulled out, but the face frame around the perimeter was kept as I would be attaching a new aesthetic frame to the existing frame.
Because some of the face frame remained, I needed to shim out the drawer slides.
I wanted large and deep drawer boxes for the two middle cabinets. Drawers are 27" x 21" x 9". I used 5/8" Baltic Birch with 1/2" Baltic Birch for the bottoms.
Simple butt joint construction with Dominos.
The 2 top middle drawers will have a nested drawer for silverware and utensils. 1/2" Baltic Birch sides and bottoms.
At the time, I didn't have a 4mm cutter for my Domino so I used a locking rabbet for the joinery on the nested drawers.
I tested out some different finishes for the drawer boxes (Boiled Linseed Oil, Rubio Natural, Rubio Pure) and opted to go with Rubio Natural since it was less amber than the others.
The drawers on the far right did not clear the range so they only opened about 6". I had to reduce the width of the cabinet to accommodate a narrower drawer. I was able to use a piece of the old face frame as the spacer. How nasty is the green grim that was under the old hinges?
The shim for the drawer slide also had to be wider than the others.
With the middle drawers finished, it was time to make the two drawers for the left cabinet. I was smarter when I ordered this hardware and got the adjustable clips for the Blum slides. I still need to order some for the middle drawers as my gaps are a bit off.
The right side drawer is full-height for cutting boards, etc.
All drawers are in. We lived with it like this for 3-4 months before I started cutting up the panels for the drawer fronts.
On the opposite side live the sink and dishwasher. Same issue here with the cabinet needing a spacer to prevent the drawer from hitting the range. This side is still incomplete as I didn't have enough material to wrap it up.
The old face frames will be visible when the drawers are opened so I need to remove the old paint.
Now it's time for the lipstick. The fronts and new aesthetic face frame and fronts are white oak ply with white oak edge banding. These are the slats that will be vertical and divide the cabinets.
This is why I kept some of the old face frame. I ended up installing the slats using dowels. I thought about using the Domino but decided that trying to hold the Domino in place vertically while plunging would've been too difficult. I drilled holes in the slats, used some dowel pins, then drilled into the old face frames. You can see the paint left in the crease where the cabinets meet. You'd think they'd be plumb but turns out everything was slightly out of square and plumb.
Preparing the panels for the fronts. The countertop and edging was also not square so each top drawer front needed to be cut to the lowest point. If you were to look at the finished fronts from below, you'd see them stair stepping from right to left. I wanted to keep a continuous grain pattern as best as I could from top to bottom and left to right across the cabinets.
Edge banding for the drawer fronts.
The drawer pulls were cut from 6/4 white oak. I used Dominos to attach them to the panels.
Partially finished drawer pull. I went back later and routed a small groove on the bottom to give my fingers a bit more grip.
The location of the pull for the cutting board drawer would dictate the location of the pulls along the other drawer fronts.
Also, the pulls for the top fronts would be recessed into a dado. I used a Kerfmaker for the dado but was struggling getting an accurate dado width in my test cuts. My dados were always about .02mm off. I ended up having to shim my jig for setting the kerf width.
Drawer pull for the bottom flush cut.
Fitting the fronts and the horizontal dividers at the bottom. I was going to leave gaps on the bottom dividers to match the drawer gaps but ended up adding material back to them so they were butted up against the vertical slats.
False top and edge for the cutting board drawer.
The pull fits cleanly under the oven handle.
Dado for the pulls in the top drawers.
Gluing the new dividers to the old face frames. I opted to glue these and finish them in place.
Finish has been applied and the fronts are going on. I used Osmo PolyX Clear Matte but in hindsight I wish I'd used their raw/natural oil to less the amount of amber. Lesson learned.
Getting closer.
Done.
I think I'm going to pull the cover panel next to the stove and add a horizontal slat to the bottom just to continue the line.
Eventually, the house will get remodeled and the kitchen will be demo'd and relocated elsewhere in the house, but I'm hoping to salvage these and turn them into a built-in in another room. At the very least, the drawers and fronts will be saved and fitted to new carcasses.
This kitchen from Nordiska Kok was the inspiration for my refacing project. I originally planned for the vertical slats to continue to the floor but found that we all kept kicking them so they were removed.
Cheers!
Anthony
Edit: some of you might remember me asking about how to remove the old counters. We decided to just keep them in place for now. They don't look as bad with the new fronts and we didn't want to spend the money on new countertops since they'll be temporary. [cool]