Grasshopper
Member
- Joined
- Oct 6, 2014
- Messages
- 595
I have been messing with different ways to make repetitive cuts (both thin strips and larger cuts) on the MFT/3 table. I needed a good way to run the stock from right to left, since I have the CMS-VL on the right, which makes a good infeed table. Also, running stock from right to left places the "keeper" piece under the rail, so you don't have to mess with taking the blade kerf into account.
Here is my method:
-Using QWAS rail dogs, i place the rail to the left side of my MFT
-I draw a cut line on the stock (in this case the strip was to be 2" wide)
-feed the stock from right to left under the guide rail, aligning with the drawn cut line (and squared up with regular QWAS dogs along the top).
-Once you have the cut line exactly where you want it (with the 2" "keeper" piece under the rail, place a couple pieces of scrap that are the same thickness of your stock from left to right on the other side of the rail. Slide these under the rail until they snug up the stock as a stop block. Once you are satisfied the stop blocks are located where they need to be, clamp them in place and you are ready to make some cuts.
Now that you are setup, feed stock from right to left until it butts up with your QWAS dogs up top, and the stop blocks to the left. Cut, rinse and repeat. Using this method, you can crank out repetitive thin or thick parallel cuts (up to about 25" long setup like this, though you could rotate the setup and use the width of the MFT/3 to get longer cuts if needed).
I like this method because when you work right to left, because your keeper piece stays under the rail, so you don't have to fiddle with factoring how the kerf thickness plays in.
See pictures below:
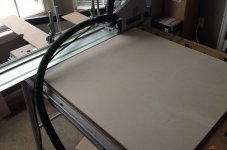
Picture of setup-
[attachimg=1]
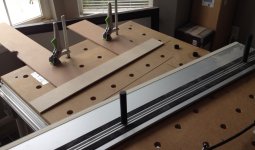
Picture showing rail removed and "keeper" piece that was sitting under the rail, as well as the stop blocks clamped to the right (the "keeper" was 2" x 25", I made 8 strips that were all identical)
[attachimg=2]
Here is my method:
-Using QWAS rail dogs, i place the rail to the left side of my MFT
-I draw a cut line on the stock (in this case the strip was to be 2" wide)
-feed the stock from right to left under the guide rail, aligning with the drawn cut line (and squared up with regular QWAS dogs along the top).
-Once you have the cut line exactly where you want it (with the 2" "keeper" piece under the rail, place a couple pieces of scrap that are the same thickness of your stock from left to right on the other side of the rail. Slide these under the rail until they snug up the stock as a stop block. Once you are satisfied the stop blocks are located where they need to be, clamp them in place and you are ready to make some cuts.
Now that you are setup, feed stock from right to left until it butts up with your QWAS dogs up top, and the stop blocks to the left. Cut, rinse and repeat. Using this method, you can crank out repetitive thin or thick parallel cuts (up to about 25" long setup like this, though you could rotate the setup and use the width of the MFT/3 to get longer cuts if needed).
I like this method because when you work right to left, because your keeper piece stays under the rail, so you don't have to fiddle with factoring how the kerf thickness plays in.
See pictures below:
Picture of setup-
[attachimg=1]
Picture showing rail removed and "keeper" piece that was sitting under the rail, as well as the stop blocks clamped to the right (the "keeper" was 2" x 25", I made 8 strips that were all identical)
[attachimg=2]