My first project - Island Build - THANK YOU FOG FOR THE HELP!

Grasshopper

Member
Joined
Oct 6, 2014
Messages
595
I wanted to say a big THANK YOU to the FOG.

I'm feeling pretty grateful to have found the FOG, and consider myself lucky to have done so.

Where else is it possible, for a total newbie... who hadn't previously built even a birdhouse, to turn for expert advice on techniques and tools to make some pretty cool stuff.

I am blown away at the support and fellowship that is had here at the FOG, and can honestly say I couldn't have done what I had done without you!!!

OK, so you may have seen my initial plans and questions for my island build here: http://festoolownersgroup.com/home-improvement-other-projects/need-help-planning-kitchen-island-build-(calling-all-fogers)/msg355220/#msg355220

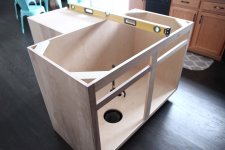
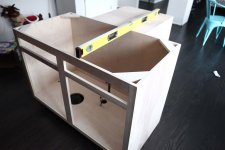
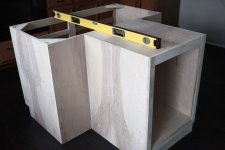
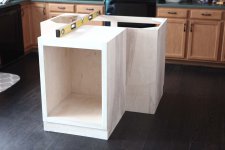
I wanted to provide an update here (should have done build pics as well).  This is my first project ever.

The base is now in place and I'm pleased with the results.  No hardware in the construction, all joinery via 6x40mm dominos.

I still need to install finished panels and figure out how to finish the inside (suggestions welcome.  Should I just add some clear coat poly, or leave the raw wood on the inside…{birch ply})

a HUGE thank you to all those who helped me either via the forum or off the forum via email, PM, etc:

[attachimg=1]

[attachimg=2]

[attachimg=3]

[attachimg=4]


Attachments

  • Island 1.jpg
    Island 1.jpg
    261.2 KB · Views: 1,312
  • Island2.jpg
    Island2.jpg
    241.1 KB · Views: 1,267
  • island3.jpg
    island3.jpg
    237 KB · Views: 1,256
  • island4.jpg
    island4.jpg
    238.1 KB · Views: 1,277
That's your first project?  WOW.  Can't wait to see images of the future progress and then the finished project.

Great job!

Peter
 
Thank you Peter.  It wouldn't have been possible without help from the FOG!

More pics to come. 

Peter Halle said:
That's your first project?  WOW.  Can't wait to see images of the future progress and then the finished project.

Great job!

Peter
 
Grasshopper, Your doing a great job and I can imagine that your wife while not quite understanding the time element is pretty proud of your achievements.  I went through and did an addition and a complete remodel of the house to justify my tool purchases and my wife is totally pleased with the results.  Unlike most people we have lived in this house since 1969 and the major redesign was started in 1984.  Today I'm still building custom pieces of furniture to replace budget driven purchases from earlier in our marriage and I just finished telling my two granddaughters that the Brazilian Rosewood dining table we used at Christmas dinner would belong to either one of them someday.

I'm looking forward to seeing the completed kitchen island project.

Jack
 
You put my first project to shame. Of course I didn't have any Festool at the time...but I still don't think mine would have been as nice as yours.

Good job, grasshopper!
 
Very nice start.  I would finish the inside of the cabinet.  I like wipe on poly, goes a long way, and will help protect the plywood.
 
Billedis said:
Very nice start.  I would finish the inside of the cabinet.  I like wipe on poly, goes a long way, and will help protect the plywood.

Agreed. Always finish both sides of your project to prevent warpage and joint failure. The inside doesn't have to be as 'perfect' as the outside, but the number of layers of finish should be similar.

Perhaps you've done this and it just isn't apparent?
 
I think you've dome a great job, especially considering this is your first ever project!!!  Well done!  What's next?

Gary
 
Young Grasshopper

much respect. first project looks like a clear road to a bright future.

nice job and show us the finished project.

 
Next time buy some prefinished ply in the end it is cheaper after you ad the refinishing materials.

I bought a house where they refinished the interior carcasses with white paint and now love the look. They just look so clean when opened up vs the wood that gets dark.

I would run a board perpendicular across the face frame at the top and again perp to under the drawer opening. They tend to flex and also adds support for that heavy counter if you use granite. Most counter co's screw down plywood and need something to screw to.

Nice job!!
 
Thank you all for your comments!  I'm excited to finish my first project and start planning the next ones!

jacko9 said:
Grasshopper, Your doing a great job and I can imagine that your wife while not quite understanding the time element is pretty proud of your achievements.
Jack

Jack, you have channeled my wife to a tee!  She's super cool and excited for more (being very patient with a long list of honey-do's).

NEW2FES said:
I would run a board perpendicular across the face frame at the top and again perp to under the drawer opening. They tend to flex and also adds support for that heavy counter if you use granite. Most counter co's screw down plywood and need something to screw to.

Nice job!!

Thank you New2fes.  I had planned on running stretchers in the larger cabinet, but after i measured the gas range that will fit inside, I didn't have the room (it would have needed to be a 1" x 3/4" stretcher in the front).  I won't have drawers in the main cab, just false panels in the front as the cooktop will be recessed from the top.

tiki man said:
Young Grasshopper

much respect. first project looks like a clear road to a bright future.

nice job and show us the finished project.

Thanks tiki man!  I have painters scheduled for early January, so hopefully finished pix will come soon. (I'd learn to paint them myself, but a friend with a cabinet painting business owes me so it will be free.)

Baremeg55 said:
I think you've dome a great job, especially considering this is your first ever project!!!  Well done!  What's next?

Gary

Thank you Gary.  Next on the list is crown molding on top of my kitchen cabinets, which will be painted white (i cheated and ordered custom doors, so those come on as well, but I can't take any credit for those).  This will be done in a week or so (hopefully).

Following the kitchen, I have a pair of window seats I want to build in our living room.

After that, new baseboard, trim, casings, plinth blocks and decorative "craftsman style" headers throughout the house (I committed myself by tearing out all the trim already, so there is no turning back  ;).

Finally, I have a built in I need to design and build for my office, and the kids playroom.  Whew…  I'm tired just thinking about all of that  [big grin]

Don T said:
Those turned out great. You are obviously a quick study.

Thanks Don T.  I sincerely am super grateful for the help from the FOG.  The help from former strangers (now friends), combined with the precision of Festool is a powerful combo.  I'm a big believer that anything is possible with the right combo. 

wow said:
Billedis said:
Very nice start.  I would finish the inside of the cabinet.  I like wipe on poly, goes a long way, and will help protect the plywood.

Agreed. Always finish both sides of your project to prevent warpage and joint failure. The inside doesn't have to be as 'perfect' as the outside, but the number of layers of finish should be similar.

Perhaps you've done this and it just isn't apparent?

Great tips from Wow and Billedis.  I am having the outside painted white, but will look into wipe on poly for the inside. Is there a brand you recommend?
 
If you're painting the outside white, why not do the inside as well? I like white cabinet interiors - it makes it much easier to see what's in there in daylight, and you can light it with a small LED light for other times.

I got a bunch of these for FREE at Harbor Freight with coupons, and modified them with a micro-switch to turn on when you open the cabinet door:

[attachthumb=1]

The mod is really simple but you do need a soldering iron. There is a magnet on the back of the light, so I just attached a large thin washer (fender washer) where I wanted them mounted and let the magnet hold it in place. It also makes it easy when it comes time to replace the batteries.

Speaking of batteries, I replaced the Harbor Freight batteries with some high quality ones (mostly so they wouldn't leak) and haven't had to replace any of them because they are on so seldom. Even if you leave the cabinet door open for a while by accident, I'd guess they'd last months or years without replacement.
 

Attachments

  • image_14142.jpg
    image_14142.jpg
    156.9 KB · Views: 147
Excellent job. I still have my first woodworking project in our guest bedroom - I still look at it occasionally and admire how it started my passion for working with wood. Your project is quite amazing for a first try. Have fun with it.
 
This Island looks great.  You are doing well being your first project.  I had read your previous thread when you were planning,  perhaps I missed it but did you decide how you are going to attach your finished side panels and how they are going to meet up with your faceframes?  I remember you were wanting a "seemless look".
 
Thanks NFK.  I ended up running the face frame flush with the sides by attaching with the Domino.  It is flush to the touch and really made me a believer in the Domino for flush joints.

I got the Domino as a "luxury item", now you will have to pry it out of my cold dead hands.

nfk said:
This Island looks great.  You are doing well being your first project.  I had read your previous thread when you were planning,  perhaps I missed it but did you decide how you are going to attach your finished side panels and how they are going to meet up with your faceframes?  I remember you were wanting a "seemless look".
 
Grasshopper said:
Thanks NFK.  I ended up running the face frame flush with the sides by attaching with the Domino.  It is flush to the touch and really made me a believer in the Domino for flush joints.

I got the Domino as a "luxury item", now you will have to pry it out of my cold dead hands.

nfk said:
This Island looks great.  You are doing well being your first project.  I had read your previous thread when you were planning,  perhaps I missed it but did you decide how you are going to attach your finished side panels and how they are going to meet up with your faceframes?  I remember you were wanting a "seemless look".
I was thinking you were having some raised panel sides made that will match your doors?  Maybe I misread something in your other thread.  If you are, I was wondering how those are going to meet up with your face frames.
 
You are correct. I opted to just have the finished panels proud of the face frames so they match the rest of the kitchen when it's all done.

If I were redoing the rest of the cabinets, I'd have made the panels flush.

nfk said:
Grasshopper said:
Thanks NFK.  I ended up running the face frame flush with the sides by attaching with the Domino.  It is flush to the touch and really made me a believer in the Domino for flush joints.

I got the Domino as a "luxury item", now you will have to pry it out of my cold dead hands.

nfk said:
This Island looks great.  You are doing well being your first project.  I had read your previous thread when you were planning,  perhaps I missed it but did you decide how you are going to attach your finished side panels and how they are going to meet up with your faceframes?  I remember you were wanting a "seemless look".
I was thinking you were having some raised panel sides made that will match your doors?  Maybe I misread something in your other thread.  If you are, I was wondering how those are going to meet up with your face frames.
 
Back
Top