My first project

Mario Turcot

Member
Joined
Nov 26, 2017
Messages
1,288
I built a small shop (20'x20') last summer and I am ready to tackle my first project.

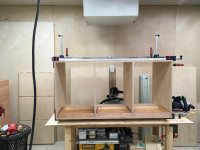
I am making a Kapex stand similar to the one Dave Stanton (thanks for the inspiration Dave) have in his shop. I will post picture during the process, if I can find out how  [blink].

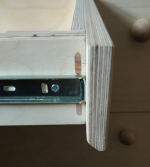
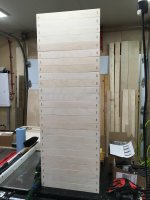
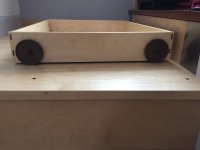
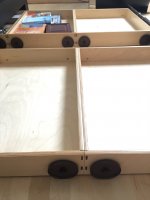
Last night I cut out the parts for the Systainers drawers (25). The sides, front and back are 50mm (2") in height I made a 6mm dado at the bottom to slide the bottom part. The systainers will fit snuggly in the drawers.

I need your advice for assembly. I am not comfortable enough to use drawers lock joint or any other fancy joinery type yet. Should I use dominos or pocket hole?

I thought about Dominos because it would make me learn that tool (purchased a few weeks ago) in the process.

Your thought!

Mario
 
Domino...definitely

Photo 1 = storage boxes for upstairs storage.

Photo 2 = under-bed storage boxes.
 

Attachments

  • 1351.JPG
    1351.JPG
    1.5 MB · Views: 714
  • 3106.JPG
    3106.JPG
    1.1 MB · Views: 614
Thanks for your reply, that's what I thought Domino all the way.

[member=44099]Cheese[/member] ole macaroni, this is nifty. Where do you got those little wheels from?
 
Mario Turcot said:
Where do you got those little wheels from?

Those are referred to as bed box wheels. They used to be sold by everyone, everywhere. Then Hafele quit selling them and everyone followed suit...weird. Those were the last 10 sets that I purchased from Woodcraft about 3-4 years ago. I made a phone call and they commandeered the last ones available from 3 different stores in 3 different states.

This next photo shows storage boxes in the shop. Each one holds 15-20# of equipment. Tightbond III and Dominos only, everything is still solid after 6-7 years of pulling them down and then returning them to their location.
 

Attachments

  • 4895.JPG
    4895.JPG
    1.8 MB · Views: 556
Very nice. Are the tenons made of walnut?

What size/ratio you use. Say my wood is 15mm thick, would you go with 6mm or 8mm?
 
Since you have the Domino, then definitely use the Domino to do the drawers. It's a good starter project for the Domino to learn the ins and outs, and low risk if you get something wrong.

If you haven't seen it already, do a search for "domi drawers" or "domino drawers" and you will see some more examples where the domino shows through rather than being concealed. I tried this for the first time two weeks ago and below is a picture that I took at the time.

Rather than do it in 2 stages I tried a method where I glued and pinned the box together, did a single plunge all the way through both pieces, glued/inserted the domino, then trimmed off the excess.

[attachimg=1]
 

Attachments

  • 12-01-2018 1-19-59 PM.png
    12-01-2018 1-19-59 PM.png
    548.4 KB · Views: 2,076
eddomak said:
Since you have the Domino, then definitely use the Domino to do the drawers. It's a good starter project for the Domino to learn the ins and outs, and low risk if you get something wrong.

If you haven't seen it already, do a search for "domi drawers" or "domino drawers" and you will see some more examples where the domino shows through rather than being concealed. I tried this for the first time two weeks ago and below is a picture that I took at the time.

Rather than do it in 2 stages I tried a method where I glued and pinned the box together, did a single plunge all the way through both pieces, glued/inserted the domino, then trimmed off the excess.

This is what I am looking for. Thanks for the tip
 
Mario Turcot said:
Very nice. Are the tenons made of walnut?

What size/ratio you use. Say my wood is 15mm thick, would you go with 6mm or 8mm?

The tenons are standard Festool Sipo. I used 5mm Dominos in 1/2" thick material.

I also made a jig that held 2 of the sides in position so that I could plunge through both sides at the same time. That eliminates any DF placement & registration issues. So just mount the sides to the fixture 2 at a time, label the sides so you know how they pair up, plunge the mortises and when all 4 sides have been mortised, then do the final assembly/glue-up.

As already mentioned, I'd use 6mm Dominos.
 
Cheese said:
The tenons are standard Festool Sipo. I used 5mm Dominos in 1/2" thick material.

I also made a jig that held 2 of the sides in position so that I could plunge through both sides at the same time. That eliminates any DF placement & registration issues. So just mount the sides to the fixture 2 at a time, label the sides so you know how they pair up, plunge the mortises and when all 4 sides have been mortised, then do the final assembly/glue-up.

As already mentioned, I'd use 6mm Dominos.

Care to share a picture of your jig?

Right now I don't have a MFT or a real bench to clamp so I am really limited in that area. Any particular reason you are using sipo for drawers?
 
Mario Turcot said:
Care to share a picture of your jig?

Any particular reason you are using sipo for drawers?

I looked for the jig...I must have trashed it.  [sad]  It was just 2 pieces of 3/4” ply secured at right angles with Dominos (what else) and Destaco clamps were mounted to secure the drawer sides. I clamped it to the drill press table so that the vertical leg of the jig could hang off the edge. A long wood guide was attached to both of the legs of the jig so that the drawer sides were always properly aligned. I also had side stops for the DF 500 so that both mortises were always in the same relative location. If the jig shows up, I’ll post a photo.

I used Sipo for the contrast...that’s all.
 
I think I got it! I will make one for sure because I have 25 drawers waiting  [eek]

Your jig something like that
 
Quick update, I made drawers first since I figure it was going to be the most tedious part. There we go 25 drawers ready to get a nice finish. I am very happy how accurate it turns out, especially on that scale. I never been able to get something that accurate before.


Attachments

  • drawers.jpg
    drawers.jpg
    1.1 MB · Views: 515
Nice...that's a lot of drawers. [tongue]

We'd be interested in seeing photos of the final project when it's finished.  [big grin]
 
That is indeed a lot of drawers - I guess you're a master of this technique now.  [big grin] Well done!

(and like the others, I would love to see any photos you can post later in the project).

 
Will do.

This weekend I am fixing the bottom drawers, some finishing and slides. I should work on the carcass as well :)
 
while applying Danish Oil on the drawers I realized how small is the shop  [blink] I cannot do anything but wait for that step to be done  >:(

Hope to cut and put together the cabinets carcass by the end of the weekend. At that point I should have some pictures to show off  [big grin]

Each cabinet will have three hubs for systainer drawers. Here my planning for the carcass, please let me know if I am going in the right direction or if I omit anything;

- Rabbet for 12mm back
- Rabbet on each ends and dados for hubs separators 18mm
- Dominos joinery 8mm
- 4 inches toekick with integrated adjustable glides

01s0810s2.jpg

LeeValley Glides
 
Took a long time but here a picture of the first cabinet carcass. This is a dry fit and I am pleased with the result. I still have to make the dominos and some work with the LR32 rail.
 

Attachments

  • dryfit.jpg
    dryfit.jpg
    1,021.4 KB · Views: 420
Back
Top