My Home Made MFT Storage Island

jbasen

Member
Joined
Jan 27, 2013
Messages
740
My first post, be gentle  [smile]

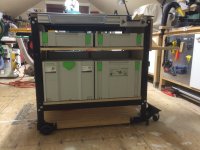
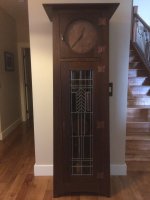
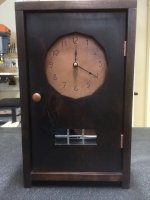
Shown here is my version of a homemade MFT/Storage Island.  My shop is located in a 2nd floor bonus room in my house so everything is on mobile bases including this MFT, table saw, band saw, drill press, joiner, and more.  This allows me to optimize usage of the small space.  In addition to woodworking I also do copper smithing, stained glass , and enameling so the space is very multifunctional.  I include these elements into the arts and crafts style furniture I build.

The steel frame for the MFT is from Rockler and the mobile base is available from Grizzly, Woodcraft, and others.  The extrusions around the top of the MFT are from 8020.  All the shelves are on pins so they can be adjusted over time as my choice of tools to store in the MFT may change over time. 

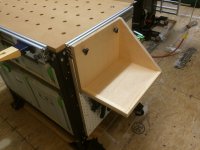
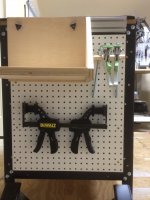
The clamping elements are kept from falling out of their mounting holes on one side of the MFT by magnets behind the mounting holes.  I’ve built a number of accessories that mount on the 8020 extrusions.  Some of the ideas I’ve taken from other posts and some of them I came up with myself.  These include:

• Walmart wire basket
• Crows foot for sawing fine metalwork
• Shelf for landing power tools during use, such as a sander
• Outlets for plugging in tools
• Magnetic tool holder
• Aluminum angle irons for clamping along as a backer for doing stained glass work

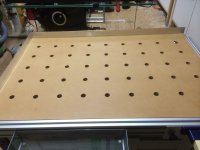
I also have cut a woodcraft floor mat to fit the top to give me a work surface without holes when I need it. 
I don’t use the MFT for sawing so it wasn’t critical to me that the holes in the top were perfectly aligned.  I do most of my sawing on a table saw or sliding compound miter saw.  I use my TS55 for cutting sheet goods, mostly down in my garage. 

I've attached 7 pictures to this post.  Hopefully they show properly


Attachments

  • P1.JPG
    P1.JPG
    1.9 MB · Views: 2,530
  • P7.JPG
    P7.JPG
    1.8 MB · Views: 1,161
  • P6.JPG
    P6.JPG
    1.7 MB · Views: 3,796
  • P5.JPG
    P5.JPG
    1.6 MB · Views: 1,407
  • P4.JPG
    P4.JPG
    1.6 MB · Views: 1,285
  • P3.JPG
    P3.JPG
    1.5 MB · Views: 2,069
  • P2.JPG
    P2.JPG
    2.1 MB · Views: 1,941
First let say  [welcome] to FOG, you will like it here and share much information with others.
Now let me say what a fantastic setup you have designed for your shop.i really like it a lot and might want to copy it for myself down the line

Sal
 
can you give me a link on that mobile base that you have in your Pix .

Pretty Sweet set-up you've done there , I'm impressed Big Time .
That's how I want my shop redo to be mobile & flexible  
I was trying to figure out a mobile island system I need 2 of them as for work stations & then to support a long wide MFT top that I can put away when needed & still have stations to work off .
I think you just have given  me a way to achieve what I was looking for .
 
Thanks all!

Based on the post I read earlier, since I haven't posted 5 times I can't include a link to the mobile base.  Given that you'll have to go the Grizzly web site and look for "D3757 Woodstock Universal Mobile Base".  It is on sale right now for $55. 

I've used this base for the MFT, band saw, and jointer.  It works very well.  You just add a piece of 3/4" plywood cut to the size of the base of your tool and you are done.  It works very well.  Bench top tools like my sliding compound miter saw (sorry it's not a Kapex  [smile])  sit on wheeled carts from Harbor Freight and get shoved in a corner until I need them. 

Let me know if you need any further info.

Thanks again

Jay
 
I like all the ideas you rolled together; looking to the right of the unit, I see you like magnets for many shop items!

I'm actually more interested in seeing more photos of your projects since you incorporate different media. Always interesting to see!
 
Well done and welcome, looking forward to more of your posts.

Where is your shop located? In the first pic the sloped ceilings and window frame of an attic space are visible.
If it is a top floor how did you get the equipment up there?
 
Nice design.  What was the source of the black angle iron you used?  Looks like a standard workbench set of legs.

Welcome to FOG -

neil
 
Thanks again for all the nice comments.  I'll try an answer a few of the questions in one post.

The steel frame is from Rockler; it is part #48089.

I do use magnets around the shop.  I have quite a few table saw accessories that magnetically attach to the cast iron top of the saw and I store them in easy reach to the right of my saw.  I simply glued a piece of steel sheet to the door of a storage cabinet and they just "stick" there.

My shop is located in a bonus room above the garage on the second floor of my house.  You are correct, getting heavy tools up there is a challenge.  I've simply found if you disassemble things enough, they are typically light enough for 2 people to carry.  This is even the case for my table saw.  Once the cast iron top was completely removed, the base could be carried up by myself and a neighbor.  The 3 pieces of the top were light enough that I could carry each of them up alone.  Fortunately, the doorways and stairs in my house are fairly wide. 

The house was a "spec home" that was about 80% complete when my wife and I purchased it.  I was able to get a few things customized in the shop by the builder.  First we left the floor bare.  The wood flooring that should have been installed is sitting in my garage.  Second I had two 220v circuits installed.

Here are a few pictures of my work.  The first is a tall case clock.  The face is hammered copper with chased numbers and decoration.  The weight covers are also hammered copper with chased decoration.  Pendulum bob and hinge plates are also hammered copper.  The leaded glass is an antique that I customized to fit the door.

The Stickley mantle clock has a hammered and chased copper face along with a hammered copper pendulum bob.  There is a small glass window in front of the bob that is done in leaded copper foil. 

I also included 2 pictures of inlays I incorporated into a pair of A&C style dressers.  The inlays are done with malachite and copper.

Thanks for your interest
 

Attachments

  • Clock 1.JPG
    Clock 1.JPG
    1.8 MB · Views: 580
  • Clock 2.JPG
    Clock 2.JPG
    1.8 MB · Views: 542
  • Inlay 1.JPG
    Inlay 1.JPG
    2.6 MB · Views: 538
  • Inlay 2.JPG
    Inlay 2.JPG
    2.4 MB · Views: 518
I forgot to mention one other use for a magnet.  I have a rare earth magnet stuck to the metal frame on the MFT.  It is powerful enough that it will hold a tape measure by the metal belt clip.  Makes it really easy to grab the tape measure and then stick it back out of the way. 

Hope this helps

Jay
 
Thanks for the project photos! Very nice inlays. Wish the clock photo was clearer to see the pounded copper better.

I do the same, I have several tape measures with a rare earth magnet epoxied to the back. Stick one to the tablesaw fence because otherwise the little time I can get in there is spent hunting that *$&% thing down.
 
Here is a slightly better picture of the face on the tall case clock.  I've thought about going back and highlight the chasing in black the same way as I did on the stickley mantle clock.  But for now, I'm just happy with it the way it is.  I've taken a series of classes up at the Roycroft Campus in East Aurora, NY.  They have some very talented artisans there.  The copper wight covers have the same rose motif as I used on the face.

Thanks

Jay
 

Attachments

  • Clock Face.JPG
    Clock Face.JPG
    1.7 MB · Views: 474
Nice work!

I like the non-graphic clock face a lot. Maybe it could stand a little more contrast.
Maybe just wipe on an oil based stain and remove it all except a trace in the grooves.
I'd use a light stain like cherry since the thickness of the stain in the grooves would be much darker than a thin film.
 
Thanks

The stain is an interesting idea.  It is my understanding that Stickley used wax to highlight the numbers on their clock faces.  I would probably want to prototype how the stain worked.  This is not my full-time job.  I built the clock a few years back and  it took me 7 months of evenings and weekends from start to finish.  At this point I'm going to be careful making changes  [smile] 

 
Wax would be better than stain and easier to test and clean off until you get it right.
Just mix a little dry pigment in with a bit of wax and rub it in.
 
For the clock face contrast use engravers ink (Black and permanent) and a repediograph which can disburse the ink into tthe fine lines you have formed in the copper. Very nice work by the way!
 
Thanks.  That is essentially what I did for the Stickley mantle clock.  The only difference being that I inked the numbers after chasing them with an ultra fine point sharpie instead of using a repediograph.
 
Back
Top