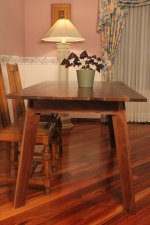
My lumber is not long enough for my table top!

oliverweagle

Member
Joined
Dec 17, 2019
Messages
4
Dang.  I’m working with some 8/4 white oak, 5” wide and the boards are about 4’6 long.  I would like to make a table top - farmhouse style - that is 7 foot long - some genius (me)  failed to account for proper seating and table leg distances before adding the breadboard ends:( I am wondering if I could use  my domino 500 and make an end grain to end grain butt joint, or perhaps consider a half lap joint - or maybe something else entirely?  The table will be 30” or so wide so I’m anticipating using 6 Or 7 boards which will be edge joined using dominos and was thinking about alternating the long and short boards.

If anyone has a suggestion to help me save this project it will certainly be well received!

Thank you!
 
Has the top been glued up into a panel, or you still have separate boards?
For end grain to end grain v-type finger joint this is the best:https://www.amazon.com/FINGER-JOINT-BIT/dp/B001DT4S8C
Make sure to do it on boards already milled to thickness for tight and crispy seams on the faces. Practice on scraps, as bit height adjustment could be fiddly. Once you have the length you need, stagger the boards in the panel randomly (just like hardwood flooring).

Or make two parts extension table  [big grin]
 
I am a firm believer in accentuating stuff like this. Maybe a dovetail or bow tie or something doing the butt joint. Call it out in the workpiece.

Always a way my friend. Always.

Cheers. Bryan.

Sent from my iPhone using Tapatalk
 
some other options for you, depending on how much material you have.

54 inch long center section with 15 inch (3 board) breadboard ends on each end

5 inch bread board end on each end and one in the middle. So now you have 5 inch breadboard then a glued up panel of whatever length another 5 inch across the ends then another glued up panel then a 5 inch breadboard end. that could make a table 10 feet long  [eek] if you kept the longer lengths

Ron

 
Thank you for your replies!

Svar - I still have separate boards

Bryan - sounds beautiful - and ambitious and a perfect opportunity for me to learn something new.  It's the visibility I'm concerned about!

Ron - very interesting! If I went with the 3 Board breadboard ends, I take it that this is composed of the 3 boards which are edge-glued together forming let's call them "breadboard panels" - which are then joined to the center panel with domino / mortise/tenon/ or tongue and groove?

 
I don't think you will be happy with a 30" wide table.  For my take, the proportional width for a 7' long table should be in the range of 38" to 42".

I think domino the end butt joint.  With staggered joints, the adjacent boards will provide stability for the joint.  Clamping the butt joint would require some creativity.  Then, maybe cut a small v-groove in the joint after the glue has cured.  The v-groove detail could be repeated at the breadboard joint for some continuity.
 
Thinking about this more. I have an alternative that I like better. Personally I don't like the way that these blended table tops look. I much prefer the look of full length rails.

So my suggestion is if you are going to expend a lot of energy on this thing then do it properly from the beginning. So,  get the number of boards you need in the proper length and save the shorter stuff for another project or the breadboard ends of the table. A serving table, some night stands a desk etc.

A 30 inch wide table is doable (I've actually got one but it's only 72 inches long.) It fits in a narrow space and anything wider wouldn't fit. BUT 36 or 42 wide makes for a nicer table for serving and sitting.

Ron

 
+1 on building things as designed even when that entails another trip to the wood store, particularly if the table is going to be front and center in your home. 

Most my “make do with what I’ve got on hand” projects turn into headaches at some point.  Some look real nice and others are flawed.
 
Thank you everybody.    I'm going to build the tabletop using the lumber as purchased - it will just be a little smaller than anticipated and will live outside following the Matt Cremona finishing with CPES and Epiphanes, seated on symmetry hardware table legs.  Will be a splendid addition  :)

Thank you again,

Matthew
 
If you’ve got reasonably good grain matches then could consider horizontal scarf joints to create longer boards, then alternate the joints to either end of the table. You will see the joins in the table top but if the grain is similar it will look good, and you won’t have a solid line across the whole top.

If you use a low angle, say 10 degrees for the scarf the joint will be super strong as its effectively a long grain joint.

Sent from my iPhone using Tapatalk
 
oliverweagle said:
Thank you everybody.    I'm going to build the tabletop using the lumber as purchased -
Matthew

Late in the game as you've decided to make do with what's on hand, which is, of course, not wrong.

But if I were in your situation, I'd only consider one of these two options:

1) Start with the proper length of stock as some others have advised. Not only does it mean meeting the original spec., but it also means less work.

2) Another (less desirable) alternative is to introduce a middle leaf to make the final table longer as planned.

I match grains for appearance and for the purpose of handplaning (in that order of priority). In other words, as long as the boards look good in their composition and, secondarily, the grains run in the same direction, I'm fine. Whether the grains alternate or not is not important to me. 
 

Attachments

  • farm style.jpg
    farm style.jpg
    626.1 KB · Views: 338
AWESOME!  I'm looking forward to getting past the planning stage as my Hammer A3-31 arrives in a couple of weeks and am so inspired by the pictures and posts on this forum.  I sincerely appreciate your knowledge and advice.  This is a very exciting time. 
 
it will just be a little smaller than anticipated and will live outside following the Matt Cremona finishing with CPES and Epiphanes, seated on symmetry hardware table legs. 

I would do a lot more research on outdoor finishes since you mention this in your last comment. Perhaps search the Wood Whisper for the 2 disasters he had with using similar outdoor finishes that only lasted a short time before failure. Whatever you do don't use that Titebond 3 crap if it lives outdoors. Good luck with your project it will be a great learning experience.
 
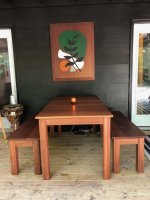
I just built a table and two benches. The client had dimensions in mind, but the width had to be enough so that two seated adults, across the table from one another, would not bump knees or feet.

Also, wide enough that the benches could slide under the table when not in use.
 
Re Titebond 3, my 10 Ipe benches have been in the woods for many years and are still solidly glued together with TB3. I did use solvent in the mortises before gluing in the Domino tenons.
 
Birdhunter have those pieces ever lived in full exposure to direct sun, rain and snow year round? From the pic it looks like a large covered area like a porch with limited direct exposure. Also what is the finish?
 
The table and benches are under a roof, but outside.

The wood is Sapiel (not sure about spelling). It's supposed to be a good outdoor wood. I built the table with the boards running across the short dimension. The benches have the boards running the long dimension. I used Z-clamps to attach the table top and the bench tops to their frames to accommodate movement.

My first finish was Epifanes applied with a foam brush. It was goopy and never flattened. I went by the manufacturer's guidelines on thinning, but I probably should have thinned it a lot more.

I sanded the Epifanes off and applied Enduro-Var Satin. I think about 4 coats. I sanded with 220 paper after the first 3 coats. It came out a bit shiny, but my clients loved it.

 
Back
Top