Need 80/20 advice

TealaG

Member
Joined
Dec 20, 2015
Messages
115
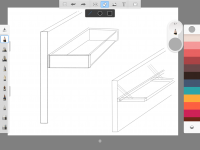
HI...Please see pdf below.  I want to build a simple rectangular frame above the windows in my sewing room.  The purpose is to provide a means of hanging an adjustable height LED light and to support the edges of a quilt being quilted.  I wanted to use "t-track" so that I can adjust the position of my accessories easily.    I built the light idea on my weaving loom and it worked out very well and so I want to add the same thing to my sewing area.  However, I don't have the benefit of the wood structure that the loom had. 

Part of the issue is that I put up a temporary light which clips to the table.  It's ALWAYS in the way because of the vertical support clipped to the table  Plus, I needed a means of hanging the quilt "from the ceiling" without being "on the ceiling" because I don't want to have to climb 11ft high to do adjustments.   

I checked my photos during house construction and realized that there's a beam above the three windows.  I figured I could attach something to that.  I then thought...80/20?!  I would have lots of t-track to work with.  I wasn't sure if it'd be too heavy and whether it could support my estimated 60lbs (that's more than I think I'll ever ask it to support) in quilt/lights.    I tried to get a consult from 80/20 but apparently, they don't do that anymore and I figured that their distributors would just laugh.

So...I just need some help.  I think the "design" fits what I need.  But now that I read about RSS GRK fasteners...should I consider building the frame from 2x4, then inset some t-track into the 2x4?      From a structural perspective, does it NEED to be a 2x4?  Would a 2x2 work?    I don't want it to fall off the wall, but the smaller the better, visually.  If necessary, I could add triangular supports underneath or put an eyebolt on the ceiling and tie the frame to it.  But I wanted to avoid it, unless necessary to prevent it from falling off.  :(  I can do all the woodwork...I'm just not a structural engineer.  I also think that 60lbs shouldn't be that bad.

Any help would be greatly appreciated...diagrams in the attached PDF.
 

Attachments

I think you’re thoughts are pretty spot on. I’d use 1/4” or 5/16 RSS fasteners into the header to secure the 80/20. I’ve done that on a work bench and it works fine. I’m not familiar with the section size of the material you’re using, however I’ve adhered both 1 1/2” and 40 mm 80/20 material to studs, joists using either 1/4” or 5/16” RSS fasteners.

If you’re a bit nervous about the weight being cantilevered off the wall, (and who isn’t), I’d suggest purchasing additional 80/20 members to be implemented as vertical supports for the cantilevered frame. If you need them, you’ve got them, if you don’t need them, you now have the beginnings of a new quilting frame.  [big grin]
 
Is the 1030 profile intended to be standing up or lay down on the wall (like wide towards the wall. So it becomes more of a box when seen from the side) ? Just trying to understand the 'T' construction that will take the 60lbs load.

If it's more if a box will the t track be of same kind of profile ? Then I could imagine it being hard to adjust.

Might be able to use smaller profiles, like 1x1, if you don't need it to cantilever off the wall, but also have a diagonal support back to the wall. On the top side so you still get the shelf underside to hang stuff from. Sort of like a reverse installed book shelf where the support normally are on the bottom of the shelf and you now have it on the top.
 
Cheese - How do you use those screws to attach the 80/20 to the wall?  Do you just run the screw through the aluminum?  I was looking at some shelf supports and thought I could actually use them underneath to support the structure since it supposedly can support 100's of lbs each.

mwildt - the rectangular structure comes out of the wall...like a pergola or patio roof.
 
If you are using something like 1.5" x 1.5" extrusion, a good way of mounting it would be on a piece of aluminum angle.  Or steel angle (might be easier to find), painted aluminum silver.    You could just use a few pieces of angle, but some might say one length looks better.    If you use something like 1.5" x 3" angle, with the 3" face on the wall, with 2 screws every 16" into the beam, you could hang a house off that strut. 

One does not normally screw though extrusion, but that is possible also.  When doing this, you commonly would use a screw with a wide head that fits in the far side T-slot, and a through hole in the extrusion just for the screwdriver.    8020 likely sells such screws, but likely in straight machine screw sizes rather than wood screws.  You could try wood screw with washer.
 
Ok, here is an attempt on drawing this free hand on a computer. I think you can save cost to go with thinner extrusions, but you need som diagonal supports instead. 8020 has hinges for this.
 

Attachments

  • IMG_1329.PNG
    IMG_1329.PNG
    460.4 KB · Views: 468
TealaG said:
Cheese - How do you use those screws to attach the 80/20 to the wall?  Do you just run the screw through the aluminum?  I was looking at some shelf supports and thought I could actually use them underneath to support the structure since it supposedly can support 100's of lbs each.

Hey [member=59699]TealaG[/member]
Here are a couple of photos of the work bench I was referring to. I used Spax Power Lags, 5/16" x 3".

1. It's very important to drill the Spax pilot holes perpendicular to the surface otherwise they're splayed in different directions and you'll never slide the 80/20 on.

2. Insert the Spax lags and tighten them up but allow plenty of room to slide the 80/20 over the heads. Every lag should be proud of the surface by the same amount.

3. Measure the distance between all lag screws and drill over sized wrench access holes in the 80/20 to match the position of the lags.

4. Slide the 80/20 over the Spax heads and make sure all wrench access holes line up with the lags.

5. Tighten each lag a little at a time (about 1 wrench turn) to avoid binding the 80/20 and Spax lags.

The 4th photo is a view of the wrench clearance hole. You can just see the Spax lag Torx drive peeking through.
 

Attachments

  • 3014.JPG
    3014.JPG
    690.9 KB · Views: 474
  • 3015.JPG
    3015.JPG
    741.9 KB · Views: 493
  • 3016.JPG
    3016.JPG
    683.1 KB · Views: 464
  • 3017.JPG
    3017.JPG
    1.3 MB · Views: 534
Guys....THANKS SO MUCH for the advice.  I think I've now figured out what my installation possibilities are (as well as learning how to put an extrusion on a workbench!).  I'll have to study a bit more, but I'm now more confident that this can be done.  THANKS again!
 
The workbench example was just to help illustrate the same technique you can use to fasten the 80/20 to a wall. Workbench...drywall... it’s all the same. You’re just looking for some solid structure to drive the Spax lags into. You have that with the header.    [smile]

Tensile strength on the 5/16” Spax is close to 1500# while the shear is over 900#...per fastener. Screw pullout in pine is over 200#. Mount a short section of 80/20 with 4-5 of these screws and you’re good to go.

The only issue of note would be possibly compressing the drywall when the full load of the quilt is leveraged against the drywall. However, that too can be overcome if it is a problem, which I don’t believe it will ever be.

 
Back
Top