Hey all, was hoping to get some input on the right way to design some cabinets for the domino connector system.
Project: cubbyhole storage cabinet for the garage. Will be wall mounted up high against the ceiling.
Dimensions: approx 6 feet long, 16" high, 22" deep.
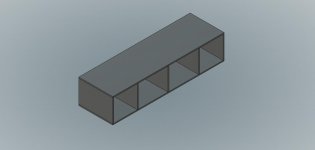
Option 1: "Short Horizontals": The typical method for doing 32mm cabinets and the domino connectors. Here the horizontal pieces are sandwiched between the vertical ones.
Pros: Just a bunch of equal sized pieces, connectors used (I think) in the position intended, ie, holding the pieces together but the mechanical load is not carried by the friction fit of the connectors. Can install it "in pieces"
Cons: Nothing long enough to keep the cabinet straight, requires that from the installation of each section
View attachment 1
=============
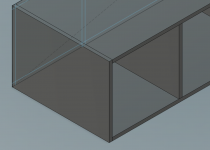
Option 2: "Long Horizontals": Here the vertical members are all the same length and they are sandwiched between two long horizontal pieces,
Pros: Long pieces to keep it straight
Cons: Domino connectors are now carrying the load using only their friction fit, not the mechanical properties of the plywood. Ie, I think they would eventually slip if under too much weight.
View attachment 2
============
Option 3: "Traditonal": This is how I would build it without the connectors, or with glued dominos, or heck just pocket screws. Two full heigh verticals to hide end grain on the side, then two horizontals sandwiched between those, then even shorter dividers on the interior.
Pros: Long pieces to keep it straight, glue in the dominos is strong (could add pocket screws too).
Cons: Fully assembled cabinet must be hoisted into place for install
View attachment 3
============
What are your thoughts on how this should be done?
Project: cubbyhole storage cabinet for the garage. Will be wall mounted up high against the ceiling.
Dimensions: approx 6 feet long, 16" high, 22" deep.
Option 1: "Short Horizontals": The typical method for doing 32mm cabinets and the domino connectors. Here the horizontal pieces are sandwiched between the vertical ones.
Pros: Just a bunch of equal sized pieces, connectors used (I think) in the position intended, ie, holding the pieces together but the mechanical load is not carried by the friction fit of the connectors. Can install it "in pieces"
Cons: Nothing long enough to keep the cabinet straight, requires that from the installation of each section
View attachment 1
=============
Option 2: "Long Horizontals": Here the vertical members are all the same length and they are sandwiched between two long horizontal pieces,
Pros: Long pieces to keep it straight
Cons: Domino connectors are now carrying the load using only their friction fit, not the mechanical properties of the plywood. Ie, I think they would eventually slip if under too much weight.
View attachment 2
============
Option 3: "Traditonal": This is how I would build it without the connectors, or with glued dominos, or heck just pocket screws. Two full heigh verticals to hide end grain on the side, then two horizontals sandwiched between those, then even shorter dividers on the interior.
Pros: Long pieces to keep it straight, glue in the dominos is strong (could add pocket screws too).
Cons: Fully assembled cabinet must be hoisted into place for install
View attachment 3
============
What are your thoughts on how this should be done?

")