Need help - boring 35mm hinge cup holes and my 1010 keeps walking

It could be made repeatable, but unless you need to do it frequently, may not be worth the effort.

Looks good though. It not that often that we see such instant results.
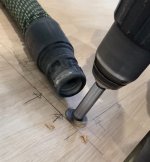
The Dominos as skis on the MFK700 is a good idea. Glad it all worked out.
 
kotto said:
Hand made for OF 1010 (not R).Newest R compatible with 3 from 6 holes.Perfectly serving.All you need is to secure the router base during the process.
[attachimg=1]
[attachimg=2]

This, why complicate things when simple does the job.
 
Crazyraceguy said:
It could be made repeatable, but unless you need to do it frequently, may not be worth the effort.

Looks go though. It not that often that we see such instant results.
The Dominos a skis on the MFK700 is a good idea. Glad it all worked out.

Haha, for sure. When I do this again, I think I’ll acquire an MFT/3 and use an LR32 rail on it. That way I can use the flag stops and batch out a bunch. Don’t have a kitchen build on the calendar until winter, thankfully. Been fun but been a challenge.
 
Crazyraceguy said:
There is a point to what you are saying....but there is another old saying that works just as well
"Run what ya brung" Not the best grammar, but it works.

Now that's a statement that certainly resonates with me.  [smile]

A street racing statement directly from the 70's before brackets were invented, and what was most important at the time is that you were forced to "put-up or shut-up." It pretty much shut down the nay-sayers that always had an excuse and liked to say...ya but.  [popcorn]

The same truths are relevant today.  [smile]

Getting back to the original problem, like others have said, firmly locate the router in the proper position through the use of clamps or a jig/fixture.

However, if this were my problem, I'd simply use a drill press with adequate material clamping. I'd also use 2 of the edges of the door for proper registration and to minimize any movement.
 
In one respect, the jigs/fixtures for drilling cup holes for hinges resemble the fixtures for drilling pocket holes.

There are fixtures that you bring to the work piece that are small and easily clamped onto the work piece, and then there are fixtures that require that you bring the workpiece to the fixture. 

For smaller doors, either work about the same.

For larger doors (like pantry doors), bringing the workpiece to the drilling station might be a problem.  For my shop, a five foot tall door would not work where I have my drill press. 

The router falls somewhere in between, but leaning more to the workpiece-to-the-fixture camp.

I just drilled out 19 doors for my kitchen reface.  I used the Blum clamp on fixture.  I still need something solid to rest the pieces on, but if I were younger, the floor would work just fine.  The clamping fixture worked fine.  I drilled 38 holes without a misadventure, or even much thought.  The only thought was where to place the hinges.

Since this was a retro-fit and some of the cabinets had pullouts, I needed to work around the placement of the pullouts.

Also note that the forstner bit generates huge amounts of chips.  These are easier to vacuum up after drilling than they are to collect using dust collection. 

For about the same cost, CMT makes a jig that drills all three holes simultaneously.  But it is drill press mounted.  I went with the Blum jig because it moved to the workpiece instead of the workpiece moving to the jig.
 
bwehman said:
Alrighty - not repeatable, but it’s completely locked into place.

If you stick to one of the standards of 32mm system layout the LR32 system is very repeatable.  There are a few different methods, choose one and stick with it.  I find that the balanced panels are the hardest to adapt to without a CNC. 
 
cdconey said:
If you stick to one of the standards of 32mm system layout the LR32 system is very repeatable.  There are a few different methods, choose one and stick with it.  I find that the balanced panels are the hardest to adapt to without a CNC.

I am curious as to why you say this? Are you referring to having to stay with specific lengths, to make the stops fit?
Yes, if you want to have panel sizes that fall outside of that, it can be an issue.
 
Crazyraceguy said:
I am curious as to why you say this? Are you referring to having to stay with specific lengths, to make the stops fit?
Yes, if you want to have panel sizes that fall outside of that, it can be an issue.

Usually the standards on layout are referenced from the bottom of the panel and relatively uniform on layout based on 32mm and 16 or 19mm for the bottom panels.  Balanced panels are centered making it much more difficult to use the stops.

Never had an issue with panel sizes using both the 1400 & 2424 rails, just set your bottom stop offset and mark your holes that need to be drilled for the layout.  Mark your offset stop bracket hole on the other end and remove if necessary.  Only challenge when joining the rails was ensuring 32mm offset between the rails, but again using the stops end to end at the joint until the rail connectors were tightened solved that issue. Had to use the sheet good edge on the rail to ensure they were straight until both connectors were tightened.

If you have an offset which doesn't work with the two options on the Festool stop, just pin a shim on the bottom of the panel to make up the offset. Some math may be required.  That was in the days before 3D printers and cheap CNC's.  Nowdays If you have a non-standard offset you could just print a new stop for your layout. 

I also used the VS600 system for dowels to assemble the carcasses - pre-domino days. 

Graduated to a CNC over the years, so my LR32 system doesn't get much use these days. 

I think sometimes people forget how solve limitations to use the tools to make the job work. 

 
In the video he is shown using a lot of pressure on the 35 mm forstner bit. That generates a lot of heat, and while I know that the heat is not supposed to be a problem with carbide, I will generally let the bit breath a bit about halfway through.

savvy ecodrill users will bore a hole in the backside of the jig for insertion of a vac hose.  This makes the bit run cooler, the operation go faster, and leves less mess to cleanup afterward.

the rather pedestrian Euro-Drill has another set of stops for height that makes marking for hinge location un-necessary.  A vac port can easily be fashioned for it too.
http://www.eurolimited.com/products/eurodrill.htm
 
“I also used the VS600 system for dowels to assemble the carcasses - pre-domino days.”

Same here, or rather just the 32mm pattern template.
Couldn’t afford Zeta and Domino didn’t exist.
 
im sure this was already mentioned but you should control the routers speed and feed sounds to me like your bit is spinning to fast and your feeding the bit to quickly, dont force it let the router do the work
 
I still can’t quite believe how over-complicated folks are making this, or how anyone can possibly think that it’s a good idea to use a Forstner bit (250-500rpm) in a router. I’ve installed 250+ kitchens with an average (say) of 40 holes per installation = 10,000 x 35mm hinge holes drilled to perfection using a slow-setting drill plus a 35mm Forstner. Goofing around with routers, fancy jigs, rails, clamps etc. is making the most basic job of drilling a hole very difficult and time-consuming for yourself. It’s a sledgehammer to crack open a walnut.

Just my 2 cents.
 
Even the Kreg jig, which is just 35.00, will make quick work of this.  It won’t drill the 8mm holes if you want to use knock-in dowels, but other than that, it works fine.  Slower to use than the Blum jig which has an incorporated clamping feature, but at 1/10th the cost.
 
woodbutcherbower said:
I still can’t quite believe how over-complicated folks are making this, or how anyone can possibly think that it’s a good idea to use a Forstner bit (250-500rpm) in a router. I’ve installed 250+ kitchens with an average (say) of 40 holes per installation = 10,000 x 35mm hinge holes drilled to perfection using a slow-setting drill plus a 35mm Forstner. Goofing around with routers, fancy jigs, rails, clamps etc. is making the most basic job of drilling a hole very difficult and time-consuming for yourself. It’s a sledgehammer to crack open a walnut.

Just my 2 cents.

I'd blame Festool in this case for including the 35mm cup hinge bit in the LR32 kit.  It would be much easier to reject the notion out-of-hand if they didn't create that situation in the first place; Festool is giving users the impression that this is a good process even if it's not.
 
squall_line said:
I'd blame Festool in this case for including the 35mm cup hinge bit in the LR32 kit.  It would be much easier to reject the notion out-of-hand if they didn't create that situation in the first place; Festool is giving users the impression that this is a good process even if it's not.

That's a very fair point [member=75217]squall_line[/member] - I believe it also encourages folks to use a piece of equipment just because they have it - even when it takes way longer to do and circumnavigates the patently obvious, correct and ultra-simple method.

Incidentally - Forstner chip collection is just as simple and obvious ....

[attachimg=1]
 

Attachments

  • Forstner.jpg
    Forstner.jpg
    81.1 KB · Views: 424
woodbutcherbower said:
squall_line said:
I'd blame Festool in this case for including the 35mm cup hinge bit in the LR32 kit.  It would be much easier to reject the notion out-of-hand if they didn't create that situation in the first place; Festool is giving users the impression that this is a good process even if it's not.

That's a very fair point [member=75217]squall_line[/member] - I believe it also encourages folks to use a piece of equipment just because they have it - even when it takes way longer to do and circumnavigates the patently obvious, correct and ultra-simple method.

Incidentally - Forstner chip collection is just as simple and obvious ....

[attachimg=1]

Not so simple with the Blum jig.  The jig captures the chips in the hollow of its body.  When you unclamp the jig, you have to have the vacuum pointed to capture the chips as you are removing the jig. 

Then you have to turn the jig upside down and use the vacuum to empty out the body of the jig.  Some of the chips get wedged in and at the end of the session, I use a school pencil to dislodge those chips.  It is the one annoyance I have with the Blum jig.
 
[member=74278]Packard[/member] I watched the Kreg video and I saw the chip pile accumulating which is inevitable given the design. But that's a minor inconvenience - chips can be vacuumed up afterwards as you say. That little jig's a truly lovely thing - and as utterly simple as it needs to be. I especially loved the cams to vary the offset (Blum offsets range from 3mm to 6mm depending on the type of hinge), the depth stop, and the provision to drill the 2mm screw mounting hole locations - which are all clever but simple solutions. I like 'simple' as you'll have figured.

So just in case anyone here thinks I'm an old-school stuck-in-the-mud who won't move with the times - I just ordered one and I'm looking forward to using it. Thanks for making me aware of this, buddy.
 
The only drilling error I’ve made with either the Kreg jig or the Blum jig was when my clamp shifted the jig so it was no longer butted against the offset cams.

So I mark the edge instead of the flat.  You can see a small notch directly above the mark on the edge in the photo below.  Note that the cams are butted to the stock.

g0GLLIF.jpg


It is a little easier to align with the Blum jig.  But always check that before drilling.

IAlsjQ6.jpg


Funny that Blum hinges have an offset between 3mm and 6mm.  Their jig goes from 2mm to 8mm.
 
I don't see the Festool Edge Guide SA-LR32being used for the offset.  These are a key piece to repeatability using the LR32 SYS for boring any holes, regardless of the diameter.

The rail should be clamped to the panel being bored to prevent movement. 

 
Back
Top