New project using my Domino

JCLP

Member
Joined
Oct 27, 2013
Messages
955
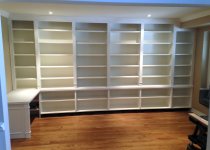
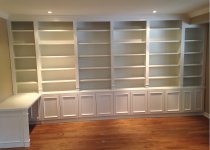
This is my first project where no screws and all Dominos were used, except to mount the levellers for the cabinets. 16' feet wide and 9' Tall. Doors will be mounted to the bottom cabinets and kick plate needs to be installed. One coat of paint for the crown and face moulding and it's payday. Once 100% completed I will post another photo.
Cheers,
 

Attachments

  • Cabinet 1.jpg
    Cabinet 1.jpg
    337.2 KB · Views: 872
stphnlwlsh said:
Good looking cabinets.  That person must have a lot of books...
Thanks for the compliment. Customer does have a lot of books and is now talking to me about building another cabinet for more books.
 
waho6o9 said:
Clean work JC and hello payday,

congrats!

[big grin]
Thank you for the compliment. Payday just in time for the weekend. It's going to be Miller time. [smile]
 
First, looks awesome being new to the craft I have some question

I that just one unit standing up against the wall on feet?  is it attached to the Studs in the wall because youse said the only screws were in the levelers?

Is it using a french cleat?

Is it painted MDF or Ply with solid face frames?

Was it pre-painted/finished or HVLP'd once installed?

Can't wait for the other photos

Again, great job.

Thanks,
Jason
 
Devildawg91 said:
First, looks awesome being new to the craft I have some question

I that just one unit standing up against the wall on feet?  is it attached to the Studs in the wall because youse said the only screws were in the levelers?

Is it using a french cleat?

Is it painted MDF or Ply with solid face frames?

Was it pre-painted/finished or HVLP'd once installed?

Can't wait for the other photos

Again, great job.

Thanks,
Jason
Hi Jason. Each bookcase is sitting on top of base cabinets and everything is vertical. The bookcases are prevented from falling forward by the crown moulding. When I installed the crown moulding I  fastened backing board on the ceiling joist and nailed the crown moulding to the backing board. It's actually quite solid. Also the back of the bookcases are 1/2 inch MDF thus making the back of the bookcases really heavy. The entire unit is made from 3/4 high quality MDF and finished with 2 coats of primer and 3 coats of paint with a 320 grit sanding between each coat. The paint I used is Benjamin Moore Advance cabinet paint which is great to work with. The final finish is a light rub down with 0000 steel wool. Everything was painted at the shop except for the front trim and crown moulding where the final coat was done on site. I'm not a big fan of spraying as I like the the finish I produce by hand better. Using Purdy paint brushes and 4" roller sleeves designed for the paint creates a great finish with old school charm. I hope to install the doors tomorrow and will have a new picture.
Client is so impressed with the cabinet they have given me more cabinets to build. Should be there for at least another 2-3 months. Then off to a century home to design and build century looking cabinets and gable and porch trim.
 
JC,

Thanks for the awesome explanation to my questions, they look amazing.  Keep the pictures coming would love to see more of your work.

V/r,
Jason
 
Here is the completed project. Client just needs to decide on the door knobs. Now on to 4 hockey lockers, 1 custom hutch which will incorporate a 55 " flatscreen and a custom island for a new kitchen. Great to be busy.
 

Attachments

  • Cabinet 1.jpg
    Cabinet 1.jpg
    399.4 KB · Views: 325
Back
Top