New Transit fit out

Joined
Jan 21, 2015
Messages
283
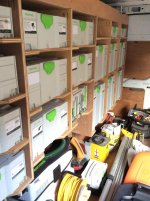
The time had come for a bigger van so I'v traded my old transit for an mk7 lwb semi hi roof transit, the new owner of my old work horse asked if I'd leave the racking as he had just started to pick up a few festools so I was happy to help out a pending Festool addict feed his habbit lol.
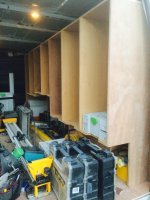
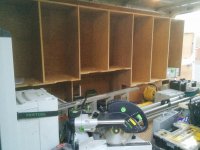
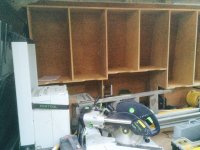
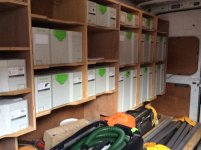
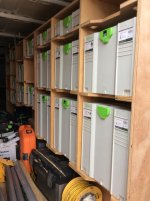
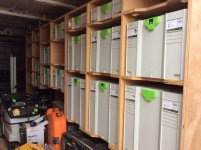
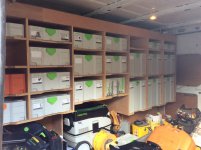
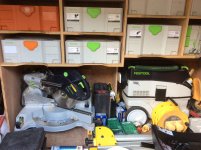
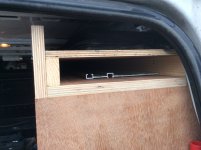
So it's time the start racking out the new van, it already plylined but I will be beefing up the wheel arch boxes and putting a new ply floor in before racking out, I will be using the same design as in my previous van only with room for more systainers  [big grin], I'v picked up 5 sheets of 18mm marine ply for the racking and 3 of 12.5mm for the floor. Oh and to feed the green habbit I picked up a 3m guide rail  [cool] which will make break down of the sheet goods easier.
Should get a start on it this week will post pics when I progress begins
 
Hi Alan yeah mate theres a few it's in a thread in this section called transit fit out check it out, my old van was a mk6 swb transit
Should have some pics of the new one by the weekend.
 
Well didn't get as much time to work on the van racking as I'd hoped darn work got in the way lol. But managed to fit a new 1/2" ply floor and get all the marine ply cut up into all the pieces for the racking just need to get some time to fit them now. The 3m guide rail was a good buy great for breaking down the full sheets and no more messing about joining rails  [big grin]
 
Eventually got some time to start the racking out here's a couple of pics of where I got to today, also routed out all the feet holes all the shelves so another half a day should finish off the sys racking on that side of the van
 

Attachments

  • image.jpeg
    image.jpeg
    814.8 KB · Views: 2,347
  • image.jpeg
    image.jpeg
    1.5 MB · Views: 1,904
  • image.jpeg
    image.jpeg
    1.9 MB · Views: 1,636
Hi, all the vertical uprights are pocket hole screwed to the floor and the side lining of the van then also glued with a product called Sikaflex a polyurethane sealant, then all shelves are pocket screwed to the verticals worked a treat in my last van, when it's finished it will also be fixed at the roof as well.
Slightly updated this racking from my last van as I could not lay 8'x4' sheets on the floor once it was racked out so this time I have made a cutout at the floor which will allow me to lay 20 sheets of 18mm or 28 sheets of 12.5mm material flat on the floor.
 
Mbconstructionjoinery said:
Hi, all the vertical uprights are pocket hole screwed to the floor and the side lining of the van then also glued with a product called Sikaflex a polyurethane sealant, then all shelves are pocket screwed to the verticals worked a treat in my last van, when it's finished it will also be fixed at the roof as well.
Slightly updated this racking from my last van as I could not lay 8'x4' sheets on the floor once it was racked out so this time I have made a cutout at the floor which will allow me to lay 20 sheets of 18mm or 28 sheets of 12.5mm material flat on the floor.
Thanks.  I had the same basic approach in mind.  I'm using a polyurethane adhesive by DAP.  I was considering only tight-fitting wood to wood at the fasteners and leaving a small gap to be filled with caulk along the edges....overthinking?
 
I just scribe all the pieces in to a neat fit, fix and then seal down both sides of the panel and I've never had any problems with squeaks  [big grin]
 
Got another couple of hour done on the van today it's getting there  [big grin]
[attachimg=1][attachimg=2][attachimg=3]
Room for a few more systainers in there yet  [big grin] [big grin]
 

Attachments

  • image.jpeg
    image.jpeg
    1.1 MB · Views: 6,653
  • image.jpeg
    image.jpeg
    439.3 KB · Views: 6,688
  • image.jpeg
    image.jpeg
    1.2 MB · Views: 7,061
Finished off the top of the racking with dedicated 3m guide rail storage and full length shelf for long levels and guide rail bag for shorter rails. I will be racking above the wheel arch on the other side for smaller item storage I.e. glues,fixings and other misc items I will also be including a section to hold mini systainers as I have found them useful for keeping stuff organised, and will also be boxing out for some storage at the bulk head to store worktop jig, and Kapex UG wings and maybe a few other things but this may be a few weeks off when things start to quieten down for Christmas, here's a couple of pics of where it's at now
[attachimg=1][attachimg=2][attachimg=3][attachimg=4][attachimg=5]
 

Attachments

  • image.jpeg
    image.jpeg
    1.3 MB · Views: 6,363
  • image.jpeg
    image.jpeg
    1.4 MB · Views: 6,223
  • image.jpeg
    image.jpeg
    540 KB · Views: 6,788
  • image.jpeg
    image.jpeg
    1.2 MB · Views: 6,266
  • image.jpeg
    image.jpeg
    1.4 MB · Views: 6,604
Mbconstructionjoinery said:
Eventually got some time to start the racking out here's a couple of pics of where I got to today, also routed out all the feet holes all the shelves so another half a day should finish off the sys racking on that side of the van
Is that a power inverter in the lower right corner of this photo?
 
Ohhh how I can have something like this in the future:) looks great!

Are the systainers secured in any way? I've been thinking about covering the shelfs with some sort of thin rubber to avoid them from sliding out. But haven't found a place to buy that.
 
The feet slots are routed out for the systainers. Stops em moving. Only works on t locks.
 
EA Custom Millwork said:
Mbconstructionjoinery said:
Eventually got some time to start the racking out here's a couple of pics of where I got to today, also routed out all the feet holes all the shelves so another half a day should finish off the sys racking on that side of the van
Is that a power inverter in the lower right corner of this photo?
Not sure which photo you mean, but I don't have a power inverter.
 
andreasg said:
Ohhh how I can have something like this in the future:) looks great!

Are the systainers secured in any way? I've been thinking about covering the shelfs with some sort of thin rubber to avoid them from sliding out. But haven't found a place to buy that.

Hi Thanks, i have routed out holes in the shelves which the feet of the systainers sit in, it keeps them very secure i'l get a pic up for you but there are quite a few foggers that have used the same method
 
jimbouk said:
The feet slots are routed out for the systainers. Stops em moving. Only works on t locks.

Yeah only works on the t-locks hence the clamps locked on the shelf in front of the older style systainers, I will eventually replace these with t-locks
 
James Metcalf said:
Two shelf pins placed between area where latches go at the front and the Classic will not move.

I had thought of putting a couple of loose fitting dominos at the front of the shelves (never thought about shelf pins) but then decided I'd just eventually replace the classics with t-locks and use the classics for storage in the garage
 
The shelf pins have a flat which you can use for a small adjustment or remove when you get T locks. My shelfs are solid at front, but I use pins at the rear to keep the Systainer from sliding back.
 
Back
Top