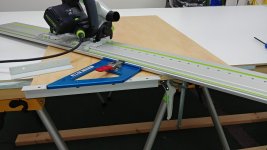
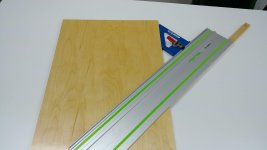
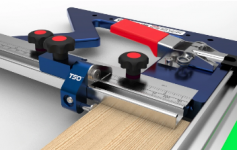
NEW TSO TPG-30 Parallel Guide

Cheese said:
The PE version is more versatile while the non-PE version is also 5/8" longer.

After I posted the above response today, Hans from TSO contacted me and added this insight to the discussion. I feel this is an easy way to determine early product from later product..and that's good.  [big grin]

"Nick, last year we made minor dimensional changes making the overall length of GRS-16 and GRS-16 PE identical so they would both fit straight rather than angled into the SYSTAINER 1 flat, one on top of the other as well as fitting behind the saw in the taller SYSTAINER.

We made that change in part because field experience had shown there is no discernible accuracy difference by slightly reducing the overall length of these tools. There also was never any customer question whether that 15+inches (almost 16 inches) length was sufficient. We went for that length because that was the "proven" length of the BIESEMEYER tablesaw fence and figured it would be hard for anyone to argue with that success."


So this explains why, as I noted in my response above, the new PE version stores vertically while the early non-PE version will only store horizontally.
 
Just a heads up, unless you already knew..., I talked with Eric at TSO and he said that the advantage of the GRS-16 over the GRS-16PE is that it will cut a 45 degree angle. He said that it was shortened a while back so that a 45 could be cut. The response that [member=44099]Cheese[/member] posted explains the shortened length and accuracy.

I didn’t see anything on the TSO website about cutting a 45. That should probably be mentioned so people like me don’t pester them. 

So I’ll be purchasing one of each instead of 2 PE’s.
 
manuc said:
Just a heads up, unless you already knew..., I talked with Eric at TSO and he said that the advantage of the GRS-16 over the GRS-16PE is that it will cut a 45 degree angle. He said that it was shortened a while back so that a 45 could be cut. The response that [member=44099]Cheese[/member] posted explains the shortened length and accuracy.

I didn’t see anything on the TSO website about cutting a 45. That should probably be mentioned so people like me don’t pester them. 

So I’ll be purchasing one of each instead of 2 PE’s.

That is interesting. Hans mentioned in the past  either here or in an email that they had originally looked into this but decided against declaring that a 45° could becut due to accuracy issues.

The Canadian knock off of the TSO  GRS -16  is sold with this feature.

Hopefully Hans or Eric [member=61691]TSO_Products[/member]  wil update us on this. 
 
tazprime38 said:
manuc said:
Just a heads up, unless you already knew..., I talked with Eric at TSO and he said that the advantage of the GRS-16 over the GRS-16PE is that it will cut a 45 degree angle. He said that it was shortened a while back so that a 45 could be cut. The response that [member=44099]Cheese[/member] posted explains the shortened length and accuracy.

I didn’t see anything on the TSO website about cutting a 45. That should probably be mentioned so people like me don’t pester them. 

So I’ll be purchasing one of each instead of 2 PE’s.

That is interesting. Hans mentioned in the past  either here or in an email that they had originally looked into this but decided against declaring that a 45° could becut due to accuracy issues.

The Canadian knock off of the TSO  GRS -16  is sold with this feature.

Hopefully Hans or Eric [member=61691]TSO_Products[/member]  wil update us on this.

[member=65145]manuc[/member] @tazprime about cutting 45 degree angles with The GRS-16:

As TSO’s Eric explained to [member=65145]manuc[/member], the GRS-16 will definitely cut a 45 degree angle, BUT the practicality of that for every day woodworking does not come up to our standards. For that reason we have not publicized this capability, leaving that claim to the “other folks”.

Look at the pictures and do some mental gymnastics with the two different positions of the GRS-16 and perhaps you’ll understand that it will work in certain circumstances, especially when used with our 15 inch precision Clamping Angle attached.But it’s easy to run out of reference edge contact with your workpiece.  Quite limited.

On the other hand the MTR-18 Triangle offers some real choices. But that's another thread on another day.

Hans
 

Attachments

  • 0209191848.jpg
    0209191848.jpg
    642.2 KB · Views: 637
  • 0209191546.jpg
    0209191546.jpg
    211.4 KB · Views: 630
Hans,

My early model GRS does not have the tapped holes on the hypotenuse leg - can these be added using the same drill jig for adding the holes for the TPG?

Thanks,

Tom
 
tomp said:
Hans,

My early model GRS does not have the tapped holes on the hypotenuse leg - can these be added using the same drill jig for adding the holes for the TPG?

Thanks,

Tom

[member=65072]tomp[/member] - thanks for the question. YES, using our Drill Fixture for adding the M6 hole pattern to the hypotenuse of an earlier GRS-16 will work. We will include that in the instructions with the Drill Fixture.
Our 15" Angle Accessory will be helpful when making 45 degree cuts. 
              https://tsoproducts.com/tso-products-guide-rail-squares/angle-accessory/

But do some dry runs and lay out examples of cuts you want to make to see how the guide rail and  the GRS-16 are placed relative to your particular work piece shape and size. We want you to understand the limitations of such a set-up before spending time and money.
We just need to get the fixture on our website while packaging the first batch of fixtures which are already done.

Hans
 
Hans,

Thanks for the information. I can see how the set-up would have some significant limitations, fortunately I have another method that's a little more user friendly.

Tom
 
From here it looks like the tso parallel guide suffers from the same clumsy ness as the Festool. That the guide stops have to be at the ends of the material being cut. What makes the Seneca and woodpecker easier to handle is that the guide rails that connect to the cutting rails can be at at any distance as they rest on top of what they are cutting as opposed to be at the ends.
 
glass1 said:
From here it looks like the tso parallel guide suffers from the same clumsy ness as the Festool. That the guide stops have to be at the ends of the material being cut. What makes the Seneca and woodpecker easier to handle is that the guide rails that connect to the cutting rails can be at at any distance as they rest on top of what they are cutting as opposed to be at the ends.

[member=4687]glass1[/member] - please help us understand what makes for "clumsiness" in the FESTOOL parallel guide (- and what you have so far seen of the TSO TPG System) ?

Your feedback may help us decide to speed up the availability of our optional TPG Rail Adapter (p/n 610-409) which accomplishes exactly what you are referring to.

Hans
 
glass1 said:
From here it looks like the tso parallel guide suffers from the same clumsy ness as the Festool. That the guide stops have to be at the ends of the material being cut. What makes the Seneca and woodpecker easier to handle is that the guide rails that connect to the cutting rails can be at at any distance as they rest on top of what they are cutting as opposed to be at the ends.

I'm a little confused here as from what I see the parallel guide (part that stop slides in) is sitting on top of the material unlike the festool.

Take a close look at the image i attached and let me know if i'm not understanding you.


Attachments

  • Screen Shot 2019-02-10 at 4.22.04 PM.png
    Screen Shot 2019-02-10 at 4.22.04 PM.png
    129.5 KB · Views: 676
Yes, stop is on top but the right angle pieces(blue) need to be at the end of the material to be ripped. It’s easier to just flop the woodpecker and Seneca on top of the material while the Festool and I presume the tso has to be placed at the ends and fitted onto the material to be ripped. I found it clumsy to maneuver the Festool parallel guides to fit at the ends of the material. Not impossible just clumsy. But I have not seen the tso in person so maybe it’s easier. There is a certain ease if everything is on top as opposed to at “the ends”.
 
Just to follow up the tso looks quite easy to use when using just one stop. I cannot see how on 8 ‘ rips one would be enough. Usually one parallels up a sheet goo first than crosscuts ?
 
[member=4687]glass1[/member] - to clarify: the TPG T-tracks rest on top of the work piece unlike the FESTOOL guide.
as to the ability to get parallel cuts with just ONE single TPG-track:

look at REPLY # 65 and # 33 and # 17.

Tom is not on our payroll - his involvement is that of a FOG member going out of his way to help another - what makes this forum such a great environment and an incentive for TSO to pay it forward.

Hans
 
I think we're reaching the far end of viability when you start looking at narrow 8' long rips using the TSO squares and PG's. Not that it cannot be done but from experience that a lot of hardware hanging on the extreme ends of a flexible rail. It'll work but be cumbersome, at least in my situation. This is no different from the Festool PG's, I owned them before the advent of the aftermarket versions.

I say this as an owner & frequent user of both TSO squares, they are awesome for dead-nuts square cross-cutting where you rely on the square always being square without thinking about it. From what I can see the square will also work great w/ the TPG addon in a  lot of situations including 8' rips of wider stock. Where I'd expect things to start breaking down is with narrow rips where the function of the square itself is diminished to being mostly a bracket to hold the PG at each end. That gets away from the excellent design and engineering that makes the original product so great to use without stopping to wonder if the resulting cut will be square. It can be done but the compromises are stacking up to the point that I'd want a dedicated tool. The aftermarket PG's are light and easy to install/remove/handle.

Just my [2cents] and loaded with personal preferences.

RMW
 
Richard,
I think you and I see things pretty much along the same lines. It is quite natural in a forum like this that members will probe the limits of what a tool "can" do. This does not mean anyone suggests buying and using a tool for the express purpose of using it at the limit of its specified capability.

We do not think ANY parallel guide is well suited for cutting narrow stock. Possible, yes, but for everyday use, get a tablesaw (portable). In January I had occasion to cut six strips 5"wide and 96" long with the TPG-20 set, the work around required to deal with narrow cuts reaffirmed our belief that this is not the strong suit of any parallel guide.

We developed this tool to be most capable to produce sheet goods cabinet parts of identical dimensions in a repeatable manner quickly and accurately.

Hans
 
Richard/RMW said:
I think we're reaching the far end of viability when you start looking at narrow 8' long rips using the TSO squares and PG's. Not that it cannot be done but from experience that a lot of hardware hanging on the extreme ends of a flexible rail. It'll work but be cumbersome, at least in my situation. This is no different from the Festool PG's, I owned them before the advent of the aftermarket versions.

I say this as an owner & frequent user of both TSO squares, they are awesome for dead-nuts square cross-cutting where you rely on the square always being square without thinking about it. From what I can see the square will also work great w/ the TPG addon in a  lot of situations including 8' rips of wider stock. Where I'd expect things to start breaking down is with narrow rips where the function of the square itself is diminished to being mostly a bracket to hold the PG at each end. That gets away from the excellent design and engineering that makes the original product so great to use without stopping to wonder if the resulting cut will be square. It can be done but the compromises are stacking up to the point that I'd want a dedicated tool. The aftermarket PG's are light and easy to install/remove/handle.

Just my [2cents] and loaded with personal preferences.

RMW

You can cut narrows, but you MUST use 2 set ups, 1 right side, 1 left side. The left side must be a PE.

I mentioned previously if you plan on narrows get another set of stops, calibrate them with the narrow rip rods.

Tom
 
And when you use right side and left side they are at the ends of the material being cut not on top correct?  That’s the cumbersome part. The space between the 2 blue squares is the length of the material being cut.
 
It’s clear as day on the tso website in the picture that is $325. The stops are at either end. Just saying that it’s harder to put on and take off when it’s not just place on top like the Seneca set up.
 
I'll start this post by making things clear-----I do not work for TSO, I am privileged enough to get to test their products prior to public release. I run them through their paces and make recommendations based my use of them. I do get to keep the majority of the items I test. I believe I've been testing the TPG's for about a year.

I do not do this just for TSO. I have shot and shared how to videos for members here and elsewhere. These videos are not public, they're to assist that person. I field on average 50 PM's per week from people looking for some insight for a project they're doing. I feel doing what I do for TSO is just an extension of helping others.

This link is to a video I shot today of the GRS & TPG set up as a single arm on one of my 3000 rails. In it I tried to address some of the question asked on this forum.


A question I get a lot after a video like this---yes, I have over 40 rails....

Tom
 
glass1 said:
And when you use right side and left side they are at the ends of the material being cut not on top correct?  That’s the cumbersome part. The space between the 2 blue squares is the length of the material being cut.

Not certain I truly understand your question but I'm going to give answering it a shot.

The squares come off and go on so easily I do not find it an issue. I find it areal advantage. This eliminates all the torque on the guide rail.

Most times you'll need to clear the cut table for the next piece. If not just slide the assembly forward. Back to the clearing the table----remove the square/arm assembly(s), set aside, lift rail, clear table, set new work piece, place rail randomly, pop on squares/arms, set stops to edge, cut, repeat.

Tom
 
Back
Top