Newbie ready to give up.

stubear334

Member
Joined
Oct 24, 2014
Messages
2
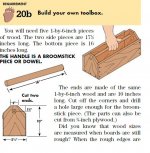
I'm in charge of making a toolbox kit for my son's cub scout den. Sounded pretty easy, but I'm stumped. I own a TS75 & MFT table & parallel guide. I've had the TS75 about 4 years & use it to breakdown plywood for my customers.

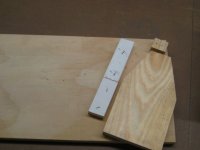
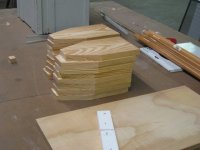
I have 2 major problems. How do you square the MFT table & keep it square ??? My only square is a speed square or framing square.  Also, I need to make repititive angle cuts & the angle is too steep for the angle gauge.

[attachimg=2]
 

Attachments

  • toolbox.jpg
    toolbox.jpg
    82.2 KB · Views: 276
  • toolbox.jpg
    toolbox.jpg
    82.2 KB · Views: 1,810
There are quite a few posts on the FOG concerning squaring. You could try that first by searching key words. It would be hard to duplicate those discussions as they are lengthy and somewhat complete. Search You Tube. There are various methods shown in videos; all work. The first time I squared it up I used nothing other than a cheap aluminum square and it was so close I couldn't tell the difference. Others will tell you that you should use something more accurate. ???? The You Tube videos are probably the quickest way to get ideas. I will search over the weekend when I get some time to see if I can find You Tube videos that helped me.

As for the angle . .. If it's too much of an angle, the complement of that angle on the MFT miter head would probably be the one you want; namely the other side. Sometimes getting there is a little tricky. The other possibility is a jig of some sort. I assume that you don't have any dogs for the MFT or I'd suggest using those in combination with a shim of some sort. If you only have one of these to make, you can be a little less permanent about it.
 
The only angle cuts look like the ends of the tool box and they could be 45 degree cuts. If you have 2 Qwas Dogs, you can position the 1X6 at a 45 degree angle to the track saw rail. Make the first cut, flip the 1X6 over and make the second cut. It doesn't look like you have to have the rail perfectly square for this project. The Cub Scouts are going to be thrilled with "good enough".
 
When I get frustrated, I think of my 3 kids. Things like tying shoes or taking out the trash would frustrate them. No different in this situation. Turns out that my Irwin try square was out of square. I got the table square by trial & error. Each time making test cuts of 2 boards, comparing them back-to-back & then reversing them. There are probably 5-6 knobs to tighten when squaring the table & lastly I adjusted the stops with the hex key.

Then, I made my very first jig. Pretty crude, but it worked 98% perfect. I cut all 16 pieces and was very happy with the results. The flag stop on the back rail is a life saver.

Here are the pics:
[attachimg=1]
[attachimg=2]
 

Attachments

  • IMG_3210_1.JPG
    IMG_3210_1.JPG
    58.1 KB · Views: 1,537
  • IMG_3209_1.JPG
    IMG_3209_1.JPG
    76.1 KB · Views: 1,572
Way to persevere...

I think there's a Merit badge for that?

[big grin]
 
First  [welcome] to the FOG

I know you have done it now, but here are a few set up videos on the MFT inc one from Peter


3 part set up here


You'll find a lot of different videos and posts with various ways to square up the MFT fence,  guide rail, MFT top holes. You need to find the one that works for you. While you probably don't need to spend a lot of extra money on squares, etc., using a set of dogs to get things square is probably a good idea. I find that I use a pair of dogs to square the fence to the holes in the top and then a second set to square the guide rail to the fence, but you can also just use a square you have faith in to square the guide rail to the fence. It is something you will probably want to do periodically if you use the fence and guide rails for cross-cutting. The guide does get out of alignment occasionally. Alternatively, as the previous poster said, you can use one of the dog-based jigs to cross-cut square. It is a little easier but it all comes down to preference for me and what you feel comfortable doing. Use the tools and find out what troubles you the most, look for a solution among the various dogs and jigs out there, and then you will find it's a great setup; accurate, easy and safe, to use and very versatile.
 
First Congrats on finishing the project. Tose things drive me nut.

Now as for Squaring up the MFT. There are many methods all are personal preferance. I choose to use a square such as the woodpeckers 1281 . Others prefer dawgs.

However if you choose not to buy a square or dawgs, here is another method that has been discussed extensively here.
Some swear about its accuracy. I dont have the patience for it.  But here it is The 5 cut method

http://festoolownersgroup.com/festool-how-to/five-cut-method-on-mft3-explained/
 
Just a suggestion, but I rely strongly on Woodpeckers squares. I use their biggest square for trueing my MFT rail and my Sawstop fence. Their smaller squares are useful for construction projects and trueing router table fences.
 
Well done - you made it! (Sometimes kids are also amazing at their persistence as well - far more persistent than a lot of adults where we give up too easy.  [wink])

For the jig that looks great - one option that I used for repeating angles was instead of nailing those stop blocks down to a separate board, you could clamp them directly to the MFT. Just put your first piece in place ready to cut, then place the stop block aligned to the edge and clamp down. Make your cut, remove piece, then put next piece in its place. Just an idea you might like to consider for next time.

Cheers!
 
Back
Top