No MFT? No problem!

jroth33139

Member
Joined
Sep 12, 2011
Messages
36
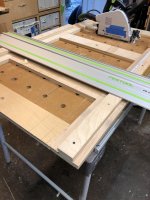
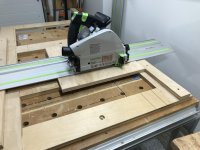
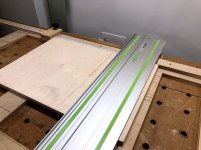
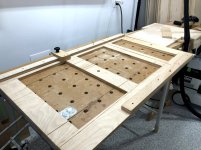
Thought I would share my MFT substitute. Most of my cutting is 3/4 ply or solid wood, at 90 degrees. I have an MFT but find it easy to get out of adjustment and at least for me not producing consistent results. So I made a cutting board out of plywood, sufficient to fit 48 inch/600 mm wide panels, which works for me since I cut a lot of cabinet parts.

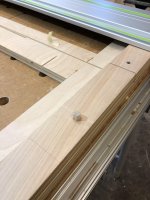
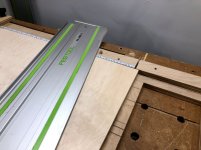
What makes it idiot-proof (important for me [big grin]) is that the rail is held in place with a 3/8 inch dowel, slightly shaved to fit the rail groove. In making it, I placed the back pin, then squared up the rail and screwed in the second pin. It will always be square.

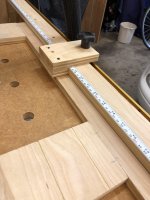
The rail supports the cut on both sides and a tape and homemade stop on a t-track gives me consistency. When I am done, I hang it on the wall. I have a similar one that I use for longer cuts, up to 46 inches.

View attachment 1View attachment 2View attachment 3View attachment 4View attachment 5
 

Attachments

  • unnamed.jpg
    unnamed.jpg
    1.5 MB · Views: 929
  • unnamed (3).jpg
    unnamed (3).jpg
    781.1 KB · Views: 626
  • unnamed (1).jpg
    unnamed (1).jpg
    1,003.3 KB · Views: 434
  • unnamed (2).jpg
    unnamed (2).jpg
    1.1 MB · Views: 645
This is very, very interesting.  No need for dog holes or rail clips or anything else.  You may have to supply more pictures though.. [big grin].  Thanks for the post.
 
Ha! My kids say I’m a lousy photographer, and this may prove it. A couple more photos so you can get the gist. The only unique thing is the use of the dowels to secure the track, and I use them for special cutting jigs of odd shapes. So I keep a few dowels glued into ply to set up quick jigs. The other photos show the cutting process, and the platform hung up out of the way when I want to use the table for other functions.

I like the portability of it, since it weighs far less than the MFT. I am also a fan of having a fence on the off cut side of the track, as I think it helps with alignment. Narrow strips aren’t really a problem any more, since I can use both sides of the cut line.

Took me an hour or so to build and cost basically nothing. It can be made any size you need or want, depending on the size of your rail. For me, its a keeper.
 

Attachments

  • lekxwBu1RU2dd5ISk9Jrjw.jpeg
    lekxwBu1RU2dd5ISk9Jrjw.jpeg
    147.1 KB · Views: 487
  • qNoXfYMeTMW_EjhhK6O61Q.jpeg
    qNoXfYMeTMW_EjhhK6O61Q.jpeg
    156.5 KB · Views: 399
  • 48kvC6xPTSGntZEMqUz92w.jpeg
    48kvC6xPTSGntZEMqUz92w.jpeg
    148.4 KB · Views: 389
  • eRUpew2wRfi-LfkvIeH3Tg.jpeg
    eRUpew2wRfi-LfkvIeH3Tg.jpeg
    209.8 KB · Views: 396
  • 0VNAq53GQbeh_-BZZ4FxPA.jpeg
    0VNAq53GQbeh_-BZZ4FxPA.jpeg
    189.1 KB · Views: 411
  • Fsh8-NLWTyacqM8GIFsP-A.jpeg
    Fsh8-NLWTyacqM8GIFsP-A.jpeg
    189 KB · Views: 519
  • xVpg4x9fSmmg26ysj8eH5g.jpeg
    xVpg4x9fSmmg26ysj8eH5g.jpeg
    152.2 KB · Views: 407
The pictures are great, thanks for those.  Always looking for another way to do things.  Everyone has scrap plywood laying around.  This is great work.
 
Looks good to me.  We all need to have systems that work for us.

My way of making larger cross cuts, more than the 9 inches or so I can do on my 12 inch CMS is by using rail dogs on my shortest DeWalt track saw rail into the 20mm holes in my Paulk style outfeed/work table.  That gives me about 28 inches cross cut capacity.  It is pretty quick and is certainly simple.  The cuts are as square as I can measure.

I have not had success with a sled on my table saw for large pieces although I know that works well for many people.  I think your jig would work but I did not find the Paulk crosscut jig to work very well for me. 

Now that I have the rail and regular dogs working, I will probably quit messing around with other methods. 
 
Looks interesting!

Any special considerations as far as locating the stops so everything ends up square? 

How 'square' is it capable of?  Are we talking 'framing square' kinda square, or '5-cut method' sort of square?
 
Thanks for the note. The trick for getting it square is to install the pins (dowels) in the fence material first. Then, I used the following process:  Install the back fence first -- easy enough, just screw it down into the base along your back edge, using a single piece that extends to the right of your future cut line. My back fence is a little over five feet, with about a foot on the right of my cut line.  No need to be particularly precise.  For the front fence (the one closest to you), install the rail on the pins on both the back fence and the front (as yet unsecured) fence. Then put the front fence in the approximate position and adjust it so your rail is square to your back fence.  I used an Anderson plywood square for that. Clamp or pin the fence to the base material to make sure it doesn't shift, then screw it down on both sides of your cut line. First cut establishes your kerf. Takes about five minutes.

How square? As square as you want it. Use whatever square you trust to set it up, and it will be that square. The dowels start slightly oversize, and you will need to file them down slightly, so you can walk up on a super snug, slop-free fit.  So that can't introduce error. Because you do this once and can't adjust it, it can never go out of square. Get it right the first time and never have to worry about it again. My experience with the original MFT setup was that it was very fiddly, and constantly risked coming out of square. (I understand others' experiences may differ.) This has a fence on both sides of the cut line, which also reduces user error in ensuring that your piece is against the fence.

To be honest, I haven't tested it with the 5 cut method because I haven't ever had a problem or suspicion that it isn't square enough for my purposes. I understand that different people have different opinions about "how square is square," but I am good with "as square as I need" or "as square as my tools will measure." I have checked it against dogs in my MFT and haven't detected gaps or slop, so it is as square as using dogs.

But I like this better because you can use it to make a cut, hang it up, and then have your table clear for whatever operation is next. No unscrewing fences and dogs. Or throw it in your car/truck and pull it out and use it, without having to worry about adjusting it.  Same with the tape on the fence. Because the fence never moves, the tape will always be in the same place with no need to calibrate it.

Others have had similar concepts. The only unique thing is using the dowels to secure the track, and making the base itself light and portable.
 
Back
Top