Nova Voyager - Aftermarket table

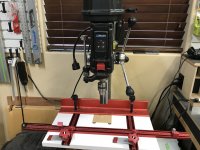
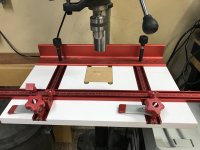
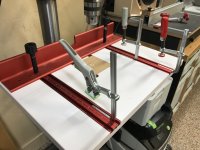
Thanks for the link (again), Cheese. Don’t know how I missed it in your earlier post...and on the woodpeckers website  [embarassed].

Will be putting together my shopping list this morning. Amazon is a little higher priced but I know I’d get the stuff in time to do the work while I’m on vacation. Woodpeckers site shows backorderd but Toolnut has in stock and good price. Wonder how fast their free shipping is...?

Thanks again,
Dean
 
Hey the link is tough to find on the woodpeckers website. That's the reason I included it for you.

You'd think it would be under Flip Stops, however it's not.  [sad]
 
Caboose1966 said:
Cheese, what kind of setup do you have there with what I assume is a vacuum nozzle?  Does it pick up the shavings pretty well?

Hey Dean, it’s a vac nozzle that works well. Woodcraft sells it for about $25. The hose is really cool, you can shorten it, lengthen it or bend it to hold any shape you want, and then return it to its original size.  It also comes with a scoop end rather than the nozzle end for wider dust collection. My last project was aluminum so that’s the reason the nozzle end is still on.

I made a bracket from BB and fastened it to the Delta with 2 MagSwitch magnets. The sizing of the hole for the hose was the most difficult part of the project.  [smile]  A small enough hole to hold the hose securely yet large enough so that the hose can be adjusted/moved with one hand.

Again, no clamps, no straps, no extraneous parts...just friction holds it in place.

 
Hey cheese or anyone with the Woodpecker table, can you give me the measurement C to C between the two tracks, and the tracks thickness?

I just ordered the tracks and low profile fence and some SStops  [big grin] I will be making my own top since the woodpecker top alone bumped the shipping from $46 to $111  [eek]

The table will be based on neilc top with probably some magswitch magnets to hold it (ty Cheese). I'm also planning to incorporate a circular offset insert.
 
[member=66597]Mario Turcot[/member] I’d suggest bolting the table down. Unless you’re going to spend the big bucks the magnets can’t hold against the torque involved.

Ron
 
rvieceli said:
[member=66597]Mario Turcot[/member] I’d suggest bolting the table down. Unless you’re going to spend the big bucks the magnets can’t hold against the torque involved.

Ron

Ron, I was thinking to screw a runner like, under the table that would make a snug fit. Sliding the table in position and securing it sideways from magnets through the runners. The magnets would ultimately hold the table to stick on the DP table and the side runners to avoid spinning. Do you think it would be enough to keep it secure?

Another option would be a L channel with pressure screw from under. All i am looking for is a quick way to remove the top for when I drill into metal+lubricant using a vise.

Sorry to hijack your thread Dean  [sad]
 
Mario Turcot said:
Hey cheese or anyone with the Woodpecker table, can you give me the measurement C to C between the two tracks, and the tracks thickness?

Hey Mario, the CL to CL (center line) distance between the tracks is 13.75". The track width appears to be 1.75" because the slot width is 1.77/1.78". The track thickness however, is another story. It is .50", I think ??  It's tough to get an accurate measurement of the track thickness without removing it from the table.

I'd suggest you wait until you have the track in your hands because you want it to be slightly recessed relative to the top surface. Woodpeckers recesses their tracks by .030" (1/32") to prevent anodization wear from sliding things across the table.

I'd also echo Ron's thoughts on bolting your home made top down to the Voyager table. It's not only side thrust & twist you have to worry about, it's also a heavy off set load on the table could flip it off. I can place a 35# vise loaded with another 25# of material ANYWHERE on the top and not be afraid of it landing on the floor...or my toes. [big grin]
 
Gotcha on the toes  [eek] and thanks for the measurements.

I will probably sandwich two pieces of BB 12mm together. Hopefully the tracks will recess enough to prevent wear out with 12mm. That way i don't have to make any dado to sit the tracks on. will have the bottom layer in one piece and the top layer in three pieces. Want it modular enough so I can replace any top part w/o having to redo the whole top.

Back to the design table  [wink]
 
Caboose1966 said:
I notice that the DP table is available with the standard hold-down clamps or with knuckle clamps. Has anyone had experience with both and/or can comment if the knuckle clamps are a better option? It’s only a $15.00 price difference, so worth it if they are better/more convenient.

I also have the WP DP table on my Delta 18-900 and love it.  Just wanted to let you know the Festool track clamps work good with the track and also accepts 1/4"-20 hex bolts/nuts for custom jigs.
 

Attachments

  • IMG_6470.JPG
    IMG_6470.JPG
    237.5 KB · Views: 301
  • IMG_6471.JPG
    IMG_6471.JPG
    192 KB · Views: 291
  • IMG_6473.JPG
    IMG_6473.JPG
    215 KB · Views: 291
More great info and pictures.  Thanks, everyone.

Mario, no worries about "hijacking".  Personally, I like it when everyone chimes in with their related questions/ideas.  Makes it more one-stop shopping that way  [laughing].

TrackTubes... thanks for the info on the Festool track clamps.  Good to know.

I've got to get on ordering the table today.  After that's in place and the way I want it, the vacuum setup looks like a great addition.  I've got a few dust-collection related tasks things I have to get figured out.  Everything is just set up to hook up to my shop vac on an as-needed basis right now.  Ultimately, when I get a permanent dust-collection system set up, I'll have to re-work some of the connections, but trying to think ahead as much as possible to minimize that re-work down the line.

Thanks again for all the helpful info.

Dean

 
Doh! Tracktubesguy, you just make me realized that the DP3 can be reversed  [big grin]

After crushing all the numbers I came with a first draft. Let me know what you think and if you see any flaw.

[attachimg=1]

This is the lower layer only, showing where the WP tracks will sit. The dark grey parts are column and actual drill press table. The light grey are bumpers under the table to ease installation and make sure it's always at the same position. The column collar (that's how I named it) have a shape to allow the table to tilt easily. The black parts are where the WP tracks will be. I still have to find out the center of the chuck based on the column (What is called the depth I guess).
 

Attachments

  • TopDesign.png
    TopDesign.png
    54 KB · Views: 619
[member=66597]Mario Turcot[/member]

There's not a particularly compelling reason the have the add on table extend any farther that the column in the rear. You won't really gain anything and it complicates the construction a bit.

In addition you might as well extend the t track all the way to the front edge. Makes it easier to insert things.

If it were me, I'd take bar stock that would fit through the slot in the factory table, drill and tap it for maybe 1/4-20 or the metric equivalent. Cut it to a length that when rotated at 90 degrees to the slot would hold securely. I would then drill and countersink the holes in the add on top to keep the screw heads below the surface. You would align the tapped bars so they dropped through the factory table slots to below the factory table and then rotate them 90 to the slot and tighten the screws.

You'd need to decide if you needed just two of those or maybe one in the front also.

Ron
 
Depending on what sort of fence mounts are being used having the table extend back past the column can gain a couple inches of usable space.  My t- track fence  mounts are behind the fence. The table extends back. The mount can be in the track space beyond the column gaining space in the drilling area in front of the fence.

[attachimg=1]

Seth
 

Attachments

  • IMG_1000.JPG
    IMG_1000.JPG
    116.2 KB · Views: 565
SRSemenza said:
I used a socket  with extension and flex head ratchet (extra stuff I had) in place of the crank on this Delta. It works very well. Plenty of leverage, easy to reach with out contortions,  and works around any other objects that might be in the way.

Seth

Just thinking, we all have at least 1 old cordless drill that refuses to die and it's battery still charges to full capacity, yet when we reach for a drill we always grab the newer models. [sad]

Why not replace that ratchet handle with the old cordless drill and then just pull the trigger?  [big grin] 

I'm going to try that on my Delta...got an old Milwaukee cordless just hanging out in the shop.
 
I made a home brew drill press table from 1" MDF and Formica laminate.  I dedicated an inexpensive ratchet for the column lock and extended the crank handle.  While it works great for my needs, there are a few things sub optimal.  One is that to tilt the table, I have to loosen a set screw on the coupling nut for the crank handle extension.  The other is that I wish I had made the crank handle quickly removable as it always seems to snag on other tools when I wheel my drill press into storage position.

Edit:  Note the position of the square sacrificial insert.  It is purposely offset to drill in one quadrant of the insert.  This gives me 4x positions on two sides before I need to replace the insert.

[attachimg=1]

[attachimg=2]

[attachimg=3]
 

Attachments

  • IMGP3328.jpg
    IMGP3328.jpg
    319.9 KB · Views: 588
  • IMGP3331.jpg
    IMGP3331.jpg
    288.8 KB · Views: 591
  • IMGP3329.jpg
    IMGP3329.jpg
    314.6 KB · Views: 566
Dick Mahany said:
I made a home brew drill press table from 1" MDF and Formica laminate.  I dedicated an inexpensive ratchet for the column lock and extended the crank handle.  While it works great for my needs, there are a few things sub optimal.  One is that to tilt the table, I have to loosen a set screw on the coupling nut for the crank handle extension.  The other is that I wish I had made the crank handle quickly removable as it always seems to snag on other tools when I wheel my drill press into storage position.

  Cool extension!  If you take out the front set screw you can go with a socket and extensions in place of the threaded rod. And  maybe a universal would take care of the tilt problem?

Seth
 
See why I don't mind "hijacking".... I LOVE all these ideas and pictures!  I have the Woodpeckers fence and the fence on it's way, but now I want to make my own custom fence, too.  I also have a 6" handwheel coming for the table elevation crank, but I'm liking these extensions and ratchets and all the other cool ideas.  Necessity is the mother of invention, right.

Hijack away!!  ;)

Dean
 
SRSemenza said:
  Cool extension!  If you take out the front set screw you can go with a socket and extensions in place of the threaded rod. And  maybe a universal would take care of the tilt problem?

Seth

Great suggestion...........I see a trip to Harbor Freight for some cheap 3/8" extensions in my future  [big grin]
 
Dick Mahany said:
SRSemenza said:
  Cool extension!  If you take out the front set screw you can go with a socket and extensions in place of the threaded rod. And  maybe a universal would take care of the tilt problem?

Seth

Great suggestion...........I see a trip to Harbor Freight for some cheap 3/8" extensions in my future  [big grin]

Not sure how well it will crank with the universal while tilted and I think you will need to allow extra length in the extension so that it can slide in the support  when tilting.

Seth
 
[member=3192]rvieceli[/member] Ron, thank you for your comments on my first draft.
rvieceli said:
There's not a particularly compelling reason the have the add on table extend any farther that the column in the rear. You won't really gain anything and it complicates the construction a bit.

In addition you might as well extend the t track all the way to the front edge. Makes it easier to insert things.

If it were me, I'd take bar stock that would fit through the slot in the factory table, drill and tap it for maybe 1/4-20 or the metric equivalent. Cut it to a length that when rotated at 90 degrees to the slot would hold securely. I would then drill and countersink the holes in the add on top to keep the screw heads below the surface. You would align the tapped bars so they dropped through the factory table slots to below the factory table and then rotate them 90 to the slot and tighten the screws.

You'd need to decide if you needed just two of those or maybe one in the front also.

Ron

Ron, I agree with you that it might not help it and that make the design more complicated. I do like some challenge  [big grin].

I am a too visual person to picture where you talk about drill & countersink the holes [sad]. My goal right now is to get to a design that will give me the larger working surface possible w/o getting out of wack. For example, if I end up extending the table in the back, there will be a notch for the handle or the handle will be mounted under the table like Dick one with a double universal joints. I like the hand wheel suggestion, looks very nice I.M.O.

Extending the tracks? Well that first draft is based on the length of the WP tracks 15 3/4". I was planning to add a key hole (T-Bolt size) in the front of each slot to help sliding in clamps.

Having a front track? Another very good suggestion. I might add one on the next version. Of course that track would go all the way  [wink]

I am still at the design phase and love all the idead & pictures you guys bring in. Thank you  [smile]
 
Back
Top