Oak boards for table surface advice requested

Cyanide

Member
Joined
Dec 22, 2015
Messages
7
Dear all,

Today I ordered some oak boards that are to be used as a surface for a table.

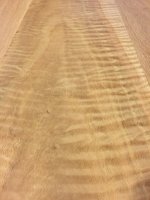
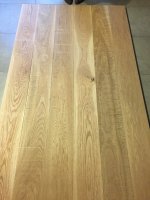
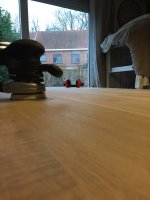
2 of the planks show a wavy wood grain pattern as you can see in attached pictures.

What surface treatment would you suggest to minimize this effect ?

Many thanks in advance for any help or suggestions
 

Attachments

  • 201601221637_002.jpg
    201601221637_002.jpg
    4 MB · Views: 647
Wow, that's an interesting approach. I think most members on this forum would want to maximize the look rather than minimize it.  Reminds me of quilted maple.
 
How many boards total?

Is the pattern through the board?

You could use those as a border, center accent or every other.

I don't think you be able to hide the pattern completely.

Tom
 
There are in total 6 boards of which 2 have that curvy patttern, which makes them kind of stand out. Putting them as in the middle or at the border might help.
 

Attachments

  • 201601221637_001.jpg
    201601221637_001.jpg
    5.1 MB · Views: 614
With 6 boards---border.

Match the grains and tones on the center the best you can. It may be helpful to wipe them with mineral spirits to show the grain/color better. Don't forget to check both sides.

Tom
 
I'd suggest getting some more boards that match the others you are going to use for the table top.  Oak boards can have very different grain patterns from one to another.  Best to get a very similar pattern in all boards.  You want the top to end up looking like "one" board when finished.  Get six boards that all have the same pattern and then shuffle them around so they create the best flow.
 
Thanks for all the replies. Getting more is unfortunately not an option. These boards are quite expensive as they are 40 mm thick and 1,8 m long. I may cut the plank in half and put them both at the border. Don't know whether that will be visually appealing, so I have to try a few things I guess.
 
If you lived near me you could have your pick of plain grain oak boards in trade.  I would find a way to feature them, not hide them.  Maybe put them right in the center.  Figured oak is rare.  All figured wood is interesting. 
 
Thanks for all the comments. I've been working on the table a bit and made a table top. I have grown quite fond of the special structure, so I have incorporated them in the top. The only question I have right now is that after glueing and setting the table top has warped a bit. It is not perfeclty straight. Any tips on straigthening it out?
 

Attachments

  • 201602211550_001.jpg
    201602211550_001.jpg
    4.9 MB · Views: 566
  • 201602211550_002.jpg
    201602211550_002.jpg
    4.6 MB · Views: 530
You could recut the table along the grain where there is a warp with your TS saw on a rail and then reglue it to take any warp out and then sand it out.  You could also do a breadboard end on it to minimize warping, but I think you said you did not want to buy any more of the wood as it was expensive.

How much of a warp and what kind of base are you attaching to? You might pull the warp out as you attach to a base depending on the structure.
 
Place a pair of winding sticks on the table and post a line of sight pic. This will allow us to see the warp and make better suggestions.

Tom
 
That wavey effect is certainly sought after for furniture making especially for top surfaces. It is caused by stress in growth which also leads to the burr sections prized in many hardwoods especially oak, elm, walnut and yew.

If you had the means you could have it resawn into veneers, even at 1/8" you would get enough to produce some lovely tops. A friend of mine has just bought an oak trunk which is almost all burr - it was about to become firewood. He is spending a considerable sum having it transported to France where a specialist company will convert it to veneer. My friend expects to make enough to buy a good quality car.

Here is a breadboard that I made last week with the same pattern - the wood is chestnut.

[attachimg=1]

Peter
 

Attachments

  • Breadboard - FOG.jpg
    Breadboard - FOG.jpg
    850.9 KB · Views: 527
Beautiful breadboard!

Thank you all for the replies and comments. I took a new picture with a ruler on the table so you can see the curve. The boards themselves are not warped on their longitudinal axes ( or very minimal ).

I might be able to take the curve out by attaching the top to the base as there still is some flex in it?
6a8dcb428989c5076d4d36858b72d5ea.jpg
 
Looking at the last picture----cut the top along the existing seams and reglue it making sure it stays on plane.

Tom
 
[member=11196]Peter Parfitt[/member]  Would love a video to see how you did THAT!

Peter Parfitt said:
That wavey effect is certainly sought after for furniture making especially for top surfaces. It is caused by stress in growth which also leads to the burr sections prized in many hardwoods especially oak, elm, walnut and yew.

If you had the means you could have it resawn into veneers, even at 1/8" you would get enough to produce some lovely tops. A friend of mine has just bought an oak trunk which is almost all burr - it was about to become firewood. He is spending a considerable sum having it transported to France where a specialist company will convert it to veneer. My friend expects to make enough to buy a good quality car.

Here is a breadboard that I made last week with the same pattern - the wood is chestnut.

[attachimg=1]

Peter
 
[member=37411]Edward A Reno III[/member]

Just for you .....

Take a look at this from about 8 minutes and 40 second mark but I think that you might enjoy watching it from the beginning.


Peter
 
tjbnwi said:
Looking at the last picture----cut the top along the existing seams and reglue it making sure it stays on plane.

Tom

That is an excellent suggestion from Tom. You need to do it in two stages...

First cut along the glue line creating two pieces of wood.

Next, with the two pieces on a flat surface and with the two cut edges butted together, clamp both pieces securely to the bench top and then run your track saw along the line again to do a scribing joint.

Once that is done you can join the two pieces again.

I have just filmed a similar operation but am not ready to release the video yet. I will try and remember to put a link on this thread when that is done.

Peter
 
Nice table...looks good.

Just curious, if you alternated the end grain orientation (up-down-up-down) during the glue-up or did you just glue it up with whatever grain pattern looked the best?
 
Back
Top