OK, seriously now, how do YOU calibrate your Domino 500?

Gotoh

Member
Joined
Apr 16, 2014
Messages
34
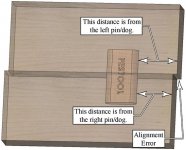
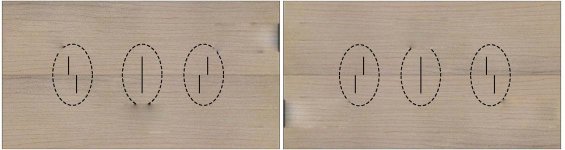
My will's ability to resist the Domino sale fell short, so I found myself ripping open a box and making my first test cuts the other day. Sure enough, the center line markings on mine were not properly aligned.

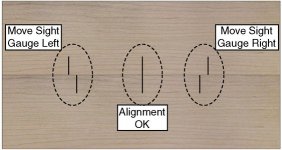
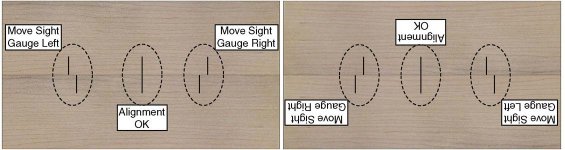
I'd read the instructions and watched all the videos and figured this would be an easy fix. Took two identical pieces of scrap, drew my line, joined them together, looked at which direction the lines were off and... Oops... Which piece did I cut first? The top one or the bottom one? OK, mark them and try again on the other side...

Second set cut and now I know which one was first. Oh man, the manual doesn't even say whether the first cut should be on the top or the bottom when evaluating the line position. Alright, let's figure that out and make the adjustment.

Third set cut and I over-corrected. On to set four.

Set four cut and I over-corrected the opposite direction. Here comes lucky number five.

The clear plastic window shifted while I was tightening it and now it's just flat out crooked. How long have I been down here again?

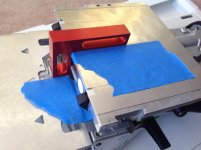
At this point I took a step back and judged this entire process to be inherently stupid. I took two pieces of masking tape and applied them very carefully along the marking lines on both the base plate and the plastic window just to create a tiny bit of a lip. I then held a small Woodpecker's mini-square flush against this lip, adjusted the fence height so that it would contact both surfaces, and viola! Perfect calibration in seconds.

[attachthumb=#]

I didn't actually try it after I'd experienced this instant success, but it dawned on me that a good laser level would also probably be able to make this goofy trial-and-error process a whole lot less annoying.

I sifted through some search results but didn't find a whole lot of alternative solutions. I know I'm pretty darned dumb, but I can't be the only one who's had trouble with this process. Does everybody *really* do the draw-join-eyeball cycle repeatedly until it just magically happens to work?
 

Attachments

  • IMG_0014 1.JPG
    IMG_0014 1.JPG
    1.4 MB · Views: 768
Don't have the time to find it now, but Paul Marcel, Halfinch Shy, has a video on youtube showing how to calibrate the 500.
 
NYC Tiny Shop said:
Don't have the time to find it now, but Paul Marcel, Halfinch Shy, has a video on youtube showing how to calibrate the 500.

Paul actually has 4 domino videos to peruse including the one mentioned.

Here is a like to his YouTube channel: 
 
Shane Holland said:
Here's the video in question.


Yep, saw that one before I even ordered. Still more cognitive work than actually necessary in my opinion, and I don't happen to have one of those wheel markers handy.
 
Have you confirmed that your Domino is not calibrated? It should be calibrated right out of the Systainer.
 
Shane Holland said:
Have you confirmed that your Domino is not calibrated? It should be calibrated right out of the Systainer.

Like I said, first thing I did before loosening any screws anywhere. It was absolutely not even close to calibrated--off by nearly 1/8".
 
I don't even know that there's a full 1/8" movement in the cursor adjustment. I'm very surprised that it's off by that much. My advice would be to swap it for another unit if it's convenient to do so, or you can send it in for calibration under warranty for free.

Shane
 
Shane Holland said:
I don't even know that there's a full 1/8" movement in the cursor adjustment. I'm very surprised that it's off by that much. My advice would be to swap it for another unit if it's convenient to do so, or you can send it in for calibration under warranty for free.

Shane

It's not possible to go a full 8th off, but it was more than 1/16th. I made my marks with a 0.3mm pencil lead, was cutting into brand new 3/4" MDF that was flat, smooth and soft, and I plunged very slowly to make sure there was no accidental movement on my part--I'm pretty confident I did the actual cutting correctly.

Swapping's no more convenient than a warranty return would be, and it's fine now. Made a perfect Parson's joint as detailed in the supplemental manual in one try.

I suppose the real question is: why is the process in the manual the process in the manual? At the very least, it should instruct one as to the proper orientation of the first and second cut pieces so you don't have to perform a bunch of spatial reasoning acrobatics to get a straight line.
 
Out of the box I took two scrap pieces of wood, made a mark across both where they would be joined.  I then made the cuts, inserted the Domino, and it matched up perfectly.

I then proceeded to make frames for box lids using basic butt joints with a domino placed in each joint.  All frames came out perfect!
 
Gotoh said:
I suppose the real question is: why is the process in the manual the process in the manual? At the very least, it should instruct one as to the proper orientation of the first and second cut pieces so you don't have to perform a bunch of spatial reasoning acrobatics to get a straight line.

I think the illustration is pretty straight forward. I'm not sure what other process could be used for calibration that would be more straightforward. If you have recommendations, please share them and I'll submit them for consideration. Sorry if you found it confusing.

Shane
 
Gotoh said:
I suppose the real question is: why is the process in the manual the process in the manual? At the very least, it should instruct one as to the proper orientation of the first and second cut pieces so you don't have to perform a bunch of spatial reasoning acrobatics to get a straight line.

You are actually over-thinking it. I already did all the thinking for you, and you just need to follow the graphic shown in the manual. The one thing that I could have done better was making it more clear that moving the sight gauge "right" and "left" are when the fence it toward you and the power cord is away from you. It is kind of intuitive because you would normally be facing the fence to make the adjustment, but it could have been stated clearer.

As for the procedure, it doesn't matter which was first or second, just follow the procedure and the graphic and they cancel out. No matter how you orient the boards, as long as the pencil lines line up as shown, move the sight gauge in the direction indicated.

[attachimg=#]
 

Attachments

  • DF500-28-lo.jpg
    DF500-28-lo.jpg
    54.1 KB · Views: 1,731
Shane Holland said:
Here's the video in question.


I hadn't seen this video until now, but the procedure shown is much more complicated than it needs to be. (Sorry Paul-Marcel). He is mixing the two procedures up a little (sight gauge versus pins/paddles). When calibrating the pins/paddles, you do need to pay attention to which board was mortised from the right or left pin/paddle. That is why the graphic shown in the manual shows the tenon location way off-center from the center of the board.

When calibrating the sight gauge, it doesn't matter whether the two boards are flush when you draw your line. It is also a needless step to transfer the line from the base of the Domino up to the sight gauge. 

[attachimg=#]
 

Attachments

  • DF500-61-lo.jpg
    DF500-61-lo.jpg
    67.3 KB · Views: 1,821
Gotoh said:
Shane Holland said:
Have you confirmed that your Domino is not calibrated? It should be calibrated right out of the Systainer.

Like I said, first thing I did before loosening any screws anywhere. It was absolutely not even close to calibrated--off by nearly 1/8".
Dumb question(s)

Did you buy it new?
if no, well you take your chances buying used

if yes, did you buy it from a brick and mortar or online?

If Brick and Mortar- then I return it , let the festool guy at the B&M play with it and see if its is out or operator error.

If On-line and not a festool specialist  (amazon etc.) like we have here- Aldo, Bob, Tom, Sean, K-119 phil then contact festool service.

Lessons learn:
Dont buy used unless you thoroughly check it out
Dont buy online unless you buy from a specialist
Dont buy from a B&M unless they are very familiar with festool.
festool service is your friend.
 
My 500 was about a 1/16" off, new. 700 was spot on. Both, came fom Toolnut. I calibrated it, with the help of Paul's video and a PM ( still needed to file the plastic a little) and now it's spot on. (BTW, I have a hard time believing that both the 700 and 500 are manufactured and assembled in the same factory.)
 
Rick Christopherson said:
You are actually over-thinking it. I already did all the thinking for you, and you just need to follow the graphic shown in the manual.

Uh...

[attachimg=#]

I completely disagree that failing to mention which piece goes on top and which goes on bottom doesn't matter at all. Look at it one way and the lines skew one direction. Look at it another and they skew the opposite direction. Remove the text overlays from those images (my MDF certainly didn't come with them printed on it) and you cannot possibly intuit which direction to move the line just by looking at the lines themselves.

[attachimg=#]

I made my purchase from Tool Nut (how would I possibly have gotten a sale price buying used, anyway?) and have absolutely no reason to believe that I received anything other than a brand spanking new unit. It was off and the manual's weak.
 

Attachments

  • Alignment.jpg
    Alignment.jpg
    48.2 KB · Views: 1,470
  • Alignment2.jpg
    Alignment2.jpg
    36.9 KB · Views: 1,305
Gotoh said:
I completely disagree that failing to mention which piece goes on top and which goes on bottom doesn't matter at all.

Nope, it doesn't matter at all.

[attachimg=#]
 

Attachments

  • DF500-28-Rev-lo.jpg
    DF500-28-Rev-lo.jpg
    67.7 KB · Views: 1,507
Good lord, I really cannot believe that I'm even having this discussion. Take the words off of the image and pretend you're looking at actual wood.

[attachimg=#]

I believe you think you've done all the thinking, but I think you're blind.
 

Attachments

  • Alignment2.jpg
    Alignment2.jpg
    36.9 KB · Views: 1,379
Jeez both of these demonstrate that if it's out of alignment to the right move the sight glass left and if it's out of alignment to the left move the sight glass right. [big grin]
 
Gotoh said:
Good lord, I really cannot believe that I'm even having this discussion. Take the words off of the image and pretend you're looking at actual wood.

[attachimg=#]

I believe you think you've done all the thinking, but I think you're blind.

Rick is right.  If your domino joint was like the first one in the first image and you rotated (not flipped) the two pieces, the third domino joint in the second image.  They are the same.
 
Back
Top