OK, I might as well post my other project that was the start of the recent trend of building things...
Last November (2013) I decided to build my own outdoor table rather than buy one, and it's been over 20 years since high school woodworking, but I am generally OK with tools, and remembered some of the techniques.
I decided to build it from mahogany, as it would be nicer than Merbau (which tends to bleed tannins), and far less expensive than Teak (especially if I made a mistake). Also even though the lifespan is less than teak, since the joinery would be purely Kreg pocket hole joints, then I didn't want the wood to outlast the screws. Also it would give me an excuse to build a replacement.
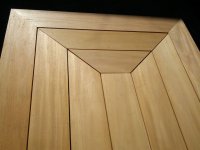
I wanted to spend more time on a nice design, rather than too much time in crazy joinery that was beyond my ability. The cocentric mitres had a lot of interesting things to solve - how to get the right lengths, how to get those visible lines aligned, how to provide support from below, etc.
First session was not so good. Despite planning everything on Sketchup, I found out that in the real world wood isn't that precise
Sketchup model:
[attachimg=#8]
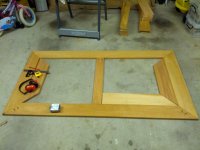
- so I ended boxing myself in without enough gaps. (Lesson learnt and applied on the 2nd session - work outwards)
[attachimg=#1]
Also I had no experience with how exact mitres needed to be over 1800mm, so had some problems with open mitres on the outer frame (cue lots of searching for solutions on YouTube). Note that mitres on the internal layers have an intentional gap for drainage and to emphasise the design - these gaps worked in my favour because it could be less precise. [wink]
[attachimg=#2]
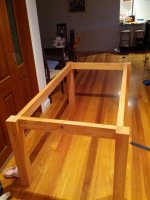
Built the legs and frame in 20 minutes with pocket screws...
[attachimg=#3]
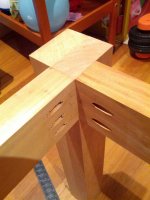
Close up of the pocket screws...
[attachimg=#4]
2nd session got it all done, and this is before finishing...
[attachimg=#5]
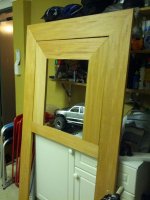
Another angle...
[attachimg=#6]
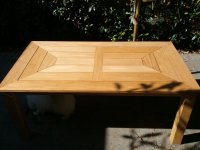
"Finished" with a lot of outdoor furniture oil (I didn't build the chairs)...
[attachimg=#7]
I had no idea or experiences with finishes, so have been quite happy with how it has turned out. A couple of months of use and I decided to do a 6mm roundover as we kept getting marks on our forearms.
If only...
- I had a Kapex at the time (the dust and subsequent cleanup was terrible)
- I had a TS55 and MFT at the time (I could have put all the boards together then cut the mitres in one go)
- I had a Domino - it would have made the joins so much stronger and easier to align
But I loved the project, loved the outcome, and learnt a lot. Also it has got me building a lot more since then. ;D I have also discovered Festool - woohoo!
Last November (2013) I decided to build my own outdoor table rather than buy one, and it's been over 20 years since high school woodworking, but I am generally OK with tools, and remembered some of the techniques.
I decided to build it from mahogany, as it would be nicer than Merbau (which tends to bleed tannins), and far less expensive than Teak (especially if I made a mistake). Also even though the lifespan is less than teak, since the joinery would be purely Kreg pocket hole joints, then I didn't want the wood to outlast the screws. Also it would give me an excuse to build a replacement.
I wanted to spend more time on a nice design, rather than too much time in crazy joinery that was beyond my ability. The cocentric mitres had a lot of interesting things to solve - how to get the right lengths, how to get those visible lines aligned, how to provide support from below, etc.
First session was not so good. Despite planning everything on Sketchup, I found out that in the real world wood isn't that precise
Sketchup model:
[attachimg=#8]
- so I ended boxing myself in without enough gaps. (Lesson learnt and applied on the 2nd session - work outwards)
[attachimg=#1]
Also I had no experience with how exact mitres needed to be over 1800mm, so had some problems with open mitres on the outer frame (cue lots of searching for solutions on YouTube). Note that mitres on the internal layers have an intentional gap for drainage and to emphasise the design - these gaps worked in my favour because it could be less precise. [wink]
[attachimg=#2]
Built the legs and frame in 20 minutes with pocket screws...
[attachimg=#3]
Close up of the pocket screws...
[attachimg=#4]
2nd session got it all done, and this is before finishing...
[attachimg=#5]
Another angle...
[attachimg=#6]
"Finished" with a lot of outdoor furniture oil (I didn't build the chairs)...
[attachimg=#7]
I had no idea or experiences with finishes, so have been quite happy with how it has turned out. A couple of months of use and I decided to do a 6mm roundover as we kept getting marks on our forearms.
If only...
- I had a Kapex at the time (the dust and subsequent cleanup was terrible)
- I had a TS55 and MFT at the time (I could have put all the boards together then cut the mitres in one go)
- I had a Domino - it would have made the joins so much stronger and easier to align
But I loved the project, loved the outcome, and learnt a lot. Also it has got me building a lot more since then. ;D I have also discovered Festool - woohoo!
Attachments
-
 IMG-20131116-WA0004.jpg98 KB · Views: 1,338
 -
 IMG-20131116-WA0006.jpg107.4 KB · Views: 1,268
 -
 IMG-20131118-WA0003.jpg110.7 KB · Views: 1,299
 -
 IMG-20131118-WA0005.jpg106.2 KB · Views: 1,279
 -
 IMG_20131124_164311.jpg92.5 KB · Views: 1,307
 -
 IMG_20131124_164226.jpg114.2 KB · Views: 1,322
 -
 IMG_20131226_175749.jpg136.2 KB · Views: 1,312
 -
 Outdoor Table.png41.3 KB · Views: 1,308