Paint cabinets myself or factory finish?

Kodi Crescent

Member
Joined
Aug 6, 2010
Messages
791
Hi,

I'm getting ready to buy some cabinets for a home office.  I'm trying to make a "paint myself" vs. "have painted" decision and I'd like some input.  Here's what I have in in mind for the cabinet order, all Shaker style doors:

(2) 2 drawer 2 door base cabinets (24"W x 21"D x 36"H)
(1) 3 drawer base cabinet (16.5"W x 24"D x 28.5"H)
(1) 2 drawer 2 door base cabinet (24"W x 24"D x 28.5"H)
(2) 2 door wall cabinets (24"W x 14" D x 37"H)
(1) 1 door glass front wall cabinet (16.5"W x 12"D x 37"H)
(1) 2 door glass front wall cabinet (24"W x 12"D x 37"H)
(1) Open front wall bookshelf (36"W x 12"D x 37"H)
(2) Base end panels (3/4"W x 24 5/8"D x 28.5"H)
(3) Minor size end panels
(4) Filler strips (2.25"W x 39"L)
(2) Light valence rails (2"W x 90"L)

The interiors of many of the cabinets are pre-finished.  I'd have to paint the following:

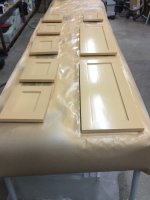
10 Shaker style doors
3 - 6 lite glass doors
9 Shaker style drawer fronts
2 upper cabinets (glass cabinets are unfinished)
1 open wall bookshelf (comes unfinished)
4 filler strips
2 light valence rails

I have a Fuji Q4 HVLP, limited spraying experience, would need to setup something in my garage, and wait until Spring probably for warmer temps.

The difference between buying unfinished and finished is $2300.  When the company paints they do 2 coats of primer and 2 coats of paint.  They want $2300 for this.  Is this a good deal, or am I better off finishing these myself?

Any input is appreciated!
 
Do it yourself, spraying is not that difficult. But make sure you have a dust free environment. You also already have a paint sprayer, so what's holding you?

Start small with one cabinet. If it doesn't work out right away, sand it and do it again until you get it right. Then do the rest.
 
If you've already got the Fuji Q4 then of course do it yourself.

HVLP spraying is not that difficult. My first experience was spraying an 8 metre long by two metre high MDF shelving display for a retail outlet. I had worked in a car repair shop many moons ago but too long ago to still have the muscle memory/eye for a good technique.

I bought the Apollo Pro Spray 1500 which not quite as good as your Fuji and it worked great, so your Fuji should be ideal.

My only advice would be to pay close attention to putting thin layers down not to cause runs. I made this mistake on the first few feet of the shelving unit and had to spend a bit of time spreading and removing the paint with a mini foam roller. It's especially difficult for a novice if you're sprayin a light colour onto a light primer.

i was under time pressure and circumstances conspired against me so that I had very little time to practice and so my first spray experience was an oversized baptism by fire.

If you have a practice, do some research on correct techniques and take your time you'll be very pleased with your results and be glad you have the $2300 for something else.
 
Just don’t make the mistake to spray planes in a horizontal position (eg ‘flat’). Make sure what you spray is mostly vertical and dries in that position too.
 
Bert Vanderveen said:
Just don’t make the mistake to spray planes in a horizontal position (eg ‘flat’). Make sure what you spray is mostly vertical and dries in that position too.

Really?  Why?  I was envisioning that this would be relatively easy to spray if I laid it flat.  I wouldn't think I would experience runs laying horizontal.  Can you please expound on this?
 
Instead of paint you could go with a colored finished designed to be sprayed. There are tricks to using modern acrylic paints with HVLP equipment.

The pictures are cabinet and components sprayed using my Q4, 2 coats SW Multi Purpose Primer, 2 coats SW Pro Classic, 2 top coats of SW Kem Aqua + clear. Had to go with paint to match the color.

Not sure why Bert feels you need to spray with the parts vertical, spraying can be done in all positions.

By the way, $2200.00 to spray your cabinets is not a bad price at all.

Tom


Attachments

  • IMG_4034.jpg
    IMG_4034.jpg
    1,019.2 KB · Views: 646
  • IMG_4044.jpg
    IMG_4044.jpg
    972.9 KB · Views: 797
Kodi Crescent said:
Bert Vanderveen said:
Just don’t make the mistake to spray planes in a horizontal position (eg ‘flat’). Make sure what you spray is mostly vertical and dries in that position too.

Really?  Why?  I was envisioning that this would be relatively easy to spray if I laid it flat.  I wouldn't think I would experience runs laying horizontal.  Can you please expound on this?

When it is lying flat you can not control the overspray. Imagine the spray bundle as a cone shape. When the intersection of the object you spray is perpendicular to that cone the area that receives the spray (paint) is round and the overspray (particles that overshoot the main spray area) is evenly dispersed around this round area. This only happens when your spray nozzle is at a 90 degree angle to the plane (or very close to it).

Now imagine spraying the plane when it is lying flat, parallel to the ground. You will almost never be able to achieve a 90 degree angle (for several reasons you can imagine), so there is an uneven overspray (that will have on oval shape, with less paint particles in the top and more in the bottom part of the sprayed area) resulting in uneven dispersion of the paint.

Pro painters use special techniques to counteract this, it takes quite a few hours to learn these. For non-pros the problem is evaded by favoring spraying vertical planes.

Regarding the runs: a run is an indication of possible problems: too much paint, overdilution, bad adherence, etc. All things you need to avoid. In general: be tight with the paint, do an extra course if needed.

This is information I recently gained from a Dutch forum, BYW. So I may have oversimplified or exaggerated things.
 
Bert Vanderveen said:
Kodi Crescent said:
Bert Vanderveen said:
Just don’t make the mistake to spray planes in a horizontal position (eg ‘flat’). Make sure what you spray is mostly vertical and dries in that position too.

Really?  Why?  I was envisioning that this would be relatively easy to spray if I laid it flat.  I wouldn't think I would experience runs laying horizontal.  Can you please expound on this?

When it is lying flat you can not control the overspray. Imagine the spray bundle as a cone shape. When the intersection of the object you spray is perpendicular to that cone the area that receives the spray (paint) is round and the overspray (particles that overshoot the main spray area) is evenly dispersed around this round area. This only happens when your spray nozzle is at a 90 degree angle to the plane (or very close to it).

Now imagine spraying the plane when it is lying flat, parallel to the ground. You will almost never be able to achieve a 90 degree angle (for several reasons you can imagine), so there is an uneven overspray (that will have on oval shape, with less paint particles in the top and more in the bottom part of the sprayed area) resulting in uneven dispersion of the paint.

Pro painters use special techniques to counteract this, it takes quite a few hours to learn these. For non-pros the problem is evaded by favoring spraying vertical planes.

Regarding the runs: a run is an indication of possible problems: too much paint, overdilution, bad adherence, etc. All things you need to avoid. In general: be tight with the paint, do an extra course if needed.

This is information I recently gained from a Dutch forum, BYW. So I may have oversimplified or exaggerated things.
I hate to tell you how wrong you are but spraying flat is the best way to do it
Most cabinets manufacturer are using this technical now days
Everything is sprayed flat then put together
 
Bert Vanderveen said:
Kodi Crescent said:
Bert Vanderveen said:
Just don’t make the mistake to spray planes in a horizontal position (eg ‘flat’). Make sure what you spray is mostly vertical and dries in that position too.

Really?  Why?  I was envisioning that this would be relatively easy to spray if I laid it flat.  I wouldn't think I would experience runs laying horizontal.  Can you please expound on this?

When it is lying flat you can not control the overspray. Imagine the spray bundle as a cone shape. When the intersection of the object you spray is perpendicular to that cone the area that receives the spray (paint) is round and the overspray (particles that overshoot the main spray area) is evenly dispersed around this round area. This only happens when your spray nozzle is at a 90 degree angle to the plane (or very close to it).

Now imagine spraying the plane when it is lying flat, parallel to the ground. You will almost never be able to achieve a 90 degree angle (for several reasons you can imagine), so there is an uneven overspray (that will have on oval shape, with less paint particles in the top and more in the bottom part of the sprayed area) resulting in uneven dispersion of the paint.

Pro painters use special techniques to counteract this, it takes quite a few hours to learn these. For non-pros the problem is evaded by favoring spraying vertical planes.

Regarding the runs: a run is an indication of possible problems: too much paint, overdilution, bad adherence, etc. All things you need to avoid. In general: be tight with the paint, do an extra course if needed.

This is information I recently gained from a Dutch forum, BYW. So I may have oversimplified or exaggerated things.

All 3 of my Fuji guns spray in a line, unless I've set the pattern to pencil.

A fan placed to draw the overspray from the area will decrease or eliminate the issue entirely.

I can spray at any angle to the material and control the lay of the product. The optimal is 90º but that is not always an option.

If the parts are on the flat and you can't get the gun to 90º, the work surface height needs to be decreased.

One note with parts on the flat, place them in contact (as they are in my picture above) with the work surface if both sides will be seen. This prevents rebound from fogging the back side of the piece along the edges. Once sprayed carefully move the pieces to a drying rack, do not allow them to dry on the work surface.

Tom

 
This is a paper derealer I made to get clean paper on the spray surface easily. I start with the large pieces, spray them, place a smaller piece in the void, continue this way until I have no pieces that will fit in the void. Roll the paper, start over....

I do use a piece of plastic under the paper to prevent bleed onto the MFT tops.

I start with the roll on the conduit side, roll the paper to the 2" PVC side, when I've used the entire roll I run the clean side back to the conduit side.

Tom
 

Attachments

  • IMG_0065.jpg
    IMG_0065.jpg
    2.1 MB · Views: 625
  • IMG_0066.jpg
    IMG_0066.jpg
    2.3 MB · Views: 617
  • IMG_0067.jpg
    IMG_0067.jpg
    2 MB · Views: 599
  • IMG_0068.jpg
    IMG_0068.jpg
    2.1 MB · Views: 567
  • IMG_0069.jpg
    IMG_0069.jpg
    1.9 MB · Views: 555
I have sprayed so many things in my father's bodyshop, we also did furniture, industrial objects like machines, air ducts, boats, you name it.

It really makes no difference at all in which position you spray it.

But there are some things you need to keep in mind:

- make sure the paint has the proper dilution. Not too thick, not too thin.
- keep your sprayer moving. Always.
- keep the sprayer at the proper distance, around 30 cm/ 1 foot.
- spray thin layers. 2 thin layers is better than 1 thick layer. Especially on furniture we often did one thin layer, let it dry for 10 minutes and then a second layer over it. How long you can wait between layers also depends on the type of paint used.
- spray with a bit of overlap. 

 
Sorry to hijack this thread thought I'd try hear first before opening a new topic along similar vein.

I am looking at spraying face frames, doors and some carcasses. Primer only to be hand finished on site.

Thinking of going hvlp but not done any spraying before so looking for some advice and guidance towards what kit to buy. Will setup an area in the workshop. I already have a compressor if I can utilise that. I think the hvlp requires different type of pressure though?

Appreciate the comments hopefully coming.  [big grin]
 
Follow up question on the same project - Due to some job limitations, I won't have the time to build these and spray them.

I have a couple of quotes on this job.  One quote involves cabinets from a vendor who uses pre-finished plywood for the boxes, so the cabinet interiors will have a factory pre-finish.

The other quote is from a well thought of local builder.  He doesn't use pre-finished plywood to build the boxes, but will use standard plywood (I assume baltic birch).  He doesn't have spray equipment, and has quoted rolling and brushing on a primer coat, followed by a coat of Sherwin Williams "Extra White".

His quote is significantly cheaper than the other quote.  Not sure how I feel about brush and roller applied finish for the cabinet interiors.  Any cautions on his proposed finish type for cabinet interiors?
 
Kodi, I'm curious as to why he doesn't use pre finished ply on the boxes.  That's what I use and it saves a ton of time.  The only time I don't use it is when the interior is going to show and then I'll either paint or stain to match the exterior.
 
I'm not sure myself.  I have looked for pre-finished in this area.  It's not easy to come by.  There are a couple of the cabinets that are glass and open faced and he wants to paint to match the doors.  Perhaps he only wants to make one trip for all the plywood for the boxes (to Home Depot would be my guess).
 
Kodi Crescent said:
Any cautions on his proposed finish type for cabinet interiors?

The contractor has only specified a color (Extra white - SW 7006) vs. type of paint (latex, lacquer, etc.) he is proposing. I would get him to tell me the type of paint he is proposing and then you can make a decision.
A brush and proper application in the hands of someone who knows what they are doing is a very good finish that can rival any sprayed coating.
Tim
 
Kodi Crescent said:
It was latex.  No good?

I wouldn't recommend it.
Go with the other vendor. At least the inside of the cabinets will stand up to the wear and tear.
What is the first vendor proposing for the face frames and doors/ drawer fronts etc.?
Tim
 
Frameless cabinets.  If I have them finish them, they apply 2 coats primer, 2 coats finish.  Sherwin Williams Pure White varnish.  Barker Cabinets is the vendor.
 
Back
Top