- Joined
- Oct 6, 2018
- Messages
- 215
This post documents my painting of a systainer. Want to follow my other systainer projects? Check out Systainer.Store on Instagram (systainer.store) or sign up at the website for the newsletter (it includes a one time discount coupon to Systainer.Store).
Go Blue!
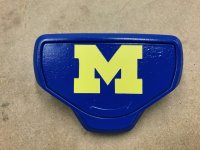
A while ago I asked on the forum about painting systainers. A couple weekends ago I painted my first systainer, a SYS-I, to be like a University of Michigan Football Winged Helmet, in the spirit of the upcoming college football season. Here is a chronicle of what I did to paint the systainer, and perhaps what I would do differently next time.
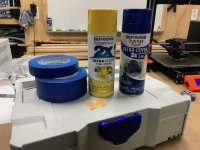
For this project I used Rust-Oleum Gloss Sun Yellow and Gloss Deep Blue. Overall, the colors are good, not perfect and not that lovely really dark blue, but good representation. Yellow is a pretty good Maize substitute I think. It didn't feel too glossy, maybe that is because of the texture on the systainer. U of M has a style guide with the exact pantone colors, however I found it too expensive to mix custom spray paints. I checked several places (if you have a source, let me know!)
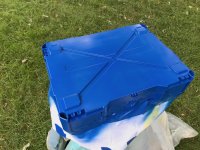
[attachimg=1]
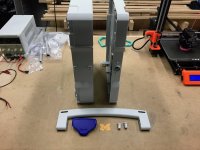
First - take the systainer completely apart. Pop off the handle, T-Loc and hinge pins.
[attachimg=2]
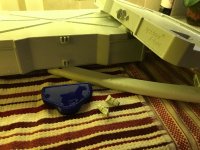
Next wash the systainer with warm water and soap to get any grime or oils off. Let it air dry for a bit. I then towel dried the rest. If you have compressed air available, you could likely blow any remaining water off as well.
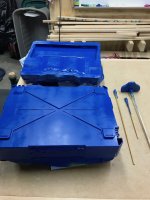
[attachimg=3]
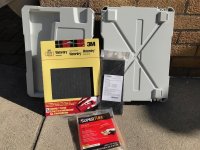
Then I decided to give a very light sanding with 320 grit sand paper. The intent here is to scuff the surface enough to give something for the paint to bite on to. This is especially important for the non-textured surfaces of the systainer. Don't over do it, just run the paper over the entire systainer. After this you may want to wash it again and blow it off. I used a tact cloth to be sure to get all the dust.
[attachimg=4]
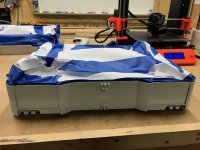
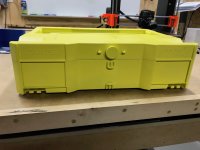
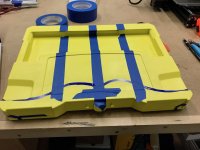
The painting I did was only on the outside of the systainer. I decided to paint the systainer similar to how I understand the real helmets are painted. By that I mean I painted the whole thing yellow - well most of it. Then I masked what should stay yellow and painted the rest of the systainer in blue. Each coat of paint was applied 2 to 3 times. Short, quick burst of paint and movement to keep the coats light and to not get runs. Use multiple coats to get good coverage.
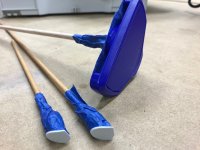
I used standard printer paper and blue tape to mask the inside of the systainer for yellow (maize) paint application. I made 'skewers' for the small parts. For the T-Loc I used a small bit of hot glue to hold the stick to the back. This worked well, just don't use too much glue or you will have a hard time getting it apart at the end.
[attachimg=5]
[attachimg=6]
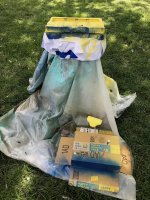
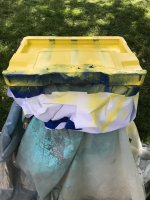
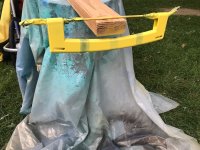
My 'spray booth' is actually outside in my backyard. I put down a drop cloth and set up a stand to hold the parts. If you do it like me, ensure it is a pretty still day (no wind) and the temperature/humidity works with your spray paint.
[attachimg=7]
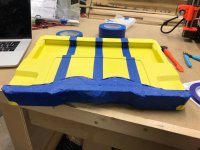
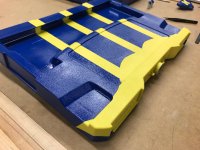
With the systainer all yellow (two to three passes), I removed the masking and then reapplied it for the wing helmet, strips and block M. This took some time. Go slow. Have a template. And in my case, if you get frustrated, stop for a while, then come back to it. I don't consider myself artistic and the part I was excited and yet nervous to do was getting the wing look right. After looking at many pictures, printing some templates and sketching with a pencil on the yellow paint, I was able to get a look I liked, which is difficult with the curves/faces of the systainer. Take your time.
With my pencil marks set, I then used 1/4" vinyl tape to mask the curves. This was a challenge in itself as well. Vinyl tape is good because it stretches but doesn't stick as strong as I would have liked, so it was quickly followed up with blue painters masking tape. A couple times I had to reset the curves and reinforce the tape. It is tough to get the masking into some of the nook and crannies. Do your best. Lots of small pieces of tape help. Even in my case, there were some hard to get spots and so I'm going back and touching up the paint where I couldn't get it fully masked.
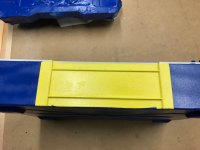
I used 1" wide tape for each of the three stripes. Those were pretty easy. Keep them straight and even. The hardest part to tape is in the undercut by the handle. Again, small pieces of tape and maybe some tweezers or needle nose plied to help place the tape.
I should mention that if you want, you could sand and clean the yellow paint before the blue coat. This may help with adhesion of the blue. Overall, I don't expect this paint job to be job site durable. I'm using it more as a show piece and experiment, I expect it may flake eventually, though a clear coat may help to prolong that demise.
[attachimg=8]
[attachimg=9]
[attachimg=10]
[attachimg=11]
With the new masking applied, back to the spray booth. I did another quick coat of yellow where there was masking. This was an attempt to 'seal' the masking so that blue doesn't creep under the tape. Then a couple coats of blue paint. Be sure that you paint from many different angles. It helps to have the systainer raised up so you can spray paint from top, sides, bottom, etc. Keep the spray quick and moving, you can do multiple passes if you need to get good coverage in any of the tight spots and coves.
[attachimg=12]
[attachimg=13]
[attachimg=14]
Let the whole thing dry well before handling it.
[attachimg=15]
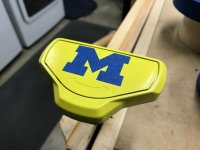
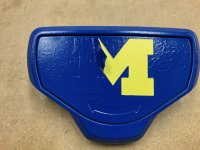
Finally, the fun part - at least I think it is fun. Peeling back the masking and revealing the hours of effort! Again, some masking may not be perfect, remember you can always touch up the paint. I used a razor knife and tweezers to catch the corner and pull the masking back.
Then reassemble the unit. Enjoy!
[attachimg=16]
[attachimg=17]
[attachimg=18]
[attachimg=19]
[attachimg=20]
[attachimg=21]
I did consider starting with the sapphire blue systainer, and perhaps if I do this again I may try that. Then the only thing to paint is the yellow/maize.
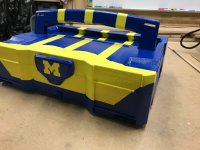
There it is, Go Blue Systainer!
I'll likely touch up some areas, be sure to erase pencil lines and then clear coat the parts. I also want to mask in Systainer.Store text in yellow as well as Go Blue and M Club Supports You, maybe that will be on the sides.
Want to follow my other systainer projects? Check out Systainer.Store on Instagram (systainer.store) or sign up at the website for the newsletter (it includes a one time discount coupon to Systainer.Store).
Make it a great day - Sys Tim
Go Blue!
A while ago I asked on the forum about painting systainers. A couple weekends ago I painted my first systainer, a SYS-I, to be like a University of Michigan Football Winged Helmet, in the spirit of the upcoming college football season. Here is a chronicle of what I did to paint the systainer, and perhaps what I would do differently next time.
For this project I used Rust-Oleum Gloss Sun Yellow and Gloss Deep Blue. Overall, the colors are good, not perfect and not that lovely really dark blue, but good representation. Yellow is a pretty good Maize substitute I think. It didn't feel too glossy, maybe that is because of the texture on the systainer. U of M has a style guide with the exact pantone colors, however I found it too expensive to mix custom spray paints. I checked several places (if you have a source, let me know!)
[attachimg=1]
First - take the systainer completely apart. Pop off the handle, T-Loc and hinge pins.
[attachimg=2]
Next wash the systainer with warm water and soap to get any grime or oils off. Let it air dry for a bit. I then towel dried the rest. If you have compressed air available, you could likely blow any remaining water off as well.
[attachimg=3]
Then I decided to give a very light sanding with 320 grit sand paper. The intent here is to scuff the surface enough to give something for the paint to bite on to. This is especially important for the non-textured surfaces of the systainer. Don't over do it, just run the paper over the entire systainer. After this you may want to wash it again and blow it off. I used a tact cloth to be sure to get all the dust.
[attachimg=4]
The painting I did was only on the outside of the systainer. I decided to paint the systainer similar to how I understand the real helmets are painted. By that I mean I painted the whole thing yellow - well most of it. Then I masked what should stay yellow and painted the rest of the systainer in blue. Each coat of paint was applied 2 to 3 times. Short, quick burst of paint and movement to keep the coats light and to not get runs. Use multiple coats to get good coverage.
I used standard printer paper and blue tape to mask the inside of the systainer for yellow (maize) paint application. I made 'skewers' for the small parts. For the T-Loc I used a small bit of hot glue to hold the stick to the back. This worked well, just don't use too much glue or you will have a hard time getting it apart at the end.
[attachimg=5]
[attachimg=6]
My 'spray booth' is actually outside in my backyard. I put down a drop cloth and set up a stand to hold the parts. If you do it like me, ensure it is a pretty still day (no wind) and the temperature/humidity works with your spray paint.
[attachimg=7]
With the systainer all yellow (two to three passes), I removed the masking and then reapplied it for the wing helmet, strips and block M. This took some time. Go slow. Have a template. And in my case, if you get frustrated, stop for a while, then come back to it. I don't consider myself artistic and the part I was excited and yet nervous to do was getting the wing look right. After looking at many pictures, printing some templates and sketching with a pencil on the yellow paint, I was able to get a look I liked, which is difficult with the curves/faces of the systainer. Take your time.
With my pencil marks set, I then used 1/4" vinyl tape to mask the curves. This was a challenge in itself as well. Vinyl tape is good because it stretches but doesn't stick as strong as I would have liked, so it was quickly followed up with blue painters masking tape. A couple times I had to reset the curves and reinforce the tape. It is tough to get the masking into some of the nook and crannies. Do your best. Lots of small pieces of tape help. Even in my case, there were some hard to get spots and so I'm going back and touching up the paint where I couldn't get it fully masked.
I used 1" wide tape for each of the three stripes. Those were pretty easy. Keep them straight and even. The hardest part to tape is in the undercut by the handle. Again, small pieces of tape and maybe some tweezers or needle nose plied to help place the tape.
I should mention that if you want, you could sand and clean the yellow paint before the blue coat. This may help with adhesion of the blue. Overall, I don't expect this paint job to be job site durable. I'm using it more as a show piece and experiment, I expect it may flake eventually, though a clear coat may help to prolong that demise.
[attachimg=8]
[attachimg=9]
[attachimg=10]
[attachimg=11]
With the new masking applied, back to the spray booth. I did another quick coat of yellow where there was masking. This was an attempt to 'seal' the masking so that blue doesn't creep under the tape. Then a couple coats of blue paint. Be sure that you paint from many different angles. It helps to have the systainer raised up so you can spray paint from top, sides, bottom, etc. Keep the spray quick and moving, you can do multiple passes if you need to get good coverage in any of the tight spots and coves.
[attachimg=12]
[attachimg=13]
[attachimg=14]
Let the whole thing dry well before handling it.
[attachimg=15]
Finally, the fun part - at least I think it is fun. Peeling back the masking and revealing the hours of effort! Again, some masking may not be perfect, remember you can always touch up the paint. I used a razor knife and tweezers to catch the corner and pull the masking back.
Then reassemble the unit. Enjoy!
[attachimg=16]
[attachimg=17]
[attachimg=18]
[attachimg=19]
[attachimg=20]
[attachimg=21]
I did consider starting with the sapphire blue systainer, and perhaps if I do this again I may try that. Then the only thing to paint is the yellow/maize.
There it is, Go Blue Systainer!
I'll likely touch up some areas, be sure to erase pencil lines and then clear coat the parts. I also want to mask in Systainer.Store text in yellow as well as Go Blue and M Club Supports You, maybe that will be on the sides.
Want to follow my other systainer projects? Check out Systainer.Store on Instagram (systainer.store) or sign up at the website for the newsletter (it includes a one time discount coupon to Systainer.Store).
Make it a great day - Sys Tim
Attachments
-
 IMG_8647.jpeg299.1 KB · Views: 1,335
 -
 IMG_8652.jpeg317.8 KB · Views: 1,229
 -
 IMG_8656.jpeg336.2 KB · Views: 1,235
 -
 IMG_8679.jpeg458.2 KB · Views: 1,276
 -
 IMG_8664.jpeg290.1 KB · Views: 1,239
 -
 IMG_8678.jpeg302.8 KB · Views: 1,254
 -
 IMG_8755.jpeg559.9 KB · Views: 1,224
 -
 IMG_8750.jpeg256.3 KB · Views: 1,285
 -
 IMG_8752.jpeg305.7 KB · Views: 1,255
 -
 IMG_8754.jpeg255.2 KB · Views: 1,204
 -
 IMG_8744.jpeg198.9 KB · Views: 1,211
 -
 IMG_8756.jpeg336.9 KB · Views: 1,233
 -
 IMG_8760.jpeg397.9 KB · Views: 1,204
 -
 IMG_8762.jpeg411.4 KB · Views: 1,190
 -
 IMG_8764.jpeg309.2 KB · Views: 1,226
 -
 IMG_8770.jpeg336.4 KB · Views: 1,177
 -
 IMG_8771.jpeg337 KB · Views: 1,218
 -
 IMG_8773.jpeg248 KB · Views: 1,197
 -
 IMG_8780.jpeg363.1 KB · Views: 1,221
 -
 IMG_8787.jpeg252.2 KB · Views: 1,265
") Go for it!
Go for it!