Parf Guide mark 2 issues and questions

wch said:
I recently got my Parf Guide Mark II system, and I have some issues and questions.

First off, it looks like one of the Parf sticks has hole spacing that is ever-so-slightly greater than the other. The error is such that over the 960mm from hole 0 to hole 10, one stick has holes that are around 0.10-0.15mm farther apart than the other one. Has anyone else encountered this before?

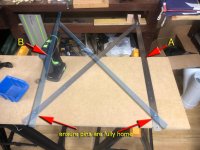
My grid is 15 wide by 7 high. When using the Parf sticks to make the "starter" set of 11x7 holes, it worked out OK. Next, I extended the grid to the right by adding 4 holes to the top row and 4 holes to the bottom row. Then I tried to connect the far-right top and bottom holes by pinning one of the Parf sticks to the top-right hole and bottom-right hole. Unfortunately, the 3mm holes I drilled in the table were slightly too far apart, and the pins wouldn't seat all the way. I think this is because the 3-4-5 triangle that was used to create the grid was slightly off, resulting in a grid that wasn't quite square.

I'm concerned that with the slight error of the holes, when I try to cut a right angle, the angle could be off by an amount that will cause problems when I try to do precise work. Is that a reasonable concern? I watched Peter Parfitt's video where he found that cuts on the workbench he made had an error of about 0.03 degrees per cut, which is very good.

Incidentally, the fact that I'm encountering fit problems when the error is so small is a testament to the overall precision of the Parf Guide system.

I have a few other questions that hopefully someone here can help answer. These first two relate to how close to perpendicular the holes will be.

  • How accurate can I expect the hole spacing to be on the underside of the panel?
  • For taller dogs like Super Dogs, how accurate can I expect them to be further away from the table?
  • The panel I'm using is MDO, based on the recommendation of someone from this forum. Unfortunately, it's slightly bowed so that if one end is pressed all the way down, the other end will stick up probably half an inch. Is unreasonable to expect an MDO panel to be much flatter than this?

Here are some pictures that show the misalignment of the holes.

With the fixing pin connecting both Parf sticks at hole 0, the longer drill guide seats easily all the way into hole 1.

View attachment 1

With the fixing pin still at 0, the drill guide fits tightly in hole 5. In this picture, it's tight enough that I'm able to lift both Parf sticks off the table with the friction.

View attachment 2

With the fixing pin still at 0, the drill guide won't go through both Parf sticks at hole 10.

View attachment 3

Using calipers going through both Parf sticks at hole 1, I measured a width to be 5.98mm.

View attachment 4

If I lift the calipers slightly so that it's engaging the hole in only one of the Parf sticks, the width is 6.00mm.

View attachment 5

At hole 10, going through both Parf sticks, the width is 5.86mm.

View attachment 6

At hole 10, lifting the calipers slightly so that it engages the hole in only one Parf stick, the width is 5.99mm.

View attachment 7
 
[member=73541]Paulhoward[/member]

Hi Paul

I am sorry that you are having difficulty. Please contact Axminster Customer Services with you problem:

cs[member=63423]AxminsterTools[/member].com

They may arrange for any suspect kit to be returned for their QA people to check.

Peter
 
Thanks Peter, I have reached out to Axmenister, and they will help Me with this. I am a Fan of Parf Products and the Axmenister Co.
 
I have my Parf Guides coming from Axminster tomorrow and will have a opportunity to see if i can come up with an accurate MFT. Accuracy is seems to be like a dog spinning around trying catch his tail ... he just can't quite catch it. Some where someone stated that even CNC dog holes aren't perfectly round but close enough that your eye can't see it.

I wonder if i were to layout a grid by hand using the Pythagorean Theorem i could do it without any error whatsoever ... probably not 🤔 Thus i think that Peter Parfitt and Axminster made a bold move to put together this system so the rest of us could enjoy making our very own custom MFT tops made to our own specifications. No one else has endeavored to undertake a project like theirs except for a few router templates offered by a few manufacturers. It really is quite ingenious to say the least and I expect that as time goes on Peter will come up with ways to make it more "idiot proofed". Not trying to knock anyone because as i haven't started my top yet, i could be the idiot 😅 I will certainly do a bit of practice on some sacrificial surface first though to hone my Parf skills.

I do like that UJK fence Axminster has made for the MFT tables and as soon as they have them back in stock i will have to have one 😉
 
When watching Peters videos on the Parf Guide system he was using the CXS to drill his holes with which probably was advantageous when drilling perpendicular holes with such a small foot print with the little guides. Because of the light weight of the drill and the "c" grip allowing the hand being place right over top of the drill in line with the hole and the Centrotec chuck adding to the stability it is probably of great help to being accurate. I don't have one of those little gems but i shall one day when they become available again in my domain. My drill is a "T" handle of course that offsets your hand and pressure from the vertical centre line and not really balanced for precision drilling.
 
That is easy to fix. Just glue a bullseye level to your drill. Making sure it is accurately attached isn't that hard, I should think.
 
I received my New Parf Guide directly from Axminster today. It was well packaged, all parts were present and in excellent condition, the rulers were flat and in perfect condition. I am very pleased thus far. 😃 The vacuum attachment was included and i ordered the revision dogs and a few parf dogs and the rail clips.

On another note i received my TSO connectors from Lee Valley and installed them between my two rails without a straight edge to guide them and after i secured them i did put a 4’ straight edge against the rails and they were bang on.

The sun is shining here today so all is good.
 
Hi all,
I picked up a PGS mk 1 second hand but it appears to be unused. I understand there were some issues with the earlier models so I was wondering if anyone can advise what I should be checking? I have checked the rulers and all the holes seem to line up perfectly. Is there anything else?

I'm going to order all my dogs etc from axminster soon and am holding off until I know the PGS is good to go as I may need to order spare parts to fix.

Thanks for your assistance!
 
AndrewG said:
Hi all,
I picked up a PGS mk 1 second hand but it appears to be unused. I understand there were some issues with the earlier models so I was wondering if anyone can advise what I should be checking? I have checked the rulers and all the holes seem to line up perfectly. Is there anything else?

I'm going to order all my dogs etc from axminster soon and am holding off until I know the PGS is good to go as I may need to order spare parts to fix.

Thanks for your assistance!

Hi [member=16995]AndrewG[/member]

From the checks that you have done there should be no issues. The 3 mm pins may be a little tight in the rulers which is deliberate in order to improve accuracy. When you first use them you may have to twist them into the holes which then ensures a very good fit.

Check that the 20 mm cutter has not been damaged in any way. It should have a leading spike 3 mm in diameter and about 8 mm long.

I will PM my email address to you and will be available to offer assistance if required.

Peter
 
Hi all,

I’m doing a test panel using my mark 1 system. I drilled the first row then set up the rulers for the next step as pictured.

I’ve noticed there is slight play in the rulers in this position. I could clamp it down but I wouldn’t know if I clamp it down in the right place. It’s only at most 0.5mm movement.

Any assistance would be great.
Thanks
Andy

2a4ac1a380874eff261dbd7a6bd50226.jpg
 
Hi Andrew

A very slight bit of play can occur as a result of rather enthusiastic drilling of the 3 mm holes but this should not lead to any significant accuracy loss provided....

When setting up the rulers as shown in your picture make sure that where the two rulers meet with the pin through both that the rulers are fully in contact and noy a few mm apart. If necessary use a small piece of tape to keep the rulers together.

It may seem counter intuitive but flat rulers can flex in the plane of the ruler body (that is from side to side when on a flat surface). In your setup as shown make sure the 2 pins at each end of the rulers are fully home and then let the triangular arrangement find its own position of rest. Then without using any lateral force clamp the rulers in place.

Assuming that the first row of holes has already been created (as shown in your photo) just drill one hole near the far edge in your photo (position A). Now swap the arrangement around to create a mirror image and drill just one hole near the far edge on the other side (position B). With that done check that a ruler can fit between those last two holes (along that far edge of your stock between A and B) and be secured with a pair of pins.

Peter
 

Attachments

  • Andrew Image 02.jpg
    Andrew Image 02.jpg
    392 KB · Views: 335
AndrewG said:
Hi all,

I’m doing a test panel using my mark 1 system. I drilled the first row then set up the rulers for the next step as pictured.

I’ve noticed there is slight play in the rulers in this position. I could clamp it down but I wouldn’t know if I clamp it down in the right place. It’s only at most 0.5mm movement.

Any assistance would be great.
Thanks
Andy

2a4ac1a380874eff261dbd7a6bd50226.jpg

Hi,

I am seeing the same thing with my mark 2 system, play of around 0.5mm at the joint between the two parf sticks. 

The 3mm pins fit snugly and was careful and drilled using the pecking motion.  My table is a little larger, so I am using the drill guide with long spigot for that joint.  I don't know if the drill guides are slightly off in diameter?  I contacted TSO and then Axminster and showed a video, but no resolution yet.

I was concerned as I expected this to be a solid connection.  Per Peter's videos, my system did not show any issues with having the pins or guide being an overly snug fit in the parf guides.

Perhaps that ~0.5mm, over the length of the parf stick is acceptable or within tolerance?  I stopped drilling any holes when I contacted Axminster so as not to make the situation worse, if it is indeed an issue. 

 
FrankJP302 said:
AndrewG said:
Hi all,

I’m doing a test panel using my mark 1 system. I drilled the first row then set up the rulers for the next step as pictured.

I’ve noticed there is slight play in the rulers in this position. I could clamp it down but I wouldn’t know if I clamp it down in the right place. It’s only at most 0.5mm movement.

Any assistance would be great.
Thanks
Andy

2a4ac1a380874eff261dbd7a6bd50226.jpg

Hi,

I am seeing the same thing with my mark 2 system, play of around 0.5mm at the joint between the two parf sticks. 

The 3mm pins fit snugly and was careful and drilled using the pecking motion.  My table is a little larger, so I am using the drill guide with long spigot for that joint.  I don't know if the drill guides are slightly off in diameter?  I contacted TSO and then Axminster and showed a video, but no resolution yet.

I was concerned as I expected this to be a solid connection.  Per Peter's videos, my system did not show any issues with having the pins or guide being an overly snug fit in the parf guides.

Perhaps that ~0.5mm, over the length of the parf stick is acceptable or within tolerance?  I stopped drilling any holes when I contacted Axminster so as not to make the situation worse, if it is indeed an issue.

Let's see that video, if you don't mind.
I have the mark II system, and I don't have any play.
 
FrankJP302 said:
Hi,

I am seeing the same thing with my mark 2 system, play of around 0.5mm at the joint between the two parf sticks. 

The 3mm pins fit snugly and was careful and drilled using the pecking motion.  My table is a little larger, so I am using the drill guide with long spigot for that joint.  I don't know if the drill guides are slightly off in diameter?  I contacted TSO and then Axminster and showed a video, but no resolution yet.

I was concerned as I expected this to be a solid connection.  Per Peter's videos, my system did not show any issues with having the pins or guide being an overly snug fit in the parf guides.

Perhaps that ~0.5mm, over the length of the parf stick is acceptable or within tolerance?  I stopped drilling any holes when I contacted Axminster so as not to make the situation worse, if it is indeed an issue.

I have the Mark II version and didn't have any play at all when I joined the two Parf strips together.  My table is two meters long and one meter wide, with 200 holes. 

i-H2KKSjH-XL.jpg


I made many connections with the two strips as I worked my way down and across the surface, and would have noticed immediately if there was any movement.  I didn't follow the instructions with the Parf Guide, and started in the lower right corner in this image and worked my way to the upper left corner.  If there had been any movement, the variation would have been apparent over the length of this table.
 
Hi,

Here is a video showing the play. Note that the 3mm pins are secure and fully seated.  They fit snugly into the 3mm holes.  I am using the drill guide with the longer spigot to hold the intersection of the two sticks. 

It's possible I am doing something incorrect, would love for that to be the case.  The pins do fit snugly as I mentioned, and the sticks don't move in the original line of holes, though there is a slight click sound when moving, so maybe there is some play with the stick and the pins, but was minimal.\

File is a little larger and not on my laptop, so sharing the link from Google Drive: Parf Mark II Issue

I appreciate any comments or thoughts. 

Unrelated, but used MikeGE's and AtomicRyan's table design for making mine :)

 
FrankJP302 said:
Hi,

Here is a video showing the play. Note that the 3mm pins are secure and fully seated.  They fit snugly into the 3mm holes.  I am using the drill guide with the longer spigot to hold the intersection of the two sticks. 

It's possible I am doing something incorrect, would love for that to be the case.  The pins do fit snugly as I mentioned, and the sticks don't move in the original line of holes, though there is a slight click sound when moving, so maybe there is some play with the stick and the pins, but was minimal.\

File is a little larger and not on my laptop, so sharing the link from Google Drive: Parf Mark II Issue

I appreciate any comments or thoughts. 

Unrelated, but used MikeGE's and AtomicRyan's table design for making mine :)

Hi Frank

That (induced) play is perfectly normal and could not be eliminated. Your video is excellent as it shows that although one can move the end from left to right there is a neutral rest position. When in that rest position the lining up is perfect. When clamping a ruler or drilling without clamping it is important to ensure that the ruler(s) is not moved beyond that neutral rest position.

Many thanks for taking the time to show this - I will copy your idea and show something like this in a future video.

Peter
 
Peter Parfitt said:
Hi Frank

That (induced) play is perfectly normal and could not be eliminated. Your video is excellent as it shows that although one can move the end from left to right there is a neutral rest position. When in that rest position the lining up is perfect. When clamping a ruler or drilling without clamping it is important to ensure that the ruler(s) is not moved beyond that neutral rest position.

Many thanks for taking the time to show this - I will copy your idea and show something like this in a future video.

Peter

Hi Peter,

Thank you for taking a moment to watch and explain that, really appreciate it.  I had been holding off on completing the top but happy now that I can move forward knowing everything is correct.

Thanks and have a great day!
 
Back
Top