Parf Guide System Review

DiscoStu

Member
Joined
Jan 9, 2015
Messages
156
I bought a Parf Guide System as soon as it was announced last year and today I finally got round to opening the packet!

I thought I'd share my thoughts on it.

For those that don't know it's a system for creating 20mm holes in a perfectly square pattern in wood. This is ideally used with parf dogs to create cutting tables for use with track saws (like the Festool MFT).

c19ea3a6d69f17ce8655922dc731ef6f.jpg


Inside the package you get:

2 x 1m rules with pre drilled 3mm holes
3 x 3mm pins
1 x 20mm forstner style bit (although it's specific to this set)
1 x 3mm drill bit
1 x 3mm drill guide
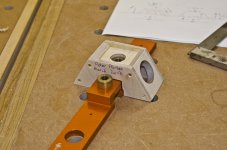
1 x 20mm drill guide (The big orange thing)
1 user guide

182b2ad02d395fb443c42b64aad805d9.jpg


65114c7302a81785eef0e8695f1956e9.jpg


So my first thoughts are that it is a well made high quality precision tool. It oozes quality and tight tolerances. The supplied manual is clear, detailed and is a world apart from most of the manuals we see, although it's on a par with other manuals I've seen from UJK.

3f2f4e27f72a0352483b37a702c1596a.jpg


It's easy to set it up and to get you first row of 3mm holes. The guide for the 3mm hole helps keep the drill vertical. I had an old piece of 18mm MRMDF lying about so I used this for my test. I clamped a parf stick (Steel ruler with pre drilled holes) down to the MDF and drilled my first 3mm holes. I then swung it around roughly 90 degrees and using the 3/4/5 method set it accurately to a right angle (the manual clearly explains this so I'm not going into detail here). Once this was set I could do a set of vertical 3mm holes and then I repeated for the other side and top edge. I finally finished with another vertical set of holes in roughly the middle.

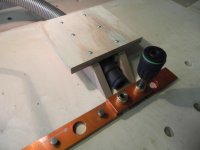
So 3mm holes all done I moved onto the 20mm holes. You use the pins and guide block to line up the 20mm cutter and away you go. I found that my 20mm cutter got clogged pretty quickly but my MDF was a bit old and going "furry". Once you've done a series of 20mm holes you have to use parf dogs to position the block as the points where the 3mm alignment holes were have become 20mm holes. You need to be aware that the 20mm parf dogs don't come with the system. Not that this is an issue as you'll be buying these to use with it anyway. For me it was a bonus as I already had parf dogs so I didn't feel like I was paying for them twice.

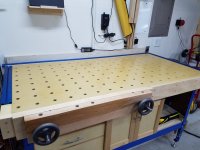
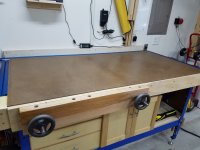
I did a 600 x 1000 sheet of MDF from start to finish in about an hour having never use the system before. I found the accuracy was excellent. The only downside was that the cutter kept clogging although this is likely to be the MDF. I did find that having a drill with removable chuck was incredibly useful although only my CXS has that feature and it's not the most powerful of drills.

3b0ade0256b240a47039cd3d837581c7.jpg


After completing all of my holes I did a very quick check for square with a rail and it was spot on.

399f3329f422fd5b0cab77db124d4529.jpg


583cd01712466c2a47726f93d55f85dd.jpg


This was just a quick test to see how I got on with it and if it was accurate and it seems to be spot on.

I found the 20mm holes a bit of a pain but I am hopefully it's just old MDF stock.

I am intending to build a bench with this sort of top so it should be good for that.

I'd love to see a router version as I think that could be excellent.
 
DiscoStu, your experience with the system matches mine - although I didn't have an issue with the 20mm bit clogging. Did you use a vac when drilling the holes? Really helps keep it clean. I've just finished a 6x3ft bench with 128 holes (8 x 16 matrix) - took a while but dead accurate throughout. I also made the mistake of applying finish after drilling the holes - something to avoid at all costs in the future :-(
 
andygiddings said:
DiscoStu, your experience with the system matches mine - although I didn't have an issue with the 20mm bit clogging. Did you use a vac when drilling the holes? Really helps keep it clean. I've just finished a 6x3ft bench with 128 holes (8 x 16 matrix) - took a while but dead accurate throughout. I also made the mistake of applying finish after drilling the holes - something to avoid at all costs in the future :-(

This is a DIY shoe that allows for convenient chip collection.

Also, very important.... Oil the shaft of the bit, use real oil not WD-40...

[attachimg=1]
 

Attachments

  • Shoe.JPG
    Shoe.JPG
    228.7 KB · Views: 17,120
I did use oil as Peter mentioned that. I didn't use a vac but will do in my "real" top.

Sent from my iPhone using Tapatalk
 
Just as an aside to those in the US buying this system - I found it slightly cheaper to buy and ship from the UK supplier to TX, largely due to the exchange rate. Also the 20mm bit that came with mine was a Centrotec bit which makes the process slightly easier
 
andygiddings said:
Just as an aside to those in the US buying this system - I found it slightly cheaper to buy and ship from the UK supplier to TX, largely due to the exchange rate. Also the 20mm bit that came with mine was a Centrotec bit which makes the process slightly easier

Just to help with people's expectation management...

The 20 mm cutter with the Centrotec end is more expensive and is sold as an individual item (that is as an extra). There were about a dozen sent out to customers as part of a full PGS in error.

The new cutter has not been made part of the full PGS kit at this stage because Axminster do not wish to raise the price of the PGS.

I have asked them to keep this under review.

Peter
 
live4ever said:
Looking forward to getting mine when Lee Valley gets their next batch!

wow.. didn't know lee valley sold them!

i bought mine from axminster and had them imported last year when these were first released.  mine are still in the tube and i haven't used them yet  :o
 
andygiddings said:
Just as an aside to those in the US buying this system - I found it slightly cheaper to buy and ship from the UK supplier to TX, largely due to the exchange rate. Also the 20mm bit that came with mine was a Centrotec bit which makes the process slightly easier

Andy, I have a quote into Axminster now to get the PGS sent to me in Ohio.  The quote mentions an item DAP (Delivery at Place). It appears to be some sort of COD for duties and taxes.  I have never ordered from overseas before and don't really know if that applies to me.  The Axminster person who quoted it said it may be an additional 30 GBP but also doesn't know for certain if I will need to pay it in addition the quoted shipping fee.  I don't want to order not knowing if I will be charged an additional fee especially not knowing the exact amount.  If there is this additional fee, it will put the cost over the top and not make it cost effective to purchase from Axminster.  Can you tell me if you were charged the quoted price without any additional fees?  Any feedback or help would be greatly appreciated!

Thanks,
Ed
 
Ed, no additional charges were levied on me - I had the same terminology in my order and it was delivered in early Feb this year. If they were going to make any charges after delivery I'm reasonably sure they would have done so by now. Total shipping for mine was 35 UK Pounds. I ordered two sets of Parf Dogs at the same time so your charges may be different
 
Thanks for the quick reply!  Good to hear on no additional charges.  It sounds like you have the same order as mine and the shipping (carriage) is also the same amount.  Also good to hear they are consistent.

Curious, how long did it take to arrive?

Thanks again,
Ed
 
I also had a great experience with this product. 

I bought a few of the short and the long bench dogs too.  Now I want more of each.  Super useful.

I have been thinking for several years about making a workbench.  I always considered getting a traditional woodworking bench, beefy, vices on the front and the end, possibly drawers beneath. 

But the MFT stopped me in my tracks. 

Now that I've got the ability to make my own MFT, I have been thinking about making a hybrid traditional/MFT workbench. 

I love the Festool clamping elements. 

Does anybody know the maximum thickness that a bench top can be to allow the clamping elements usable? 
 
Hi Everyone

it is really important to use a dust extractor when drilling the 20 mm holes as cutting MDF (especially poorer grades) produces a lot of waste that clogs the cutter leading to an inaccurate cut, overheating and potential damage to the cutter.

I appreciate that some users have produced their own Extractor Port accessories to make it easier to use. I have been playing with several designs over the last few weeks and have now settled on what I think is the easiest to make yet most practical to use. Here is a picture of the finished prototype:

View attachment 1

The gadget can be attached in either 20 mm drilling position and it has a hose opening on both sides so it will suit both right and left handed users. It fits snugly on the 20 mm Guide Block and helps the user keep the Guide Block pushed flat on the bench top.

I am in the process of a making the video which I expect to be able to release within the next 5 days. The plans will be available once the video is live. It would take the average woodworker about an hour to make with an additional allowance for gluing time. It consists of 5 pieces of wood all of which require some form of 30 degree cut. Tools required are a 22 mm Forstner (but larger would do), a 35 mm Forstner (for a Festool 27 mm hose fit) and a screwdriver.

Peter
 

Attachments

  • PGS Dust Port.jpg
    PGS Dust Port.jpg
    907.2 KB · Views: 2,132
craigcm said:
I also had a great experience with this product. 
...
I love the Festool clamping elements. 

Does anybody know the maximum thickness that a bench top can be to allow the clamping elements usable?

Matches my experience so far.

I'm in the process of making a 28" x 72" (or so) bench that is about 1.5" thick.  I've drilled it with the parf guide system, which was accurate within any measure that I could make = plenty accurate for woodworking.

Any kind of dog (parf, surface, low profile fences, etc) works just fine, of course.

But 1.5" is way too thick for the through clamps (quick clamps and screw clamps).  I'm experimenting with ways to undercut the holes so that they'll work, but don't have a good solution for that yet.  My only solution is to grind off the nub that holds the clamp heads on so that I can insert the shafts into the holes from below.

Clamping elements can be used without the knobs, but of course that means that the clamps will lift a bit more.  My next challenge is to see if I can make some longer knobs that will work.

At any rate, for full MFT type functionality in a large workbench top, I think I would recommend a 3/4" MDF (better quality like Medite) top with a torsion box.  I'll be trying that sometime this year, I hope.

Note that Veritas has started making more bench accessories with 20mm posts, so I'm considering some of those.  In particular, they have a bench clamp that inserts and locks into a 20mm hole, and I think I'll use that for vertical clamping on the front of the bench.

 
In terms of max thickness, as noted, 3/4 inch is ideal otherwise there can be issues with clamps. The other point I'd make if you go for a torsion box assembly is watch out for your internal height between top and bottom. I made mine 3 inches between faces and was glad/lucky I didn't go thinner, otherwise the Festool clamps wouldn't insert due to the lower arm length.

Attached are a couple of photos of my MFT hybrid workbench. The frame is an off the shelf Kreg table which I can't recommend highly enough - very strong, flat and stable. I use a sheet of hardboard when I'm gluing up/assembling/finishing and remove it for other tasks. I used Hard Maple as a facing for the torsion box, otherwise the MDF side would get wrecked fairly quickly. Size is the same as Harvey's - 28x72.
 

Attachments

  • 20170308_100347.jpg
    20170308_100347.jpg
    2.9 MB · Views: 3,704
  • 20170308_100300.jpg
    20170308_100300.jpg
    3.2 MB · Views: 2,494
HarveyWildes said:
But 1.5" is way too thick for the through clamps (quick clamps and screw clamps).  I'm experimenting with ways to undercut the holes so that they'll work, but don't have a good solution for that yet.  My only solution is to grind off the nub that holds the clamp heads on so that I can insert the shafts into the holes from below.

Clamping elements can be used without the knobs, but of course that means that the clamps will lift a bit more.  My next challenge is to see if I can make some longer knobs that will work.

I filed off the nubs (pretty easy), and then drilled a hole near the nub to accept a nylon screw and nut (I thought about tapping but didn't have a suitable tap).  Now, when I need to use any of my Festool clamps, I can separate the two parts and insert one half from the bottom and reattach the other part from the top.  It takes a few seconds but works great.

The knobs for the clamping elements can easily be lengthened by removing the cap (there is a thin slit to insert a small screwdriver and pry open) and changing out the hex bolt for a longer one.  I've even used the knobs with 5/6-18 bolts for other applications where a 5/16-18 bolt is required (e.g., Kreg clamps).
 
Hi Everyone,

The video of the making of the Dust Port for the PGS is now live. I have put a post about it in the main PGS thread in the Sales and Dealer area but will include the link here as well:


Peter
 
As usual, Peter, your videos are educational, informative and enjoyable to watch.  Thanks so much for making them.  I am waiting for my Parf Guide System to be delivered when Lee Valley gets their next shipment (on or about March 18). Thanks again.

Paul
 
hopper said:
As usual, Peter, your videos are educational, informative and enjoyable to watch.  Thanks so much for making them.  I am waiting for my Parf Guide System to be delivered when Lee Valley gets their next shipment (on or about March 18). Thanks again.

Paul

Hi Paul,

Many thanks.

I am sorry that you are having to wait for your PGS - that is the cost of success I suppose. I know that Lee Valley are doing their best to get new stock in as fast as they can. Axminster have stepped up their manufacturing capability and the PGS effort is part of an additional £1m manufacturing investment.

Have a good weekend.

Peter
 
Back
Top