parson table question / wood movement

humantorch

Member
Joined
Nov 20, 2013
Messages
47
Hey gang,
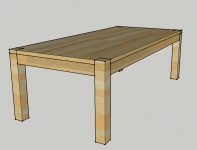
So I've drawn up a plan for a parson style table for a client but this is the first one I've attempted.
I'm planning on attaching the top to the the skirt via some simple table top fasteners that fit into grooves in the apron and allow for movement over time.
My question is does anybody know how the the movement of the top affects the legs which are flush with it? They also want the apron the sit flush with the side (not my choice). My concern is that over time the top will push on the legs and there will gaps or worse.
Is this a totally irrational fear as everything will move together or is there something I'm missing here and need to address now while still in the planning stages??
Thanks so much[attachimg=1]
 

Attachments

  • Screen Shot 2015-07-28 at 6.26.12 AM.png
    Screen Shot 2015-07-28 at 6.26.12 AM.png
    180.6 KB · Views: 3,170
Just my  [2cents] ,

I believe the problem area would be the end skirts where the grain runs perpendicular to the top.  The length of the skirt should remain fairly stable while the width of the top would move.

Can you run the grain of the end skirts the same direction?  Might make for an interesting design element - sort of a "waterfall" look.

Alternatively is to use veneer over more stable materials for the top.

I recently saw some solid wood free-standing counters installed at a new hospital pharmacy.  They consisted of a base of three solid panels glued up in a "U" shape with the grain running vertically and an attached solid glued up top.  The base panel with the grain running at a right angle to the top was already split apart in places.  These tables were less than a year old.

Mike A.
 
Do 2 designs, one the proper way allowing for wood movement and the other the way your customer wants it. Explain the difference and associated problems. Then its up to them if they want it built properly and you if you want to build it properly. Sometimes its just better to walk away.
 
Here is a video from Marc Spagnuolo at the The Wood Whisperer. Check out what expansion did to his chess board/box at 13:05 min.
Tim
 
Ok,
Since using a veneer is not an option per the client my thought is now to make it with an 1/8" gap around where the top meets the legs to allow for some movement and then set the apron back about 1/2-3/4" from the end. This is piece is going to live in the desert southwest so the climate is pretty dry and stable. Hoping this will work?? I did a quick image search and found this which aligns with my thinking[attachimg=1]
 

Attachments

  • parsons-white-oak-dining.jpg
    parsons-white-oak-dining.jpg
    2.2 MB · Views: 4,320
With what I have been seeing in the news about priests and parsons, I would suggest making those legs as strong as possible.
 
You have to be able to explain to them that a solid wood top vs a veneered top does not effect quality or craftsmanship. You are not using a wood that would have very particular boars that you want to showcase as a top.

Clients sometimes just need to be educated. You can explain some of the most expensive furniture in the world has veneer. They probably here veneer and think IKEA or similar quality. Also show then some of the better quality veneers that do not have a repetitive pattern but instead look like individual boards. Take a razor blade and lightly score to further look like individual boards.

MLCS or similar sell a plywood end cap bit that works well. I also 45 miter end grain cuts to give the illusion of solid boards.

Then you have to explain that the veneer will actually cost more money.

 
There are a lot of wood movement tables that will allow you to calculate the amount of space needed between the legs and the top.  A clean look that allows for wood movement would be to raise the end aprons above the legs and let the table top "float".

Jack
 
Consider quartersawn white oak for the top, and make the leg reveal a design statement.  For a table 40 inches wide, QSWO will move maybe 3/32" equally out to each side, thus you want that reveal to be 1/8 inch if the table is built with the wood at its driest.

This, from one of the wood movement calculator sites:

The amount of shrinkage calculated is:
0.0800 inches 
        or:
0 3/32 inches
(rounded to nearest 1/32 inch)

The information you entered was:
Width: 20 inches
Initial Moisture Content: 0.08 (decimal percentage value)
Final Moisture Content: 0.1 (decimal percentage value)
The type of lumber you chose was: Quarter Sawn

The Shrinkage Percentage Value used for
the species you chose (Oak, White) was: 5.6%

As you can see, this kind of movement was from a change from 8 percent MC to 10 percent.

I know the 1/8 margins are crumb-catchers, but I cannot think of another way to deal with your problem.  The modern-look parsons table is a design that has come about since the age of plywoods and laminates.  A table with that look would not have been built by nineteenth-century woodworkers.
 
Just a word of caution on the EMC calculators- make sure you are using a calculator for INDOOR use (most of what I have seen are scaled for outdoor conditions) if that is the intended use of the table.  From memory, I know the mean EMC of wood for in most of the temperate regions of the US is about 7% (outdoor will be around 12%).  I believe in the Southwest indoor EMC is around 5%.  Also, the rate of movement increases as the RH lowers- so the drier the climate, the movement per change in relative humidity increases.

Most of the movement issues I see occur during the winter months when the furnace kicks on.  Consider this rule of thumb: for every 20 degrees F (or 10 deg C) you raise the indoor temperature, you are cutting the RH in half (assuming you are not adding moisture).  So say next February the outdoor RH is 50% at 30 degrees F and you heat your house to 70 degrees F, the indoor RH is now about 12.5%.-- I took RH readings of less than 1% this past Feb in PA.

With all of that in mind, you might consider leaving a gap on both edges of the legs and filling with black (or other color) silicone.  It can be used as an accent line and will allow movement while keeping the crumbs out. 
 
Thanks Gene Davis,
I presented QSWO as a possibility but the dramatic price jump was beyond their liking. Unfortunately, as you all I'm sure are aware, people without knowledge of this subject tend to disregard any information as non pertinent. Especially when they've seen examples of what they "think" they want elsewhere.
That being said I've decided to go with Ash all around. I'm making the top with (10) 4" pieces to give it a distinct look and I'm going to leave a 1/8" gap on the 2 interior sides of the legs.
I really considered the idea posted by a previous member of letting the table "float" on the apron but I've decided to make it as close to the clients specs as could be.
Knowing that these are affluent customers who likely keep their house around 77deg F year round I feel pretty good with the 1/8" on each side. The only dramatic shit here in Tucson is during monsoon season (mid June-late July). With AC running indoors the table is likely to not feel the effects of the humidity shift.
I'll keep this post updated with photos and if anyone else has words of wisdom to chime in I'm all ears. You all have been extremely helpful and I'm so thankful to have this forum available to bounce ideas and problem solve off of.
Thanks again festoolers!!
 
You can also chamfer the edges of the major components (top, aprons, legs) at 45° for between 1/32" and 1/16" as a "feature" to conceal any movement over time. 
 
After much delay (13 stitches from a chisel thru my thumb) I'm back on the table and I thought I'd post a couple pics of it dry fitted. I solved the problem by leaving a 1/8" gap around the legs. The detail actually looks really nice.
[attachimg=1][attachimg=2]
 

Attachments

  • IMG_4136.JPG
    IMG_4136.JPG
    845.1 KB · Views: 2,045
  • IMG_4135.JPG
    IMG_4135.JPG
    824 KB · Views: 1,994
Sorry to hear about your chisel "bite" I learned a long time ago to keep my fingers behind the leading edge.  Nice looking table and if you were to widen the bread board to the same width as the legs you wouldn't have a wood movement issue.

Jack
 
Looks good. Don't think you needed that breadboard edge, but it does add some interest to the top.
Sorry to hear about the accident, we all have them.
Tim
 
Thanks guys,
Yeah, initially I didn't intend to have a breadboard end but because of the monsoons in Tucson and the drastic increase in humidity as well as the 2 weeks left out, the table started to cup. I wanted to keep the breadboard to a bare minimum to give it a little more modern feel but after its all said and done I kinda wish I would've made it the same width as the legs so I could have closed the gap around them to maybe 1/16".
Next time I suppose.
 
Hey, with all this climate change, your house could be in the middle of a rain forest in a few years. In that case, the 1/8" gap won't be visible any more.
 
I know this thread is older, but I’m planning to build a console in the same style, with this flush leg. I’m curious about the technique for cutting your table top corners to fit the legs. I have a number of ideas in mind, including making a jig to router it. Any information you could share would be appropriated.

humantorch said:
Ok,
Since using a veneer is not an option per the client my thought is now to make it with an 1/8" gap around where the top meets the legs to allow for some movement and then set the apron back about 1/2-3/4" from the end. This is piece is going to live in the desert southwest so the climate is pretty dry and stable. Hoping this will work?? I did a quick image search and found this which aligns with my thinking[attachimg=1]
 
[member=73634]Newlease[/member] A router jig would certainly work, after you had taken off the bulk of the waste with a jig- or handsaw, and then finish off the corners by hand.  The one thing to monitor though is how the grain is where you have to make the cuts.  If the router bit has to run against the grain, just make sure your bit is pretty sharp and fresh, and preferably a spiral bit.  This is the last place you would want tearout. 

If I were doing this, I would probably initiate the cuts with a tracksaw, then finish them off by hand with a japanese saw and then a chisel to get a crisp line and corner.
 
Back
Top