photographing your work

Alan m

Member
Joined
Aug 11, 2010
Messages
3,318
hi there

has any one got any tips or tricks for photographing your site work.
im talking more kitchens , floors, built ins

im looking to take some good shots for websites, flyers et. I have a Nikon 5200 camera  but cant get the pic the way I want it.
they usually have too much light in areas and shadows etc in others

thanks alan
 
I have the same problem. I can turn out good work, I just can't get pictures of it that don't make it look crap!
 
I am sure that there are many FOGgers who have huge credentials in the photography area but...

You need a wider angle lens for whole room shots and try and get a good depth of field so that everything looks sharp and is in focus.

Lighting is important and I now have a pro flash from Nikon which can be mounted on the camera or placed anywhere in the same room to create the right lighting effect.

I have stood outside and photographed through an open window to get more of the room in the shot.

I use Photoshop to sort out my mistakes and to change the shooting parameters after the event.

Remember the 1/3rd rule for key shots.

Peter
 
on site photography is a huge topic with lots of complications.  that's why the photogs that specialize in that can charge good coin to get you pro looking shots.  different site (architectural) photographers will also differ in style from one to another.  but this type of photography is a skill just like woodworking and you can develop it to the extent of the work and interest you put into it.  some tips that are by no means exhaustive:
-tripod (always)
-bracket shots (learn aperture priority mode or manual mode from your manual or other how-to books and shoot a series of shots at different exposures (shutter speeds), keeping everything else the same.  this will let you get good exposures for light areas on one, shadow area on another etc.  you can then pick a good compromise or blend images in a basic photo program like adobe elements, iPhoto, etc.
-for areas that are not really large you can use just one flash on your camera that will trigger small inexpensive slave units that you place in the darker areas.  these will fire when their sensor "sees" the main flash go off. ( i use morris mini slave wide)
-large reflectors like a drywall panel or a piece of plywood painted white can work wonders to reflect sunlight or lamp light into the darker areas
-if you do a lot of this kind of photography, really consider getting a pc (perspective control) lens.  this will help you line up the verticals in your photo like you see in the architecture pro shots.  otherwise you get all the associated distortions that you see in the amateur stuff.

if you find it a fun hobby then you can have an ongoing interest in this and keep developing your skills.  if it feels like pulling teeth, then just find a local photo buff or student that shoots these type of shots well and who is building their portfolio and negotiate a price or barter with them.

even if you keep expenses to a minimum, photography is a runaway cost just like woodworking etc.  by the time you get all the bits and pieces and invest the time in learning a program etc...--that's time away from your main business that earns your living.  the best thing is to hire a pro and work the price into your business.  they go in, do the job right the first time, put it on your website right away and go on to the next thing.  a pro shot speaks volumes that reflects well on your work.
 
Alan m said:
has any one got any tips or tricks for photographing your site work.

I will try...

Alan m said:
im talking more kitchens , floors, built ins
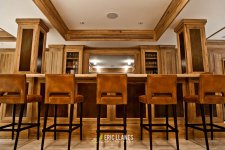
Kitchens are difficult because of multiple light sources and tight working space, built-ins easier. Floors by them selves don't really make very interesting photos even when correctly exposed. For me, natural light makes them look the best.
Practice on built-ins and then up your game.
Read photography for realestate, for more information on lighting and photographing your work.
Subscribe to some good real estate photographers blogs, they often publish tips and tricks.

Alan m said:
im looking to take some good shots for websites, flyers et. I have a Nikon 5200 camera  but cant get the pic the way I want it.
If you can post or attach a couple photo's I could pick one or two and then post what I do to correct them.

The camera doesn't matter, but good glass (lens) and composition (where and how you frame the photo) do. A good fast wide angle (18-55) zoom lens and a good fast telephoto/macro lens (100 mm) are good one-two punch to give your photos drama. The wide angle lens will enable you to take pictures in tight spaces, create more drama and the macro will allow you to take some nice close ups for contrast. The wide angle will distort the verticals in the photos so you need to correct that. If you have more space and can use a longer lens, then the correction will be less.

Alan m said:
they usually have too much light in areas and shadows etc in others

Shoot earlier or later in the day for less contrast (glare and shadow) and use a tripod to shoot at a slower speed to compensate for less light. Shoot "RAW" mode to fix bad exposure (under/over) in Photoshop or similar software, and use software Photoshop etc. to correct lens distortion correcting verticals.
Tim
 
jonny round boy said:
Peter Parfitt said:
Remember the 1/3rd rule for key shots.

And that is....?

When you compose a shot it works better if there is some interesting feature at about 1/3 in from the left or right edge and 1/3 in from the top or bottom.

Peter
 
thanks for the advice .

I don't really have any pics . I only just started . I deleted a few  pics a few days ago that I wasn't happy with.
im only learning photography. previously it was just point and shoot with a cheap 2 mega pixle .

im going to go self employed soon and want to get a few pics before that happens

I tiled a kitchen on Friday (grouted Saturday). im going back tomorrow evening or Tuesday evening anyway so I might take a few pics

the main problem im getting is that the lights are  led down lighters on the ceiling. they are creating a lot of shadows under the upper cabinets.
 
teocaf said:
the best thing is to hire a pro and work the price into your business.  they go in, do the job right the first time, put it on your website right away and go on to the next thing.  a pro shot speaks volumes that reflects well on your work.

Good advice, I agree.
I like the challenge of shooting my own and it helps improve my work when I can see and study the errors through a lens or on the computer screen.
Tim
 
Alan m said:
the main problem im getting is that the lights are  led down lighters on the ceiling. they are creating a lot of shadows under the upper cabinets.

Turn them off or turn them down (dimmer) and use natural light with a longer exposure on your camera. If no natural light you will have to light with either a flash, reflector or led out of frame aimed under the cabinet. If you can shoot without showing the top of the counter you could try to put some reflective material (card or tin foil) on the counter to reflect under the upper cabinets.
Experiment, it can be fun to see what you get.
Tim
 
If you're not a pro the less lights you use the better off you are going to be. Think of how much trouble you'd get into with a ton of tools that you have no idea what to do with. Keep it simple.

As was mentioned use a tripod. Wide angles are imperative but you don't need to worry about distortion unless you tilt them up or down. Use the tripod to set your height and keep the camera level and the lens won't distort anything. It's not a bad thing if it does for things like a detail but for the overall shot of the room it's distracting.

The problem with very dark and very light areas is solved not by lights but for waiting for the time of day when those lights are in balance with each other. Typically that's dusk or dawn. If you still have trouble with certain lights that can't be dimmed turn them off and try another longer exposure without them. You have the advantage of a digital camera that has a screen to show you what your last shot looks like - use it. Make changes. If you have a strobe/flash just point it into the ceiling or into a big wall behind you. Anything really that will diffuse the light.

You've gotten good advice here so just experiment.

If you want I wrote a photo primer once for a thread I did on a trip: http://www.advrider.com/forums/showthread.php?t=491784&page=7 and while it's primarily written to the audience of that board the advice is general and what I would give in my presentations to younger photographers at school or such.

Good luck.

Gregor
 
thanks for the advice gregor and tim

I will take a few shots and see what you think.

 
You should look at the Nikon CLS lighting system. The camera can support Nikon's CLS lighting system. In the manual flash mode and using the Nikon CLS flash units in the manual mode you can fine tune remote triggered SpeedLights to fill the darker areas. You will need to close doors or drapes to block any bright outside light.

The Nikon ClS flash system used optical sensors so the lights will need to be in line of sight or you may an extension cord with a sensor.
 
I'll second Gregor's suggestions (not just because he is a pro photographer).  When you're just starting to learn, I would not recommend messing with remote strobes or flashes yet. Work on your composition, balancing light in the room (close the shades if it's too bright outside and the sunlight is creating too much contrast in the scene) and understanding how you can manipulate exposure time, aperture and ISO to get the image you're after.  If you really need a flash, do as he suggests and point the flash at the ceiling (assuming it's white). The ceiling is a giant reflector, use it.  If you need to throw a little light forward to lighten shadows from your overhead reflector, take a piece of paper and rubber band it around the back of the flash head (still pointed at the ceiling) so that 6" sticks out over the flash head.  That will reflect a little light forward. 
 
If you want to even out the lighting without having to carry much, there are drawstring bags made from the same light-diffusing fabric used to make the light hoods.  You just clip the bag around the bulb and it really does seem to help eliminate hot spots.  It would work on either the homeowners lights or your work lights.
 
You also might be able to just use the Nikon CLS system in the automatic mode and let the camera and flashes automatically set the power levels. Nikon offers many levels of CLS flash units. The SB-700 is the least powerful and least flexible (limited to 2 units)  and then there is the more powerful SB-900 and SB-910 which can be setup with 3 remote units in automatic but for Real Estate photography you might want 4 SB-910's. One on the camera to act as the master control unit and then up to 3 remotes places as needed.

It might even be possible to use work lights to fill-in dark areas.

 
Depending how serious you are about getting professional looking pictures of rooms you might want to look at Tilt-Shift lenses or software approaches to correct geometry of a normal lens like DxO Viewpoint.

These will not fix the lighting issues you mentioned, but correct the room geometry to look natural.
 
Very interested in this thread myself, I have a website going live soon and the pictures I have are the only thing I am not happy with at the moment
 
There is a lot of good information here… and that may be problematic for someone (
 

Attachments

  • IMG_2791.jpg
    IMG_2791.jpg
    97.6 KB · Views: 1,453
Back
Top