Pillar Casing

Scorpion

Member
Joined
Jan 15, 2014
Messages
587
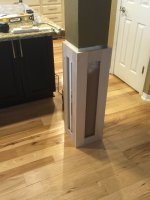
The PO of the house (apparently) was dating a handyman.  His skills were...lacking.  When they remodeled the kitchen, they replaced the counter with an island.  The counter used to be attached to this post and it must have seemed easier to encase it and do a crapy drywall repair than fix it correctly.  I almost missed the before picture - you can see I started demo.

[attachimg=1]

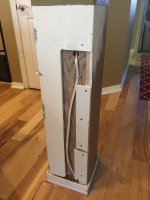
Once demo'd I found their dirty little secret (I would assume it's a dirty secret since I don't exactly know what the code is for a wire that used to be under a counter but was re-routed up a post to an outlet that's now in a pillar).  It took me about a hour to re-route the wire to inside the pilar instead of being exposed...what can you do?

[attachimg=2]

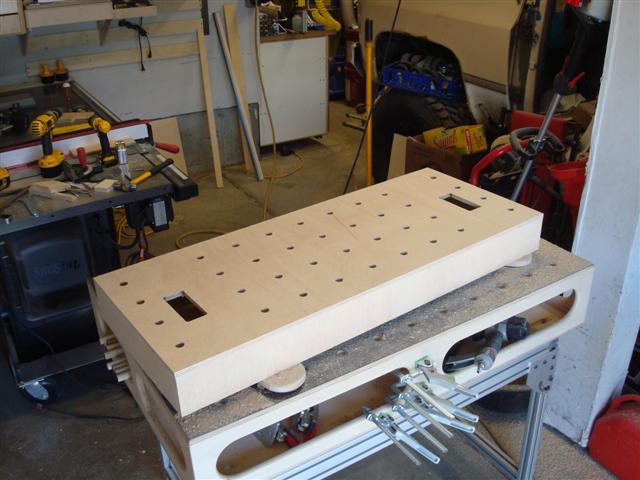
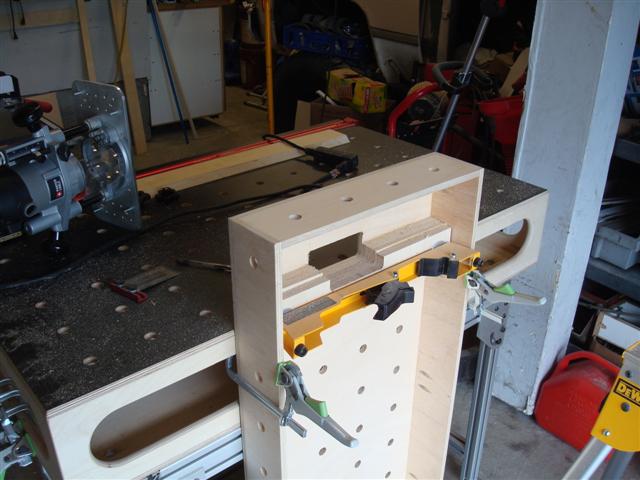
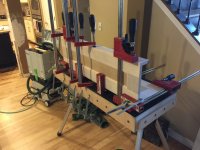
I used the domino 500 to make the sharker style panels.

[attachimg=3]

I used hard maple so they'd be able to handle the abuse that occurs at that height and chose to cut a deep chamfer on the edges so that the corners were already rounded over.  The thought here is that if the casings take some serious abuse, I can always cut the chamfer a little deeper and restore the "finished edge".  I'm going to bet the maple will be durable enough to never need to do so but if I do, like when selling the house, it'll be nothing more than setting up the router and re-cutting the chamfer slightly deeper and repainting.  I used 3/8-inch MDF for the inner panels.  It's damn cold here right now so all glue-uping happens inside.

[attachimg=4]

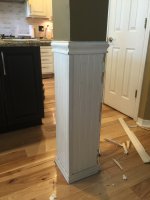
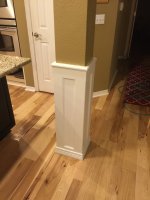
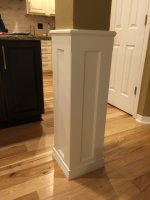
After a little trim work, here's the finished product.  I think I enjoy seeing my wife's reaction (the first time she sees my efforts) more than I appreciate the work myself.  My OCD causes me to see every imperfection instead of the overall result. 

[attachimg=5]

[attachimg=6]

Thank you for looking.  [big grin]


Attachments

  • IMG_5744.jpg
    IMG_5744.jpg
    1.5 MB · Views: 2,046
  • IMG_5747.jpg
    IMG_5747.jpg
    1.7 MB · Views: 1,643
  • IMG_5750.jpg
    IMG_5750.jpg
    1.2 MB · Views: 1,685
  • IMG_5770.jpg
    IMG_5770.jpg
    1.6 MB · Views: 1,388
  • IMG_5810.jpg
    IMG_5810.jpg
    1.6 MB · Views: 1,596
  • IMG_5819.jpg
    IMG_5819.jpg
    1.4 MB · Views: 1,642
Nice job , I used to do quite a few of those back when I was a Bar fitter. We mostly did them in veneered MDF with oak or mahogany mouldings. Most of it was made up in the shop so we just had to fit it. The top section usually had mirrors fitted all around. Most times we also had angled corner covers so didn't bother with mitred edges ,it was just butted. I've done quite a few mitred pillars though. Very pleasing job when finished

EDIT: just realized you've butted your corners too, thought you had mitred them when I looked earlier. That will teach me for not looking at the photos properly :)
 
Nice recovery and execution...

Looks like the original bodged Romex version was also a little short/narrow where it met the floor allowing a space between the flooring and the base trim to be seen. [eek]
 
Scorpion, nice work on the pillar! Can you show some pictures of the Dewalt mft sawhorse you made?
Cheers
Curt
 
Thanks all for the compliments.  Much appreciated.

joiner1970 said:
Nice job , I used to do quite a few of those back when I was a Bar fitter. We mostly did them in veneered MDF with oak or mahogany mouldings. Most of it was made up in the shop so we just had to fit it. The top section usually had mirrors fitted all around. Most times we also had angled corner covers so didn't bother with mitred edges ,it was just butted. I've done quite a few mitred pillars though. Very pleasing job when finished

EDIT: just realized you've butted your corners too, thought you had mitred them when I looked earlier. That will teach me for not looking at the photos properly :)

I worked through college in the bars and recall the mirror crazy, it hadn't even occurred to me.  t asked my wife if she'd be into mirrors around the top and she said "what in the world for?"  Guess she doesn't remember them as fondly as we do.  [blink]

I thought about mitering the edges but decided to but them to increase the strength at the edge.  It might be difficult to see it in some of the photos but there's a fairly deep chamfer on the edge to eliminate the spot in which most of the force get's absorbed when people whack the pillars with stuff walking by.  Maybe it won't help but that was the original thought behind the assembly order.
 
Curt Boyer said:
Scorpion, nice work on the pillar! Can you show some pictures of the Dewalt mft sawhorse you made?
Cheers
Curt

The MFT-Horses (I affectionately call them) were built to create an easily mobile surface that could be taken inside to the project which also doubled as an extension for my home grown MFT for use when the pieces I'm assembling were much larger than I could fit on a single reasonably sized table.  The epiphany came one day when I was attempting to work on a fairly large face frame where I needed a claimable surface 5 feet away from the MFT.  I then realized it would be cool if I had something that could bolt to a pair of the saw bases which allowed me to use my normal through table clamps.  Doing so would allow the top to be removed from the legs and easily taken inside (though since then I've realized I never really need to remove the top in order to move it around).

MMFT1.JPG


MMFT2.JPG


The tops were made just larger than the feet but the length of the saw horses.  I cut openings in the tops to allow my hands to get through and release the top using the paddle handles.

MMFT4.JPG


The mounts needed to be built up a couple inches to match the working surface but building them up allowed me to put some threaded inserts inside so they could simply screw on and off with a drill.

MMFT5.JPG


So I could beat on them I decided to laminate the top so they're not sacrificial which is okay for how I use them.  The durability has been nice.

MMFT6.JPG


I added a few french cleats on either end so I could hang stuff off the sides (and free up the work surface for actual work).  These made a huge difference inside.

MMFT13.JPG


Almost immediately after making the first one I realized how well it was going to work and I made a second.  Pulled together it's increased work height (I can clamp the MFT-Horses to the side of the MFT so it all becomes a single unit).

MMFT22.JPG


And works as originally planned if I need added space for much larger assemblies.

MMFT23.JPG


Each one cost about $30 + the $89 at Amazon for the saw horse kit.  I now use them more than I use any of my other tables (except maybe my Festool MFT) and half the time they're inside the house serving as a work surface directly at the project/install.
 
Scorpion said:
The PO of the house (apparently) was dating a handyman.  His skills were...lacking. 

Perhaps he was distracted by the owner...

Scorpion said:
...chose to cut a deep chamfer on the edges so that the corners were already rounded over. 

Great idea. I like the look.

Jozsef Kozma said:
I like to make panel style and rail to show equal after base installation

Small quibble, but agreed. Actually I try to make the bottom rail slightly wider than the others so it appears equal to the others after the base installation.

Scorpion said:
The MFT-Horses (I affectionately call them)

Thank for the detailed description. Great idea.
 
Tim Raleigh said:
Jozsef Kozma said:
I like to make panel style and rail to show equal after base installation

Small quibble, but agreed. Actually I try to make the bottom rail slightly wider than the others so it appears equal to the others after the base installation.

Yes, yes...I wish I had caught that before I put on the base boards.  I noticed it almost immediately and, unfortunately, I had already nailed them in with the finish nailer and given them paint.  I decided that I'd live with it instead of potentially doubling the work (doubt if it would have been a full re-do but it would' have been far from it in order to get the things uninstalled enough to slide them up and add in a spacer.  I'm going to give it some time, if it still bothers me enough, I'll fix them. 

I almost didn't share as a result of the mistake but, with a fairly serious case of OCD, I've learned to tell myself that most won't catch it and those that do will still appreciate beyond the mistake.  Honestly I'm shocked I made the mistake.  Think it was mostly trying to go fast leading up to company arriving for Thanksgiving.   
 
Thanks for the pictures and description of your mft horse build. I use the Dewalt horses for their profile so that I can mount any of my three mitersaws on my truck bench, Rousseau cart, and Sawhelper mitersaw stand. I have an extra horse that I've been thinking of making something like you did.

Regarding your pillar tear off the cap and baseboard and use it as a really sturdy and expensive substrate. Build a new version with a taller base and a deeper cap if the counter clearance will allow it. If it is going to be too big just rip it out and do it over. If you don't do something it's going to drive you crazy every time you enter the kitchen. Think how much faster it will take to do it a second time! Don't ask me how I know!
Cheers
Curt
 
Scorpion said:
I almost didn't share as a result of the mistake but, with a fairly serious case of OCD, I've learned to tell myself that most won't catch it and those that do will still appreciate beyond the mistake. 

I am glad you posted, better yet your wife is happy you fixed it and the mistake is minor compared to many I have made in my home.

Scorpion said:
Honestly I'm shocked I made the mistake.  Think it was mostly trying to go fast leading up to company arriving for Thanksgiving. 

We have all been there.
Tim
 
Back
Top