Just reiterating what many have already said. I borrowed a Ridgid set from a friend, including the chain vise, when I plumbed my shop for air a coupla years ago. I plumbed with 1/2" black pipe which wasn't too bad. Since I still had it in the shop, I then did a few projects using some 3/4" and 1" (very similar to what you are talking about). I can assert that this is real work, no joke. I am of average build, perhaps a bit more robust than the average joe, but it is taxing work if you are doing more than just a few pieces. I had that chain vise walking all over while threading that larger stuff. I think a proper vise mounted to a very sturdy workbench might be better if it won't move on you. I am kinda wanting to buy a set myself for the same reasons as you as I had to give back the borrowed set of course.
You are using an out of date browser. It may not display this or other websites correctly.
You should upgrade or use an alternative browser.
You should upgrade or use an alternative browser.
Pipe Threading
- Thread starter ear3
- Start date
- Joined
- Feb 22, 2016
- Messages
- 2,858
that is the reason the tripod vise has the jack screw that extends up through the table. You cut a piece of pipe and place it against an overhead beam or ceiling with a 2x4 a couple feet long, then jack the screw up to clamp the tripod to the floor. It does not move then.
- Joined
- Feb 22, 2016
- Messages
- 2,858
ChiknNutz said:Learn something new all the time! Had no idea about that. Would not have worked too well in my shop though as the ceilings are almost 13' high and all sheet-rocked.
That's why you put the 2x4 across the ceiling to span a couple joists. It doesn't take much to hold it down.
R
Rob Z
Guest
Cheese
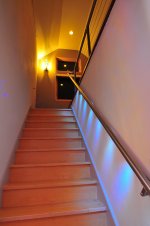
I tried to post earlier but the forum was glitching and I lost my post. I wanted to tell you how much I like your work with the stainless steel handrail pictured above.
I tried to post earlier but the forum was glitching and I lost my post. I wanted to tell you how much I like your work with the stainless steel handrail pictured above.
Cheese
Member
Rob Z said:Cheese
I tried to post earlier but the forum was glitching and I lost my post. I wanted to tell you how much I like your work with the stainless steel handrail pictured above.
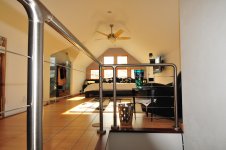
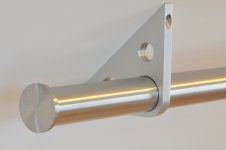
Thanks Rob... [smile] The interesting part is that those tees & elbows are all held together with 3M epoxy that's used to bond the aluminum skin on airplane wings. Here are a couple of more photos of how all the individual pieces kind of flow together.
[attachimg=1]
[attachimg=2]
Attachments
Cheese
Member
live4ever said:[member=44099]Cheese[/member]
Are those glass doors on the closet? [not worthy]
[/quotelive4ever said:[member=44099]Cheese[/member]
Are those glass doors on the closet? [not worthy]
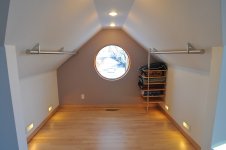
Doors no...glass yes... [big grin]
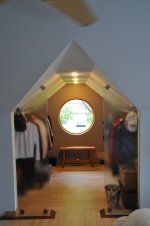
It's a walk-in closet using a softly textured glass to create a barrier without having to use doors. The overall feel is that there's a a definite boundary between it and the living space, that notion may be fairly well augmented by the flooring pieces, yet there's still an open space for light and air and for safe passage.
Here's the final result.
[attachimg=1]
This was in the intermediate stage.
Cheese
Member
Well this is strange, there are still some artifacts from Festool's last night's melt down.
Cheese
Member
live4ever said:[member=44099]Cheese[/member]
Are those glass doors on the closet? [not worthy]
Yea those are textured glass panels. Tempered to prevent personal injury. Nice...they let in the Eastern sun in the morning and cast a sun path across the entire area. On certain times of the day they cast a prismatic pattern on the wall that stupefies me and brings me back to the 60"s. [big grin] [big grin] [big grin]
Cheese
Member
So [member=13462]live4ever[/member] , here are the stages
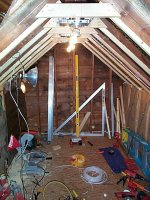
This is what I started with:
[attachimg=1]
This is stage 2 where things start to come together.
[attachimg=2]
And this is the final product.
[attachimg=3]
Here's an outlier of the project, it's always interesting to me the paths you have to travel to finally arrive at your destination.
[attachimg=4]
Attachments
[member=44099]Cheese[/member] I dig, I dig. I actually remember those closet rods when you posted about them (maybe a year or two back?), but I missed the whole project. Very sweet work.
Ok, sorry everyone, we now return you to your originally scheduled programming on pipe threading... [big grin]
Ok, sorry everyone, we now return you to your originally scheduled programming on pipe threading... [big grin]
R
Rob Z
Guest
Thanks Rob... [smile] The interesting part is that those tees & elbows are all held together with 3M epoxy that's used to bond the aluminum skin on airplane wings. Here are a couple of more photos of how all the individual pieces kind of flow together.
[/quote]
Cheese, I had been wondering how you connected the fittings-no sign of a weld nor fasteners. Nicely done. Is this in your house, or for a customer?
Cheese
Member
Rob Z said:Cheese, I had been wondering how you connected the fittings-no sign of a weld nor fasteners. Nicely done. Is this in your house, or for a customer?
Thanks again Rob, my house, there’s no more critical inspector. [smile]
Similar threads
- Replies
- 3
- Views
- 417