Plywood Trick

Birdhunter

Member
Joined
Jun 16, 2012
Messages
4,144
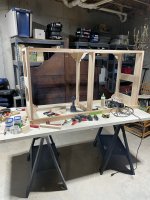
I’m building a large dresser and the “show” wood will be quarter sawn white oak. It has to be moved to its final home so I need to have the top, sides, and drawers removable to reduce weight.

I am using Baltic birch to build the frame to which the removable surfaces will be attached.

My trick is to cut 3” wide strips of 1/2” plywood and glue two together making a 1” thick board of whatever length I need.  I glue the strips down against a cheap door I bought at Home Depot. The door is perfectly flat and square. So, the glued together strips are perfectly flat and square. I do separate the wood from the door using waxed paper.

Works great.
 
He is simply gluing two strips of 1/2” ply together to make a 1” thick strip. He’s clamping the freshly glued strips to a flat surface (the hollow core door) so they stay flat while the glue dries. Waxed paper keeps the strip from sticking to the door.
 
I save the release paper from products like contact paper.  It works better than wax  paper for the purpose of resisting glues and since it is a byproduct of sticky paper, it costs nothing.  It  can be used several  times before it needs to go in the trash.
 
MK is correct. I’m careful to clamp the two strips against the door AND clamp the edges so that they line up perfectly. On a 60” set of strips, I usually have 6 clamps holding the strips against the door and 6 clamps aligning the edges.

I used this trick when I was making a king sized bed. Then, I was gluing two 1” by 4” by 8’ oak boards together and I needed them to be perfectly straight.
 
When I am gluing boards together I drive four small brads into the surface where I am applying the glue and then nip off the head leaving about 1/8" proud of the board.  The keeps the boards from sliding out of register while I am clamping. The brads never show, so they are invisible to all.  For purists, there is no mechanical fasteners involved.  Just alignment devices. 

Once it is in the right position, I clamp down on the fasteners which bury in the adjoining panel and maintain alignment.
 
Couldn't wait any longer.  I understand the jig/piece you are building, in order to facilitate 'something'.  I am trying to understand how you use these 1" x 3" x ?? strips.  Again, pictures would be great.  This is one of those things where I might not know I need it until I see how its used and then the lightbulb goes off.
 
This is the dresser frame. All the structure is made with the 2 1/2” strips glued together to make straight 1” by 3” boards.


Attachments

  • 5BC124C6-708E-4734-A223-5F77F5C9DD8E.jpeg
    5BC124C6-708E-4734-A223-5F77F5C9DD8E.jpeg
    931.8 KB · Views: 429
Yes, everything has to be dead straight when you glue it up, or it will stay crooked forever....low-level bent lamination.
I have seen more than one guy laminate a countertop on sawhorse without checking to see that it is flat, it will stay in that bend forever if it is just going on brackets. Screwed down to cabinets, it might be ok.

When I need something to be absolutely flat, I just throw it on the vacuum press. The luxury of a big shop, I can put heat to it too, if needed.
 
Birdhunter said:
This is the dresser frame. All the structure is made with the 2 1/2” strips glued together to make straight 1” by 3” boards.
Thank you for the picture.  That is a very interesting method.
 
The 62” by 20” by 3/4” quarter sawn white oak top and the two 36” by 20” by 3/4” sides will be attached to the frame with Z-Clamps. Sides, drawer fronts, and sides all of milled quarter sawn white oak finished with MinWax wipe on poly.

The frame can fit in my SUV and be easily managed by two guys with the top and sides off and the drawers removed. Not very heavy and it is extremely rigid.

Also, using Z-Clamps allows for seasonal wood movement especially as this family leaves doors open a lot.

This an unconventional construction method, but with the knockdown requirement, it seemed reasonable.
 
Why not just rip a 4' x 8' sheet to 2' x 8' and glue the halves together?  Then rip the strips as required.  It seems like less work and it seems like greater accuracy.

I have a few sandbags and I would weight the sheets down rather than clamp them.  I  would assume that the glued surface would perform as well as the factory laminations if enough glue is applied.
 
Packard, You are correct that ripping a full size sheet would be more efficient. Two issues. One, I find it very hard to handle a 4’ by 8’ sheet of 3/4” plywood. Second, the only Baltic birch I could find was at Rockler and their stuff was 30” by 60”.
 
I understand that 60" x 60" is a full sheet of Baltic Birch.  I don't buy it in full sheets (I rarely buy it at all).  God knows what it costs nowadays.  It was always more expensive than regular plywood.  I used it for drawers once, but I did not like the look.  Not much after that.

Sandbags are a cheap alternative to a million clamps.  I lay a sheet of plywood over the pieces to be joined and then load the sandbags on the top spacing it evenly.  They even sell canvas bags for flood control that is more durable than the bags that the sand is sold in.  It also allows for lighter bags (80 pounds is more than you need in one  spot).

 
Packard said:
...
Sandbags are a cheap alternative to a million clamps.
...
Never would have thought of the idea!

Over here it is even easier - you can buy sand and gravel by the truckload at every building materials shop. Costs like $50 per cubic meter (35 cu ft).

Will put it in euro-containers with flat, non-reinforced, bottoms to spread the load evenly which can also stack for storage. THANKS!
 
I never heard of “Euro Containers” (I just looked it up). My one greatest fear is that one day a bag will get a leak and that I would have sand all over the shop. I will have to get some of these.

About 5 pounds per square foot is sufficient.  About 160 pounds. The euro containers will make it easier to spread the load. About 40 pounds per container.  It will be way easier to maneuver than 80 sand bags.
 
For about 15 years Schaefer Systems was a customer of ours.  We produced the wires that allow the nesting containers to stack.  But they never referred to these as "Euro containers."

Shaefer Systems in Germany is a major producer of these items and they are also a major producer of these items in the USA (North Carolina).
https://www.ssi-schaefer.com/en-us/products
 
"Euro Container" comes from the "Euro-pallet".

It is a standard for wooden pallettes for shipping goods in Europe and the resulting sub-units of it are then used for boxes.
Over here all vegetable stuff, starting with Banana boxes is based on those sub-sizes.

The standard Euro-pallete is 1200x800, subunits are 800x600, 600x400(MAXI Systainer), 400x300 (Systainer), 300x200 and 200x150.

Some manufacturers explicitly refer to them as "Euro-containter" to distinguish them from other ranges they make like KLT etc.

The good thing about them is the external sizes are standardized, so you can mix and match boxes from various vendors and most of them will even stack together as the bottom recesses are the same too.

What I have in mind are these:https://www.auer-packaging.com/us/en/Euro-containers-solid/EG-4317-HG.html?color=7001

Takes 15 litres which should do for about 20 kg of sand with some reserve and be easy-enough to handle. I can double-stack them in case of more pressure needed and can stack about 5-6 of them with the sand inside for storage as the sides can handle some proper weight.

Packard said:
Shaefer Systems in Germany is a major producer of these items and they are also a major producer of these items in the USA (North Carolina).
This is likely because Shaefer was making these before the "euro-container" term was used.

In Germany they have the the "KLT" VDA standard which is more specific and includes also internal dimensions, catch points for automated machines etc.

These days the term "euro-container" refers more generally to the standardized external dimensions. The wiki article is actually confusing the German KTL standard - which is very specific - with the more general "containers which are subunits of Euro-pallette and can be stacked" which is the more general category.

These days I would not consider KLT-standard boxes to be what I call "euro-container" actually. Heh.

What I meant was to use boxes with flat plastic non-reinforced bottoms that ensures the load is spread and are strong enough to stack 5-6 atop with the sand inside.
 
I find a 600 x 400 Euro Container wheeled dolly useful - and inexpensive - for holding two stacks of Systainers
(for e.g. see bottom of the page linked below).

Obviously the bottom Sys doesn't lock on (and the perimeter lip is fairly shallow) so you might not want to push it across really bumpy ground outdoors, but they are used extensively in warehousing and fine for rolling around the workplace.
https://www.tradesystems.co.uk/euro-boxes.html

For those who might be new to Raaco cases (mentioned by another member in a different thread) there is a selection on that same site.
 
Back
Top