Polishing Headlights With RO 90

John Broomall

Member
Joined
Jul 26, 2013
Messages
48
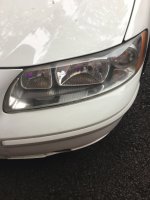
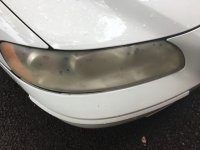
The polycarbonate headlight covers on my wife's Volvo had gotten really bad so I decided to try polishing them out with my RO 90. Because they were so cloudy I started with a 600 grit rather than the usual 1500 and then went 800, 1000, 1500, 3000, followed by polishing compound. Sander speed was set on 3. It took about 20 minutes per lens. I think the before and after photos tell the tale pretty well.
 

Attachments

  • IMG_0622.jpg
    IMG_0622.jpg
    1.9 MB · Views: 591
  • IMG_0621.jpg
    IMG_0621.jpg
    1.7 MB · Views: 509
Well done, but there are kits for that also.  Looks like you made good use of the Rotex.  I've done similar things with my Subaru but I think it's best to put a sealer on there so there's less chance of oxidizing in the future
 
RO 90 is an excellent tool for this .. personally I'd work through Scholl Concepts compounds and pads.
 
The sealer is an important step as the hazing is a result of the acrylic surface absorbing water and dirt.  The sealer slows both of those.
 
I used one of the "kits" and it worked fairly well but would not remove scratches. Also it hazed back up within 6 months.
What do you use for a sealer? Have not seen this being sold although have not looked for it. Seems like I should be using a sealer from day one of ownership.
Pete
 
Just like your skin the plastic used in headlights degrades with exposure to UV. OEM headlight plastic is treated with a UV protection layer and also a hardener to minimise scratches.

If you abrade the surface to clean it or remove scratches it will rapidly deteriorate unless you replace the protective layer.

There are lots of products being flogged in auto shops to polish and clean headlights but unless it specifically states that it gives UV protection like a sunscreen I wouldn't bother with it.
 
This was a good first pass, but I would suggest you go back and work from 1000 grit on up.  You can see the heavier scratches and haze left behind by the sanding and it should be perfectly clear if done properly.  Use water to lubricate the surface while you do it and take your time.  When you're done they will look like new.  Mask off the surrounding paint with blue painters tape so you can take the sander right to the edge of the headlights. 

For a protective coating, try opti-lens.  You won't find it in the local auto parts stores, you'll have to order online.  You'll get enough to do several cars, so line them up.  It's not cheap, but most of the cheap products won't last more than 1-3 months.  I haven't used this one yet but I would expect to get a few years out of it, Optimum produces pretty good products.
 
It's very important that all the haze/scratches are removed, otherwise the yellow will start to come back within 1-2 months. I'll start with 320/400 grit and water with the RO 90 and work through the grits. I found it's really important to work the upper region 1000-5000-8000 so that the lens is absolutely like new.

In the past I've used 3M Lens Protector 39010 as a sealant, it works pretty well, lasts about a year.http://3mauto.com/3m-lens-polish-and-protector-39010.html

Here's a 3M how-to sheet. I suggest using smaller grit jumps than 3M does.http://multimedia.3m.com/mws/media/...e-headlight-lens-restoration-system-39008.pdf

The next time I'm going to try using Opti-Lens as a sealer. It's supposed to last a lot longer, however, it's also about 6x more expensive.https://optimumcarcare.com/product/optimum-opti-lens-coating
 
Back
Top