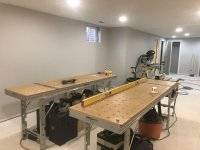
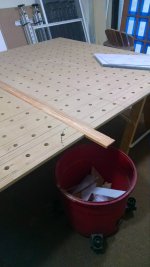
Portable Boom Arm mounted to MFT/ T-Track

Pancha said:
I'de be curious to know if they have posted any testings or conclusions on how to effectively use different gauge hoses for different lengths in different applications, and whether the 50 mm hose is actually an improvement over a 36 for this application and when it wouldn't be.

There is something like that. Probably not exactly what you're looking for but it's a decent resource nonetheless.

See the attachment at http://festoolownersgroup.com/ask-festool/connecting-two-36mm-hoses/msg342346/#msg342346
 
GarryMartin said:
Pancha said:
I'de be curious to know if they have posted any testings or conclusions on how to effectively use different gauge hoses for different lengths in different applications, and whether the 50 mm hose is actually an improvement over a 36 for this application and when it wouldn't be.

There is something like that. Probably not exactly what you're looking for but it's a decent resource nonetheless.

See the attachment at http://festoolownersgroup.com/ask-festool/connecting-two-36mm-hoses/msg342346/#msg342346

Thanks Garry,  It's certainly useful for this thread.  It doesn't really help in terms of discerning the most effective hose connection systems for different tasks but it is a great resource!  It also lends itself to the idea that starting with a 50 mm hose in the beginning and then transitioning to a smaller hose is a more effective method of dust collection.  Thank you for posting this!  I'de be curious to know what others have found with their own hose arrangements.
 
Pancha said:
It also lends itself to the idea that starting with a 50 mm hose in the beginning and then transitioning to a smaller hose is a more effective method of dust collection.

Definitely.

You might find more information by looking at dust collection ducting design - it's all about volume moved and the velocity of the airstream, and changing the size of the duct (hose) such that it is narrower further away from the extractor is one of the main ways that you retain a well functioning system when increasing the length of the ducting.

Typically, small shop systems will start with a 6" duct at the extractor/cyclone, and maybe for the main trunk, with 5" duct coming off as branches, a 4" or smaller used at machines depending on their individual requirements.

The larger diameter of duct/hose at the tool end, the higher the velocity needed to move the volume necessary to extract dust efficiently from the tool.

I assume that's why tools like the Kapex work best with the 36mm hose - it hits their sweet spot with regard to volume and velocity; a 27mm hose has more velocity but not enough volume, and maybe the 50mm hose has enough volume but not enough velocity?
 
GarryMartin said:
Pancha said:
It also lends itself to the idea that starting with a 50 mm hose in the beginning and then transitioning to a smaller hose is a more effective method of dust collection.

Definitely.

You might find more information by looking at dust collection ducting design - it's all about volume moved and the velocity of the airstream, and changing the size of the duct (hose) such that it is narrower further away from the extractor is one of the main ways that you retain a well functioning system when increasing the length of the ducting.

Typically, small shop systems will start with a 6" duct at the extractor/cyclone, and maybe for the main trunk, with 5" duct coming off as branches, a 4" or smaller used at machines depending on their individual requirements.

The larger diameter of duct/hose at the tool end, the higher the velocity needed to move the volume necessary to extract dust efficiently from the tool.

I assume that's why tools like the Kapex work best with the 36mm hose - it hits their sweet spot with regard to volume and velocity; a 27mm hose has more velocity but not enough volume, and maybe the 50mm hose has enough volume but not enough velocity?

When fuguring pumping presures and fire hoses, we used the large hose at the pressp and to narrow down closer to the fire.  That is, I have always assumed, to be the way to set up vac hoses.  I have a short 16" section of 27 hose at my TS55, OF 1000 router and sanders.  the 36 hose from there to my cyclone and 50 from cyclone to CT 33.  My HL 850 I run the 36 direct to the cyclone.  For that machine, I also run the hose horizontal for 3 or 4 feet before going to ceiling joists and then back down to the cyclone. I don't know if that is necessary, but i just think giving that little extra horizontal run give the chips a better chance to sort themselves out before going into vertical mode.  If I am working outside in my most spacious shop area with the entire universe for a ceiling, I just run the hose on the ground to my CT 22. My small domino gets the 27 to 36 hose treatment the same as for my TS55.  My OF 1400 is in its permanent home in the CMS table.  That gets the split hose treatment to the cyclone.  I just move either/both within reach of each other and run vertical and down hill to the cyclone.
Tinker
 
Tinker said:
When fuguring pumping presures and fire hoses, we used the large hose at the pressp and to narrow down closer to the fire.  That is, I have always assumed, to be the way to set up vac hoses.  I have a short 16" section of 27 hose at my TS55, OF 1000 router and sanders.  the 36 hose from there to my cyclone and 50 from cyclone to CT 33.  My HL 850 I run the 36 direct to the cyclone.  For that machine, I also run the hose horizontal for 3 or 4 feet before going to ceiling joists and then back down to the cyclone. I don't know if that is necessary, but i just think giving that little extra horizontal run give the chips a better chance to sort themselves out before going into vertical mode.  If I am working outside in my most spacious shop area with the entire universe for a ceiling, I just run the hose on the ground to my CT 22. My small domino gets the 27 to 36 hose treatment the same as for my TS55.  My OF 1400 is in its permanent home in the CMS table.  That gets the split hose treatment to the cyclone.  I just move either/both within reach of each other and run vertical and down hill to the cyclone.
Tinker

See that's the thing, People have completely different needs when it comes to what you have between the vac and the tool.  It's hard for me to justify making the boom arm part of the suction apparatus despite how much I would like to.  I like the Idea of having a boom arm that breaks down and can be transformed into a regular vacuum kit  like the stainless steel tradesman cleaning set.  I would love to have a cyclone soon too, but i'm not sure which direction to take with it.  Home made vs new Oneida AXD000009 Ultimate Dust Deputy.  I can't tell how serious this hole antistatic thing really is, but i digress...  When you start committing to certain lengths of hose you end up limiting either the suction, your options, or having to have a bunch of different diameters of hose at different lengths, and constantly hacking up hoses as your system changes.  I don't mind the last option, but they take up so much space and are a pain to carry and pack away.  I also have an added issue in that I work on decks a lot.  Awkwardly shaped ones, or narrow ones where my preferred setup doesn't work and I have to move things around.  I would like to be able to do that without affecting the dust collection because for me that's the point.  I don't know, I need to ruminate on this some more. 
 
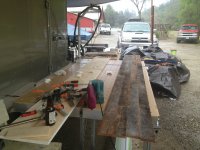
So I wanted to give an update as it’s been a few years and some folks expressed concern over maring of the t-track or worse deformation.  Happily I can say I haven’t found any evidence for such worries.  It has however been very useful in my shop and in the field.  I was recently asked to build a tiny house for a show on hgtv and had to erect basically an entire shop outside.  It proved to be truly versatile and useful as I could swap it quickly from my mft to my dashboards rather quickly as my setup and needs changed.  While the boom arm was useful I can easily say the Dashboards were invaluable and therefor feel the need to thank my friend Rob for making an incredible portable workbench.
 

Attachments

  • 1040FD30-5583-448B-A58A-995D1EA93DE3.jpeg
    1040FD30-5583-448B-A58A-995D1EA93DE3.jpeg
    2.2 MB · Views: 504
Here’s a better view of the tables in case anyone is curious about them
 

Attachments

  • 4F46CC62-9A1F-42BA-AA13-CC680EC3B9CE.jpeg
    4F46CC62-9A1F-42BA-AA13-CC680EC3B9CE.jpeg
    2 MB · Views: 538
Hi Pancha, What a great idea, and you’ve made a nice job of making it all. Very portable and lightweight!
I could definitely make use of such a set up, in all kinds of situations.

I really like that.
 
The rail holder and fence look quite interesting (in terms of lacking many of the problems the festool one has), should these be compatible with MFT/3 and priced somewhat reasonable I would order some without much further thinking.
 
Pancha said:
Hey Guys.  Yeah just FYI.  I didn’t tell him I was going to rep his product on here not that I necessarily think he would mind.  If you’re interested in purchasing a dashboard you should contact him through YouTube or visit his Instagram and send him a message there.  I’m sure he would love to hear from people who appreciate the amount of time he put into developing it..  He’s a great dude.  And I can honestly say, no offense festool, that the dashboard is much more stable and versatile than the Mft.  And a 2’x8’ dashboard basically ways the same as an mft.  Though I love both depending on what I’m doing or where I’m working.
His Instagram is Right_Angle_Design

Is that dark strip in the table top a replaceable sacrificial strip and if so what is it made of. Is it a dovetail fit or are the edges square cut as a wide dado. I'm thinking it's square cut because I see what look like hold down screws along the length of each side which would not be needed if it was dovetailed into the top.
 
My quess is it's a sacrificial strip of ABS or something similar.  I use a piece of wood that I use in my cutting table, I just loosen the one MFT side and push up against the strip, The strip is loose enough that I pull it out from the edge to start the saw cut.
View attachment 1
 

Attachments

  • IMG_20170630_094951668.jpg
    IMG_20170630_094951668.jpg
    3.2 MB · Views: 220
Back
Top