[Project 34] Cherry & Sapele Coffee Table

mattbyington

Member
Joined
Mar 11, 2018
Messages
797
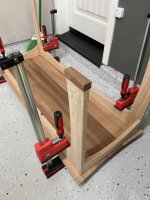
Well, I got the Shaper Origin recently. It is an absolute blast so far.

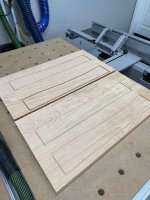
To celebrate, I wanted to make my first piece of furniture that incorporates a curve. It is crazy to think that I have not made anything with a single curve yet!

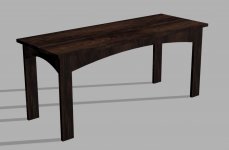
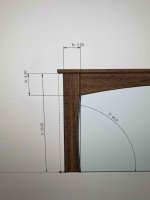
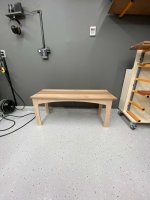
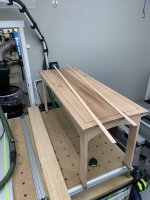
I designed a coffee table in Fusion 360 ... and off to the races we go.

Matt

[attachimg=1]

[attachimg=2]
 

Attachments

  • IMG_4745.JPG
    IMG_4745.JPG
    177.2 KB · Views: 779
  • IMG_4746.jpg
    IMG_4746.jpg
    487.8 KB · Views: 779
[attachimg=1]

[attachimg=2]

[attachimg=3]
 

Attachments

  • IMG_4751.jpeg
    IMG_4751.jpeg
    564.3 KB · Views: 690
  • IMG_4756.jpeg
    IMG_4756.jpeg
    545.4 KB · Views: 708
  • IMG_4761.jpeg
    IMG_4761.jpeg
    578.4 KB · Views: 689
Nice. Shaper makes adding curved elements relatively trivial. I tend to prefer cutting a plywood template with the shaper, then using a flush trim bit to cut the wood. I find the cut quality us better than cutting directly with the shaper bit. For those sorts of atretchers/frame members, whether im cutting directly with the shaper or with the template, I also like making a final trimming cut with the miter saw so I get a perfectly straight registration surface for dominoing. Using stops to make the cuts ensures you're still getting identical lengths.
 
I love the shaper. I had mine since the beginning. It has come a long way and is a great tool. The station they now sell is also a great piece of kit. Keep up the great work.
 
Just looking a bit closer at the design -- have you thought about thickening up those legs?  They are very thin for this sort of piece.  Could still be done by laminating a few boards together, though you would have some sanding to do to get the curves to line up after the glue up.  Or, as mentioned in my previous post, you could switch to the shaper-made template method and pattern rout them from some 6/4 or 8/4 stock.
 
[member=37411]ear3[/member] thanks so much man! I do wish I made the legs thicker...I wanted something I could cut out with the shaper without much extra sculpting. Oh well.

[member=2242]tallgrass[/member] yeah it has been so much fun!! Station on the way for me ... ETA October, they say.

More progress on this thing.

Matt

[attachimg=1]

[attachimg=2]

[attachimg=3]
 

Attachments

  • IMG_4803.jpeg
    IMG_4803.jpeg
    481.4 KB · Views: 536
  • IMG_4798.jpeg
    IMG_4798.jpeg
    1.1 MB · Views: 543
  • IMG_4785.jpeg
    IMG_4785.jpeg
    829.6 KB · Views: 537
mattbyington said:
[member=37411]ear3[/member] thanks so much man! I do wish I made the legs thicker...I wanted something I could cut out with the shaper without much extra sculpting. Oh well.

Curious, how deep a cut can it make? 

Bob
 
the depth of cut varies. Material and cutter and so on. The Shaper is not for hogging material. You are better removing less material per pass.
 
Matt, I recieved one of the first batch. Which was lucky. I actually love it. Making a station for it. This way I can have all the Shaper components in one roller cart. I am going to use Festool systainers and drawers. I am an organizational freak.
 
[member=66813]rmhinden[/member]  1" is technically the max.  There are ways of tricking it into making a slightly deeper cut by artificially zeroing out the cutter to a different starting plane.  But yeah, if you want to work on thicker material, you have to go the template route.

rmhinden said:
mattbyington said:
[member=37411]ear3[/member] thanks so much man! I do wish I made the legs thicker...I wanted something I could cut out with the shaper without much extra sculpting. Oh well.

Curious, how deep a cut can it make? 

Bob
 
It seems straight and simple curve cuts like these are faster and easier to do with traditional tools. Less waste too.
 
[member=2242]tallgrass[/member] post pictures of that when you're done, I am curious to see it!

[member=66813]rmhinden[/member] sounds like this was already answered. I think the *total* depth of travel is 1.75" on the Shaper but as already mentioned, that doesn't mean you can cut 1.75" deep unless your cutter is long enough that it is touching the material when the shaper is fully retracted, which is not really how it's designed.

In my opinion
 

Attachments

  • 61688280467__C4B87232-7335-4D2A-AB67-DC988A26B44B.jpeg
    61688280467__C4B87232-7335-4D2A-AB67-DC988A26B44B.jpeg
    668 KB · Views: 427
  • 61688233026__FCD37B04-0FB9-4DFE-90E2-7834417C2BF8.jpeg
    61688233026__FCD37B04-0FB9-4DFE-90E2-7834417C2BF8.jpeg
    470.1 KB · Views: 409
  • IMG_4820.jpeg
    IMG_4820.jpeg
    600.4 KB · Views: 418
[attachimg=1]

[attachimg=2]

[attachimg=3]
 

Attachments

  • IMG_4822.jpeg
    IMG_4822.jpeg
    752.3 KB · Views: 432
  • IMG_4824.jpeg
    IMG_4824.jpeg
    799.2 KB · Views: 425
  • IMG_4825.jpeg
    IMG_4825.jpeg
    711.5 KB · Views: 420
ear3 said:
[member=66813]rmhinden[/member]  1" is technically the max.  There are ways of tricking it into making a slightly deeper cut by artificially zeroing out the cutter to a different starting plane.  But yeah, if you want to work on thicker material, you have to go the template route.

rmhinden said:
mattbyington said:
[member=37411]ear3[/member] thanks so much man! I do wish I made the legs thicker...I wanted something I could cut out with the shaper without much extra sculpting. Oh well.

Curious, how deep a cut can it make? 

Bob
I don't have a shaper (I'm quite on the fence), but having watched some of their videos.  For making these pieces, I think the better strategy would be to use the shaper to cut a 1/4" or so groove to define your curve.  Then cut the piece out with a bandsaw and use a flush trim bit to get the rest of it.  The shaper define the final curve for you, and you can use a faster tool for hogging out the bulk of the material.
 
Back
Top