[Project 38] Black Limba Entertainment Center

mattbyington

Member
Joined
Mar 11, 2018
Messages
797
Hi team,

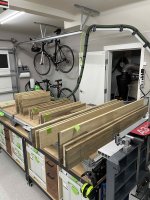
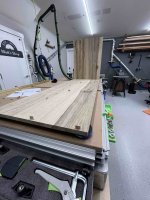
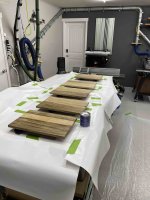
Following some advice from [member=23794]ryan_k[/member] on a previous build, I'm posting this early, as I'm just starting to do some material breakdown. My wife's favorite wood is Black Limba and that's what I've used for a few things inside the house so it all matches. This will be a new entertainment center (the thing the TV sits on). Our current one is some IKEA piece of garbage :)

I did a rough design in Fusion 360 (rough because haven't decided on legs yet).

In terms of wood movement, my plan on this one is to align all the panels so that the width of the panel runs from front to back ("into" the depth). That way when the wood contracts or expands, the entire cabinet basically will gain .25-.5" of depth (or lose it) but nothing would break. Meaning, no shelves glued in like the record player cabinet that are going the opposite direction grain wise!

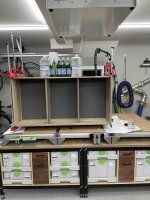
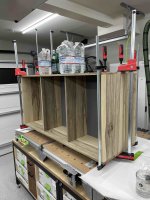
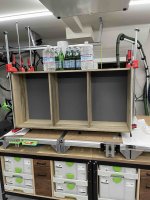
I will post more pics as I get started... any feedback is welcome as always.

Matt

 
Note that there are 3 reasons why it's a rough sketch so far:

1) It has no feet
2) It has no door (which will be in the middle)
3) The shelves will be adjustable with shelf pin holes (so there will be clearance, no worries about wood movement there).

Also the color is wrong (obviously) but this is a rough sketch...

[attachimg=1]
 

Attachments

  • Untitled.jpg
    Untitled.jpg
    103.6 KB · Views: 1,398
The plan is for it to have somewhat of a "false back" so we can store the router, Apple TV, etc etc behind there in a self-contained way.
Broke down the lumber a bit but this is as far as I have gotten so far.

Matt

[attachimg=1]

[attachimg=2]
 

Attachments

  • Untitled.jpg
    Untitled.jpg
    0 bytes · Views: 727
  • IMG_5858.jpg
    IMG_5858.jpg
    705.5 KB · Views: 1,355
[attachimg=1]

[attachimg=2]

[attachimg=3]
 

Attachments

  • IMG_5890.jpeg
    IMG_5890.jpeg
    486.8 KB · Views: 1,160
  • IMG_5891.jpeg
    IMG_5891.jpeg
    574.3 KB · Views: 1,196
  • IMG_5893.jpeg
    IMG_5893.jpeg
    554.5 KB · Views: 1,180
[attachimg=1]

[attachimg=2]

[attachimg=3]
 

Attachments

  • IMG_5909.jpeg
    IMG_5909.jpeg
    493 KB · Views: 1,159
  • IMG_5897.jpeg
    IMG_5897.jpeg
    708.7 KB · Views: 1,136
  • IMG_5896.jpeg
    IMG_5896.jpeg
    464 KB · Views: 1,199
[attachimg=1]

[attachimg=2]

[attachimg=3]

[attachimg=4]
 

Attachments

  • IMG_5910.jpeg
    IMG_5910.jpeg
    513.4 KB · Views: 1,170
  • IMG_5911.jpeg
    IMG_5911.jpeg
    552.9 KB · Views: 1,127
  • IMG_5915.jpeg
    IMG_5915.jpeg
    560.4 KB · Views: 1,118
  • IMG_5916.jpeg
    IMG_5916.jpeg
    525.2 KB · Views: 1,174
Nice work. Don’t think I’ve ever seen Black Limba before.  Should finish nicely.

Is that meant to hold electronics?  Just wondering about access holes for wiring between the shelves and thru the back.  You might try laying it on the front and using your Shaper to cut horizontal slots for access in the back.

 
[member=167]neilc[/member] thanks so much!! We are going to mount the electronics to the back using that extra 6" or so of depth behind the "false" back. That is the purpose of that. Hopefully no electronics need to go on the shelves but if they do that is a great idea and use of the shaper. good call.

We did the big glue up just now. it was stressful! also painted the back a nice General Finishes Driftwood.

Matt

[attachimg=1]

[attachimg=2]

[attachimg=3]

[attachimg=4]
 

Attachments

  • IMG_5927.jpeg
    IMG_5927.jpeg
    487.2 KB · Views: 1,040
  • IMG_5926.jpeg
    IMG_5926.jpeg
    516.4 KB · Views: 1,085
  • IMG_5925.jpeg
    IMG_5925.jpeg
    506 KB · Views: 1,053
  • IMG_5922.jpeg
    IMG_5922.jpeg
    509.4 KB · Views: 1,057
Awesome build Matt.. thanks for sharing pictures. you are so wonderfully organized. Your place looks so inviting to work. A place for everything and everything in its place. Speaks a lot about the person you are. Love the choice of wood. 
Couple of ideas to share: i usually create a double wall to hide cabling. Your equipment might change when you upgrade but your cables remain the same. So invest in good quality cables and kind of embed them into your build. Also i'd suggest you plan for led lighting and route channels so you can kinda inlay the led strips. Try to use a switch like the ones in old refrigerator where it turns on when you open the door. Do share pictures as you make progress.
 
[member=53591]Blues[/member] thanks so much for your kind words! Really appreciate it!

I did actually create a "faux back" sort of - left about 7" of space at the back, let me post more pictures! I got power strips installed there.

I don't think we're going to LED strips (my wife thinks it's tacky) but definitely a good idea for future!

We made a ton of progress over the past week, and my Wife had a really cool idea for the door (it was a LOT of work...lots of glue ups). I think because each piece is only 2" wide expansion won't be an issue but we'll see.

Matt
 
[attachimg=1]

[attachimg=2]

[attachimg=3]

[attachimg=4]
 

Attachments

  • IMG_5935.jpeg
    IMG_5935.jpeg
    648.7 KB · Views: 867
  • IMG_5936.jpeg
    IMG_5936.jpeg
    643.8 KB · Views: 856
  • IMG_5937.jpeg
    IMG_5937.jpeg
    654.3 KB · Views: 862
  • IMG_5942.jpeg
    IMG_5942.jpeg
    377.8 KB · Views: 882
[attachimg=1]

[attachimg=2]

[attachimg=3]

[attachimg=4]
 

Attachments

  • IMG_5971.jpeg
    IMG_5971.jpeg
    439.6 KB · Views: 884
  • IMG_5966.jpeg
    IMG_5966.jpeg
    445.3 KB · Views: 843
  • IMG_5960.jpeg
    IMG_5960.jpeg
    486.7 KB · Views: 847
  • IMG_5948.jpeg
    IMG_5948.jpeg
    538.9 KB · Views: 888
[attachimg=1]

[attachimg=2]
 

Attachments

  • IMG_5972.jpeg
    IMG_5972.jpeg
    519 KB · Views: 882
  • IMG_5973.jpeg
    IMG_5973.jpeg
    533.1 KB · Views: 862
Hi Matt, I don't want to rain on your parade, but it really doesn't matter that you have pieces of "only" 2". The total expansion will still be the same over the accumulated width. Here you have 12 pieces of 2" across the grain. They will definitely expand/contract with changes in moisture. The longest horizontal pieces are the equivalent of 11 pieces of 2", but now along the grain. Those will have almost negligible movement with changes in moisture length-wise. Also remember that a glue joint on end grain isn't the strongest. I don't know the properties of Black Limba in this regard, but unless this door is placed in a moisture-stable environment you will have to expect trouble. Maybe not immediately, but in the longer term it will be almost unavoidable.
 
I like the look of the door with all the pieces like that. If there's any trouble later on you can adress it then.
 
I'd be surprised if you're not making new doors at some point as any movement in any piece will affect any adjacent piece. There's a reason floating panels or t&g in doors are a thing. Veneer strips on a stable base would get you a similar effect and not have the destructive forces laying in wait you have there.
 
Great ideas and design Matt...looking good Byingtons ! Having only seen guitars made of the wood I love seeing it
 
The door definitely has a cool look.  I too worry about expansion causing the glue joints to blow out.

I'm not sure how I would try to achieve the same look, but a thin veneer over a plywood substrate might work well.  If you wanted to keep solid wood, then maybe you could do tongue and grooves.  There would be a lot of them, and keeping what is meant to be a tounge and what is meant to be a groove straight is surely challenging, but I think doable.  You might add a small chamfer detail to make the expansion less noticeable like is done on ECB pine boards.  The chamfer would change the look, but it might be close enough to what you wanted to achieve.

I wouldn't redo the door at this point, since it may last for a while or it may not.  At which point you get to decide what the most fun type of replacement is.  For me, trying out new techniques that stretch my abilities on each project is part of the fun.
 
[member=66485]hdv[/member] thank you for your input, I appreciate it! I'll be sure to update this thread in a year or two if it does move ... since it'll be in our house, which is climate controlled year-round, and Northern California has very low (and consistently low) humidity I think it might be ok!

[member=5277]Alex[/member] thanks man! that's my thought, too.

[member=53696]Roachmill[/member] understood, thanks. I thought about T&G...my wife really wanted this look. It's a door - like you said - easy to remake whenever. It's just a rectangle, and the hinges will drop right in.

[member=41086]Vondawg[/member] thank you! it's my wife's favorite species.

[member=63643]cpw[/member] thanks so much man, appreciate it. really appreciate your feedback.

[member=2242]tallgrass[/member] thank you sir!!

Well team it's all done now ...  and onto the next one ... here are some final pictures. My wife is very pleased, and we were able to organize all the electronics on the back.

Matt
 
Back
Top