[Project 41] Curly Maple Home Bar

[member=72337]notenoughcash[/member] thank you! General Finishes Arm-r-seal in Satin.

Worked on the 7 drawers this past weekend. They still need bottoms.

Matt

[attachimg=1]

[attachimg=2]

[attachimg=3]
 

Attachments

  • IMG_6584.jpeg
    IMG_6584.jpeg
    500.8 KB · Views: 908
  • IMG_6589.jpeg
    IMG_6589.jpeg
    460.4 KB · Views: 893
  • IMG_6598.jpeg
    IMG_6598.jpeg
    376.4 KB · Views: 893
[attachimg=1]

[attachimg=2]
 

Attachments

  • IMG_6599.jpeg
    IMG_6599.jpeg
    494.3 KB · Views: 889
  • IMG_6600.jpeg
    IMG_6600.jpeg
    493.3 KB · Views: 882
smart again.

out of interest why did you use finger joints v dovetails?

and what type of slides are you using?  under mount or side mount?
 
[member=72337]notenoughcash[/member] good question, I don't have an answer really. I've never tried dovetails before, and it felt like a lot for 7 drawers to me. The box joints I feel will be plenty strong, and still offer an interesting visual intrigue.

I am going to use under mount slides. Blum, specifically. I have 7 of them I just received from Rockler - the under mount soft close style.

Matt
 
Great job...coming together! Box joints are perfect fit. Thanks for going to all the work of posting and building
 
Box joints look good and are a good alternative to dovetail(I like keeping things simple too).

If you haven't already glued the boxes you might want to dado the front, back and sides to receive the bottom.
I typically use 1/4" BB ply(which is actually 1/4" and can use a single pass with a router).
Or whatever material you choose.
I say that because you're doing the Blum undermount and those need 1/2"(13mm) clearance underneath the drawer bottom.
And, it's easier to make the notch in the back for the slides before you assemble the boxes.

You might have already mentioned that's your plan and I just didn't notice.
 
[member=41086]Vondawg[/member] yeah man thank you for looking and commenting!

[member=65755]jarbroen[/member] okay so you're totally right. i did not mention it, but that was exactly my plan. and in fact last night, I did exactly that. I spent a couple hours and milled all the dados for bottoms. I went with 3/4" maple-veneered plywood so that I could glue them in and not worry about expansion. I know 3/4" is way overkill but it's what I had on hand, and it worked OK.

I did it in 2 passes at the router table. The boxes aren't glued up yet - I just got the bottoms cut last night, and the dados in the sides cut last night as well. The plan is to sand and pre-finish the inside and then do the glue up, that way I don't have to get a sander into the tight spots after glue up.

Here's my problem. I didn't think ahead well, and the 1/4" deep dado for the 3/4" bottom is showing through on the box joints. This was an oversight on my part. Obviously there will be a drawer front, but you'll still be able to see the small gap from the sides. Maybe I glue them up as planned and then cut small end grain plugs so it looks better? or would you guys not worry? cheers.

Matt

[attachimg=1]

[attachimg=2]

[attachimg=3]
 

Attachments

  • IMG_6614.jpeg
    IMG_6614.jpeg
    454.6 KB · Views: 755
  • IMG_6613.jpeg
    IMG_6613.jpeg
    302.4 KB · Views: 775
  • IMG_6608.jpeg
    IMG_6608.jpeg
    420 KB · Views: 775
I’ve had plenty of moments like that.
If you are picky like me that will bug you forever if you leave those holes.

You could do a vertical strip inlay or add some kind of decorative strap/hardware.
Sometimes those whoops turn into cool creative opportunities.
Like a wise carpenter taught me, it’s only a mistake if you can’t fix it.
 
[member=67555]mattbyington[/member],

As always from you great project.

Don’t worry about the mistake on the drawer box, you’ll learn to adjust the spacing so this does not happen.

Hardware;

You are probably paying way to much from Rockler, check the prices sat these two suppliers. They first one I purchase from there commercials division. I buy the hardware by the pallet, so I get a better price than most.
https://woodworker.com/

I’ve heard good things about A&H.
https://ahturf.com/

Again, great project you have going.

Tom
 
[member=67555]mattbyington[/member] Nice seeing your projects documented. Maybe I’m completely missing something but like you said the front is covered by the drawer front and looks like you are using slides. If so couldn’t you line them up with the dado (I have done this)?

Years ago I remember a really great woodworker say that every woodworker makes mistakes on projects but the good ones are able to recover by being the only one who knows where they are.

- just saw you are using undermounts
 
It's looking really nice, [member=67555]mattbyington[/member]  and you're moving along very quickly on it.

re: the holes from the grooves - I think that everyone does it at least once when they start doing drawers. Doing an end grain plug is the classic fix and should work well if you pay attention to the direction of the grain. Those holes are probably pretty consistent, so you should be able to mill up a few thin pieces and plug em after the boxes are glued up.  I'd mill a little oversized and try to sand or plane a little taper so the plug wedges in. It should help w/ getting a tight fit.  I use Old Brown Glue or Elmers White glue for these fixes, because they tend to be less of a problem in terms of the glue staining things.

If you want to the opposite way -  doing a little inlay 'racing stripe' (or even two parallel stripes) is a nice solution. A bit more work and you will want to make sure you have a sharp plane or card scraper to level it off, but it does give an opportunity to add a fun detail.

Concur with [member=4105]tjbnwi[/member] - you can probably get better product and support from ah turf than Rockler. Rocker's hardware tends to be a bit pricey, given that it's a commodity item.

Are you brushing Arm R Seal? 
 
Very nice project - love the detailed pics. The maple is beautiful. I think you have one of the nicest looking shops too - so clean and organized - I am jealous!
 
mrFinpgh said:
It's looking really nice, [member=67555]mattbyington[/member]  and you're moving along very quickly on it.

re: the holes from the grooves - I think that everyone does it at least once when they start doing drawers. Doing an end grain plug is the classic fix and should work well if you pay attention to the direction of the grain. Those holes are probably pretty consistent, so you should be able to mill up a few thin pieces and plug em after the boxes are glued up.  I'd mill a little oversized and try to sand or plane a little taper so the plug wedges in. It should help w/ getting a tight fit.  I use Old Brown Glue or Elmers White glue for these fixes, because they tend to be less of a problem in terms of the glue staining things.

If you want to the opposite way -  doing a little inlay 'racing stripe' (or even two parallel stripes) is a nice solution. A bit more work and you will want to make sure you have a sharp plane or card scraper to level it off, but it does give an opportunity to add a fun detail.

Concur with [member=4105]tjbnwi[/member] - you can probably get better product and support from ah turf than Rockler. Rocker's hardware tends to be a bit pricey, given that it's a commodity item.

Are you brushing Arm R Seal?

Add the plugs before sanding any of the fingers and proceed with sanding the plugs before the glue has dried so any gaps fill with sanding dust.
 
tjbnwi - mentioned A&H Turf.  GREAT place to order Blum slides (and many other items from).  Their website is a little old school, but don't let that put you off from ordering there.  Their customer service is excellent.  Definitely call them if you are placing an order and the freight seems high.
Even if they can't lower the freight price they will most likely discount the product more - and they already have the best prices on Blum.
I've ordered from them several times - most recently slides and a corner pullout for my kitchen.  Freight seemed high so I called -  Garrett really helped me out!
I'd also recommend ordering the Blum jig for the drawer holes.  I'd done probably 15-20 undermount installs previously.  Decided to treat myself for doing 20 kitchen drawers at once.  What a time saver!
 
[member=65755]jarbroen[/member] makes sense! I'm sure I"ll end up plugging them.

[member=4105]tjbnwi[/member] thanks man I'll check those places out, appreciate it!

[member=15486]Mike G[/member] yes undercounts so that won't work, I think I'll end up plugging it. And thanks for your kind words!

[member=59039]mrFinpgh[/member] thanks man! I appreciate all the kind words. Yeah I think I'll plug them after the box is glued up, or during the glue up. It should be easy enough to fix. Yep I am brushing ARS with foam brushes. Sanding w/ 500 in between coats and then brown paper bag at the end.

[member=6605]ScotF[/member] haha thanks man! Appreciate it! I vacuum a lot. Having a roomba helps ;)

[member=2098]Michael[/member] K good idea! Will do that!

[member=2912]Don T[/member] thanks man!!

[member=65755]jarbroen[/member] I'll definitely have to check them out! A lot of times I'm also ordering other stuff from Rockler so it makes it easy but if the prices are that much cheaper it's worth a second order.

Thanks so much everyone for all of your comments so far I really appreciate it.

OH and the glass came in last night! for the doors.

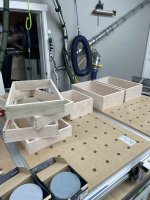
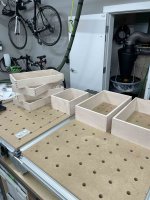
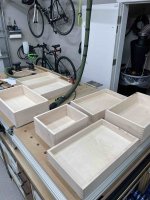
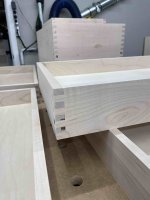
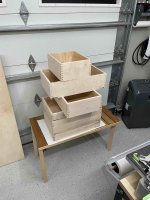
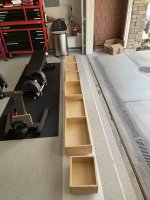
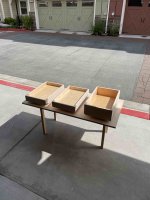
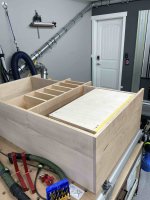
I am hoping to wrap up the drawers completely this weekend and then I can start on the final piece - the two front doors!

Matt
 
Wow Matt, Im a little late to the show but Wow that project is turning out very nice well thought out.

plus your shop holy smokes, I can believe how well thought out and organized it is and not to mention clean.

Im jealous
 
[member=10147]jobsworth[/member]

Thank you so much man! really appreciate it!!

I try!

Matt

[attachimg=1]

[attachimg=2]

[attachimg=3]

[attachimg=4]
 

Attachments

  • IMG_6653.jpeg
    IMG_6653.jpeg
    527.1 KB · Views: 890
  • IMG_6651.jpeg
    IMG_6651.jpeg
    353.1 KB · Views: 888
  • IMG_6638.jpeg
    IMG_6638.jpeg
    505.1 KB · Views: 882
  • IMG_6636.jpeg
    IMG_6636.jpeg
    434 KB · Views: 886
[attachimg=1]

[attachimg=2]

[attachimg=3]

[attachimg=4]
 

Attachments

  • IMG_6665.jpeg
    IMG_6665.jpeg
    414.1 KB · Views: 858
  • IMG_6661.jpeg
    IMG_6661.jpeg
    533.7 KB · Views: 857
  • IMG_6659.jpeg
    IMG_6659.jpeg
    481.4 KB · Views: 856
  • IMG_6656.jpeg
    IMG_6656.jpeg
    314.6 KB · Views: 876
[attachimg=1]

[attachimg=2]

[attachimg=3]

[attachimg=4]
 

Attachments

  • IMG_6673.jpeg
    IMG_6673.jpeg
    367.3 KB · Views: 854
  • IMG_6674.jpeg
    IMG_6674.jpeg
    432.6 KB · Views: 854
  • IMG_6675.jpeg
    IMG_6675.jpeg
    375.2 KB · Views: 854
  • IMG_6676.jpeg
    IMG_6676.jpeg
    386.6 KB · Views: 849
Back
Top