ear3
Member
- Joined
- Jul 24, 2014
- Messages
- 4,341
So I'm continuing on with the home renovation project I started this summer. Finished the master bedroom and moving now to the bathroom.
Let me just preface everything by saying that I'm very much a novice when it comes to painting. With that being said, I have a question about removing existing paint and then applying a new coat. First some background:
The house is from the 1930s, and has plaster walls. Other than hairline cracks and some paint flaking in a few spots, the plaster is in good shape -- still keyed to the lathe and all -- so my objective has been to preserve it. Maybe four or five years ago, before I took over full ownership of the house, there was a plumbing incident in the upstairs bathroom (right above the one I'm working on) when the plumber tore through one of the pipes while snaking it -- don't ask. Anyway, we had a guy come in and redo the plaster in the section of our bathroom ceiling that had to be torn out to get to the affected pipes. In the process he repainted the entire bathroom and trim.
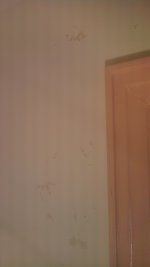
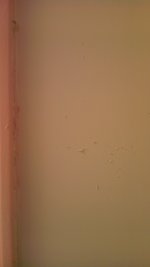
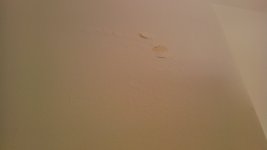
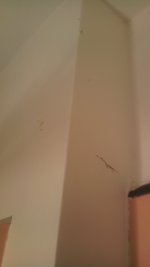
He seems to have done a good job with the plaster, as it is still solid. But within a year of the job being completed the paint started to flake in various spots. The flaking has only gotten worse, and so I can no longer ignore it and am going to redo the bathroom. As you can see from the pictures below, this is not the type of flaking you get from the plaster settling, but it's almost as if there wasn't a primer put down over the previous layers of paint (it's hard to believe the contractor would have been that stupid/lazy, but who knows).
[attachimg=1]
[attachimg=2]
[attachimg=3]
[attachimg=4]
When the room fills up with water vapor from the shower (it's not terribly well-ventilated), some additional bubbling will appear in areas that have become porous, though which have not begun to flake yet. This bubbling disappears once the vapor has subsided.
[attachimg=6]
[attachimg=5]
So the question(s): First: what is your best-guess diagnosis of the problem? No primer? Inferior paint/primer combo for humid conditions? Second, the solution: I obviously need to scrape off all the flaking as well as the bubbling sections. Since there is 80s years of paint buffering the plaster from the existing top coat, I was thinking of just using my ROTEX with some 80 grit Brilliant or Granat, and hooked up to my CT26, sanding enough to get off the first layer, but not so deep where I'm going to be cutting into the underlying layers or the plaster itself. How much of the top coat should I sand off? As much as possible, or only those areas where there are visible problems? [UPDATE: plaster is clean of asbestos, but there is certainly lead paint somewhere among those layers]
After that, I was going to apply an oil-based primer like Kilz, and then an eggshell latex top coat of some kind. Any recommendations on the type/brand of primer or the top coat, keeping in mind that these are plaster walls with 80 years worth of paint and it's a humid environment? Thanks in advance for any guidance.
Let me just preface everything by saying that I'm very much a novice when it comes to painting. With that being said, I have a question about removing existing paint and then applying a new coat. First some background:
The house is from the 1930s, and has plaster walls. Other than hairline cracks and some paint flaking in a few spots, the plaster is in good shape -- still keyed to the lathe and all -- so my objective has been to preserve it. Maybe four or five years ago, before I took over full ownership of the house, there was a plumbing incident in the upstairs bathroom (right above the one I'm working on) when the plumber tore through one of the pipes while snaking it -- don't ask. Anyway, we had a guy come in and redo the plaster in the section of our bathroom ceiling that had to be torn out to get to the affected pipes. In the process he repainted the entire bathroom and trim.
He seems to have done a good job with the plaster, as it is still solid. But within a year of the job being completed the paint started to flake in various spots. The flaking has only gotten worse, and so I can no longer ignore it and am going to redo the bathroom. As you can see from the pictures below, this is not the type of flaking you get from the plaster settling, but it's almost as if there wasn't a primer put down over the previous layers of paint (it's hard to believe the contractor would have been that stupid/lazy, but who knows).
[attachimg=1]
[attachimg=2]
[attachimg=3]
[attachimg=4]
When the room fills up with water vapor from the shower (it's not terribly well-ventilated), some additional bubbling will appear in areas that have become porous, though which have not begun to flake yet. This bubbling disappears once the vapor has subsided.
[attachimg=6]
[attachimg=5]
So the question(s): First: what is your best-guess diagnosis of the problem? No primer? Inferior paint/primer combo for humid conditions? Second, the solution: I obviously need to scrape off all the flaking as well as the bubbling sections. Since there is 80s years of paint buffering the plaster from the existing top coat, I was thinking of just using my ROTEX with some 80 grit Brilliant or Granat, and hooked up to my CT26, sanding enough to get off the first layer, but not so deep where I'm going to be cutting into the underlying layers or the plaster itself. How much of the top coat should I sand off? As much as possible, or only those areas where there are visible problems? [UPDATE: plaster is clean of asbestos, but there is certainly lead paint somewhere among those layers]
After that, I was going to apply an oil-based primer like Kilz, and then an eggshell latex top coat of some kind. Any recommendations on the type/brand of primer or the top coat, keeping in mind that these are plaster walls with 80 years worth of paint and it's a humid environment? Thanks in advance for any guidance.
Attachments
-
 Bathroom flaking paint 1.jpg392.5 KB · Views: 339
 -
 Bathroom flaking paint 2.jpg407 KB · Views: 330
 -
 Bathroom flaking paint 5.jpg419.3 KB · Views: 332
 -
 Bathroom flaking paint 8.jpg379.5 KB · Views: 341
 -
 Bathroom bubbling paint 3.jpg412.3 KB · Views: 306
 -
 Bathroom bubbling paint 7.jpg390.3 KB · Views: 312