Radius meets mitered corners

Crazyraceguy

Member
Joined
Oct 16, 2015
Messages
4,905
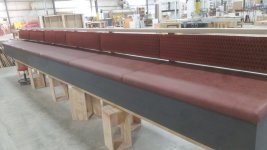
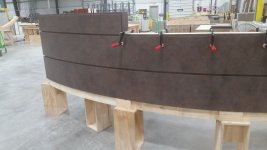
It been a while since I posted a project. This desk isn't the brightest or most colorful, in fact it's all the same color, but there are some challenging details.
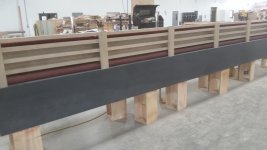
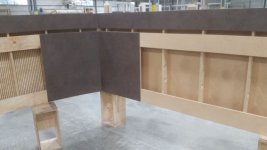
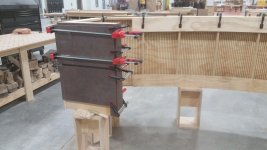
It's not huge, but big enough to have to separate into two pieces for shipping.
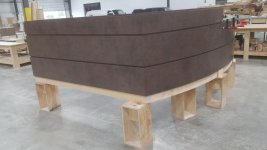
A 145" radius across the front of parallel sides that are about 150" apart, plastic laminate on all exposed edges. Mitering corners to a radius with laminated and edged parts is rather time consuming, but it came out great.
Because of a couple of machine maintenance/repair issues yesterday and some time spent on another project this morning, I'm not 100% sure of the hours in this. It has to be less than 32 though, because I took Monday off.
 

Attachments

  • Hocking Hills4.jpg
    Hocking Hills4.jpg
    154.5 KB · Views: 494
  • Hocking desk.jpg
    Hocking desk.jpg
    177.9 KB · Views: 460
  • Hocking desk2.jpg
    Hocking desk2.jpg
    202.8 KB · Views: 452
Crazyraceguy said:
It has to be less than 32 though, because I took Monday off.

I'm still trying to decide what my favorite part of this post is: the beautiful work you did, or the wonderful wordsmithing I've chosen to quote. :)
 
I really want to see this one after it's installed. The countertop is huge. It follows down the long side, makes a 90 degree turn to go across the back, then goes through a window and runs another 15 feet.
It's oddly dark for a church, top too. It is fully covered by open shelf cabinets inside. It looks like a reception desk, where someone would sit, but it's not. The window goes to a kitchen, so more of a distribution point.
The top is already done and disassembled, so I'll have to get some pics after it goes back together.

I don't take pics of everything, some just just boring, others I do, but don't show them. "Custom" doesn't always mean cool, just not part of the regular production.
It's weird to put so much effort into something I don't like myself, but somebody will love it.
I recently built a long seating bench that I was quite happy with, until the upholstered parts came back. It just didn't work for me, but I'm not paying the bill or living with it.

squall_line......thank you. Wordsmithing is a fantastic word itself.
 

Attachments

  • bench3.jpg
    bench3.jpg
    190.5 KB · Views: 357
  • bench4.jpg
    bench4.jpg
    154.9 KB · Views: 351
Nice job on the desk build.  [smile]  I like both the shape of it and the exterior surface design.

Just curious how wide and deep the kerfs are on the kerfed panels?

Does the interior of the desk get finished?
 
Cheese said:
Nice job on the desk build.  [smile]  I like both the shape of it and the exterior surface design.

Just curious how wide and deep the kerfs are on the kerfed panels?

Does the interior of the desk get finished?

The kerfs are done on the beam saw. That makes them 4mm wide. We have a few different programs saved into it with different spacings and depths. The choice is made based on the radius needed. Tighter bends get the deeper and closer kerfs, which is 3/4" apart and .670" deep. This is a bit difficult to handle as a full 4 x 8 sheet. It is super flexy, but fragile until attached to something and therefore supported. This particular wall was done with that 3/4" spacing, but .020" shallower, only because the first 2 sheets were already cut and I didn't have to wait on them. After that, I did the outer layer parts with a 1" spacing and .640" depth. These parts got a lot more handling before being attached and with that large radius, the stiffer parts were less prone to breaking under their own weight. The thin/flexy ones will break if they are turned to have the kerfs pointed up.
The beam saw is the perfect way to do this because it is literally a set and forget. It takes 20 minutes or so, depending on spacing, an you can do other things while it works.

The grooves/reveals are pretty common on these types of units. Sometimes they are the matching color, sometimes black and sometimes an aluminum U channel gets put in there. Sizes very too, anywhere from a simple 1/4" x 1/4" (which is usually just a rabbet in the edge of the panels) up to a full 3/4" x 3/4" gap between panels, like this.
Sometimes there are vertical grooves too, usually to make the panels more square and grid-like. It's nice when they are in the seam line where it comes apart or when a panel can be left off until install to cover the seam. This laminate has a random splatter, so it's not obvious where the seam goes, like an end to end woodgrain would.
There is a small gap between the cabinets in the corner, so that area is filled in, and the section above the countertop is covered too.
 

Attachments

  • Hocking Hills5.jpg
    Hocking Hills5.jpg
    142 KB · Views: 319
Again...very nice... [big grin]

Is there a program that dictates the kerf spacing and depths for a particular radius or is it just your hands-on experience?

I'm assuming the .670" depth is for 3/4" material?

I love the reveal stuff also and have thought about building something...I just don't know what.

What do you use to retain the aluminum U channel in the dado?
 
I'm sure that there is some calculation to be found for this, probably based on the kerfs actually touching? We don't do anything that precise though. I don't have a need for a free (unsupported) piece. Even the access panels that would be on and inner area of a wall like this are only loose once, after install they are screwed in place. Once they are, the access panels almost never get removed again.
If the sections between the kerfs are too wide, they show as flat spots. They will telegraph through, so keeping them as small as possible. The opposition to it is that they take longer to cut. Manually it's a big deal, with the beam saw it only take a few minutes longer.
Yes, just experimentation on our part. The first sheet we did was to shallow and was too stiff to use, but the beauty of this process is that it can be put back into the saw and re-cut back in the same kerfs.
Yes, that is for 3/4 material, it's the most common. The metal U channel is usually just held in with some clear silicone, with a good friction fit that's all it takes, maybe a little tape to keep it from moving until it sets up.

Of all weird things, I think there's another barn wood job coming up. I just unloaded a bunch more the other day. I guess the popularity of it is still going, it's been quite a while. The first time I used it was in a pizza place in 2011.
 
Crazyraceguy said:
If the sections between the kerfs are too wide, they show as flat spots. They will telegraph through, so keeping them as small as possible.

Of all weird things, I think there's another barn wood job coming up. I just unloaded a bunch more the other day. I guess the popularity of it is still going, it's been quite a while. The first time I used it was in a pizza place in 2011.

Thanks for the info... [big grin] ...the telegraphing thing makes sense, just never thought about it.

The beam saw is perfect for this application. Everything's automatic and repeatable.

I helped a friend disassemble a barn in 2000 or 2001 for barn wood for his rec room & bar so it's been popular for longer than we probably know. [tongue]
 
Back
Top